WELCOME TO MY KITCHEN


WELCOME TO MY KITCHEN!!
I hope you enjoy the food!!!

Saturday, December 31, 2011

A Cuban Feast

As I sit here on board a boat in the Whitsundays, and contemplate my New Year's dinner (and before you think luxury let me tell you this has been a poorly executed/planned trip, and we are only having BBQ sausages and pre-packaged salads)- anyway I am drawn back in longing memory to a wonderful meal we had last week. A Cuban feast in fact!

The meal consisted of two meat dishes - Cuban Shredded Beef with Capsicum or as it is called by the locals Ropa Vieja which literally means "old clothes". The second was Mojo Chicken, or Pollo Con Mojo. Added to this was Black Beans and Rice, or Arroz Congri, and a salad of tomato and avocaod, with a chilli, olive oil and coriander dressing. The piece de resitance was the desert which was a Three Milks Cake, or Pastel de Tres Leches!

I was drawn to this meal by the front cover of the latest SBS magazine called Feast. On the front cover there was a wonderful looking desert, you got it Pasel de Tres Leches!

This entire feast can be found in the January edition of Feast Magazine.

Cuban Shredded Beef with Capsicum
Ropa Vieja

Serves 6 as part of a banquet

60ml (1/4 cup) olive oil
1kg skirt or chuck steak, cut into 6 large pieces
1 large onion, chopped
1 liter beef stock
1 bay leaf
1 red onion, thinly sliced
1 large red capsicum, thinly sliced
1 large green capsicum, thinly sliced
1 bunch coriander, leaves picked, roots and stems finely chopped
2 cloves garlic, finely chopped
2 tsp ground cumin
2 tbs red wine vinegar
1 tbs tomato paste
400g can chopped tomatoes

Heat 2 tbs olive oil in a large saucepan over high heat. Cook the beef in batches, for 1 minute each side, or until lightly browned. Add the onion, stock, 250ml water and a the bay leaf, and bring to the boil. reduce the heat to low, cover and simmer for 1 1/2 hours or until the beef is tender. Transfer the beef to a plate, and drain the cooking liquid. Reserve 500ml. Wipe pan clean and put aside.


Cook the meat


Heat the remlaining 1 tbs of oil in the reserved pan over medium heat. Cook the onions and capsicums, stirring occassionally, for 10 minutes, or until soft. Add the coriander roots and stems, garlic and cumin, cook for 30 seconds, or until fragrant. Stir in the vinegar and tomato paste, then add the tomatoes and bring to the boil. Reduce heat to low and simmer for up to 10 minutes, or until the mixture is reduced slightly.


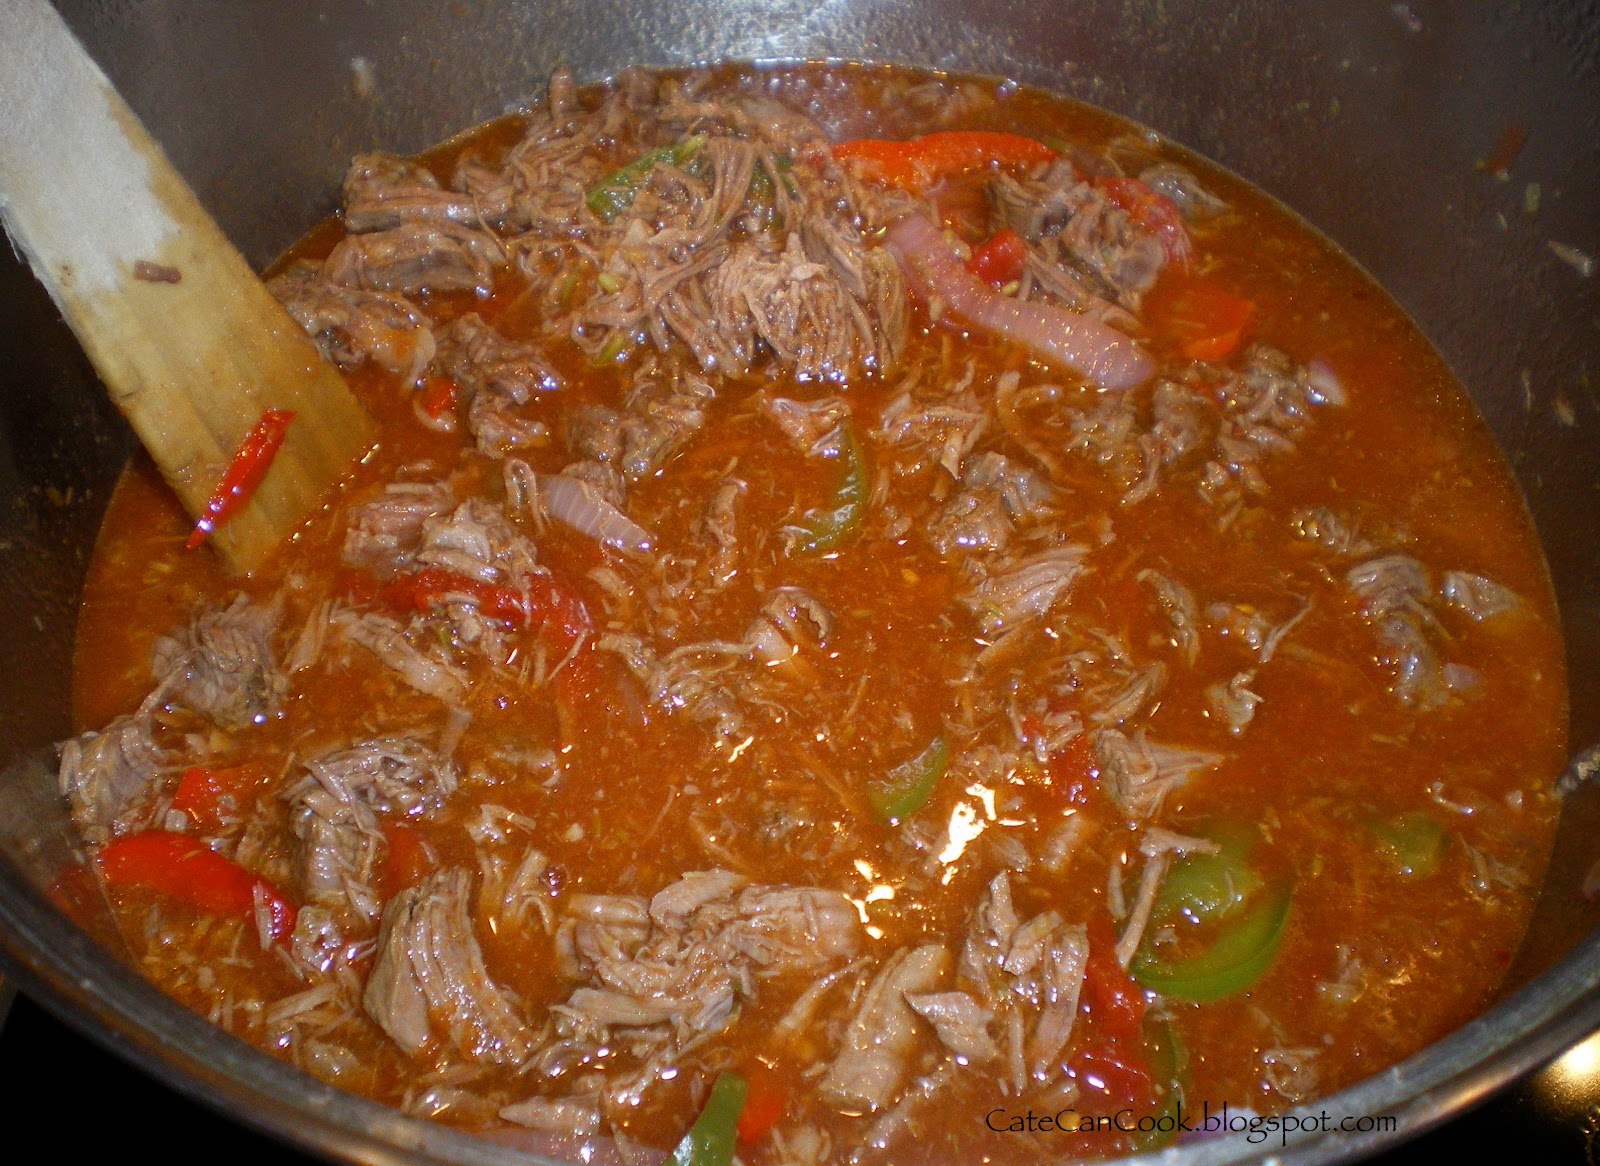
Using a fork, shred the meat and add to the capsicum, tomatoes mixture. Add in the reserved cooking liquid from the beef. Bring to the boil, then reduce the heat to low and simmer for up to 30 minutes, or until the mixture has reduced and thickened. Scatter the beef mixture with coriander leaves.


Voila!


Black Beans and Rice
Arroz Congri

2 tbs olive oil
1 onion, finely, finely chopped
1 green capsicum, finely chopped
2 cloves garlic, finely chopped
1 fresh bayleaf
1/2 tsp ground cumin
2 tbs red wine vinegar
2 tbs tomato paste
200g (1 cup) long grain rice
400g can black beans, rinsed, drained *
625ml 2 1/2 cups) chicken stock

Heat oil in saucepan over medium heat. Add onion and capsicum, and cook, stirring, for 5 minutes or until the onion has softened. Add the garlic, bay leaf and cumin, and cook for a further minute or until fragrant. Stir in the vinegar and tomato paste until combined.


Add rice, beans and stock, and bring to the boil. Reduce heat to low, cover and simmer for 15. Invites or until rice is al Dante.

Remove from heat and stand, covered, for 10 minutes or until the rice is tender.


Mojo Chicken
Pollo con Mojo

I used thigh cutlets and drumsticks for ease say 1 piece of each per person
Lime and orange wedges for garnish

Mojo Marinade
2 cloves of garlic
1 long red chilli
2 oranges, 1 zested, both juiced
2 limes, juiced
1 tsp dried oregano
1 tsp ground cumin
2 tbs olive oil

To make the marinade, either use a mortar and pestle, food processor, or Thermomix! Grind the garlic, chilli and 1 tsp of salt to a fine paste. Add the orange zest and juice, lime juice, oregano, cumin and oil.

Place the marinade in a large ziploc bag, then add the chicken pieces. Combine the marinade with the chicken, and leave to marinate for at least overnight (I actually marinated mine for 2 days and the flavour was fantastic!).

Heat a barbecue or chargrilled pan over medium heat. Drain and discard marinade. Cook the chicken, turning occassionally, for 25 minutes or until. Oozed through. The chicken will blacken due to the orange juice.

Serve with orange and lime wedges as garnish.


Of course a welcome addition to this meal was some Brazilian Cheese Bread. I have given you the recipe before, so here is the link to it. If you haven't made this bread before I strongly urge you to give it a try. Simply fantastic!

Brazilian Cheese Bread

Here is the link

Brazilian Cheese Bread

And now for dessert!

Three Milks Cake
Pastel de Tres Leches

250ml (1cup) evaporated milk
395g can sweetened condensed milk
2 tbs white rum
275g (1 1/4 cups) caster sugar - plus 2 tbs extra
500g fresh pineapple, peeled, thinly sliced
140g unsealed butter, softened
2 tsp vanilla extract
5 egg yolks
250g (1 2/3 cups) self raising flour
250ml (1 cup) milk
250ml (1 cup) thickened cream
1 tbs icing sugar
1 passionfruit,or other fruit for garnish

Preheat the oven to 140 degrees. Combine the evarated mi, condensed milk and rum in a small jug. Set aside.

To make the roasted pineapple, dissolve the extra 2 tbs of sugar in 2 tbs water in a small saucepan over medium heat. Place a sheet of baking paper one baking tray. Place the sliced pineapple in a single layer on the baking tray. Brush with the sugar syrup. Roast for 30 minutes or until slightly dehydrated. Set aside to cool.

Grease and line a 22cm springform pan.

Increase the oven temperature to 160 degrees. Using an electric mixer, or the TM, beat the sugar and butter and 1 tsp vanilla extract until pale and fluffy (speed 4 in the TM). Add the egg yolks one at a time, beating well after each addition. Fold in the flour, alternating with the milk. Mix well until combined. Pour mixture into the prepared tin.

Bake for 1 hour, or until a skewer inserted into the middle comes out clean.

Pierce the cake all over with a skewer, then pour over the evaporated milk mixture. (make sure you have the base of the pan covered well with foil in case the pan leaks - otherwise you will end up with milk everywhere!). Stand the cake in the pan for at least 3 hours, or until the cake is cooled completely. I actually left mine overnight, and it was fine.


Soaking the cake with the milk


Whisk the cream with the vanilla and icing sugar until stiff peaks form. When the cake is cooled completely, top the cake with the whipped cream, then top with the roasted pineapple and passionfruit pulp. You may also like to top with some chopped pistachios.


What a meal! The flavours all around, were spectacular! This is such a great meal to have if you are having company. Absolutely great for sharing!

So I leave you Dear Readers with the memory of a fabululous meal, and anticipate a New Year's Eve meal that to say the least will be quite ordinary - I do however have a spectacular view to more than make up for it though.

How are you spending your New Year's Eve Dear Readers, please share.

Happy New Year to all of you, may 2012 be a fantastic year for us all!

PS please excuse any typos of the human or pre emptive kind - I am at sea and the boats rocking!

Tuesday, December 27, 2011

Christmas Ham and Dessert

OMG!

A friend told me yesterday that she doesn't glaze her Christmas ham!!! Has never had a glazed ham in fact! How can this be? I would never dream of an unglazed ham - an unglazed ham seems almost naked in my mind.  If there is one thing that typifies Christmas to me, it is that lovely, sweetly glazed ham. So moist, and sweet, and the smell of if it the oven just makes my mouth salivate. So to think of Christmas with a ham straight out of the fridge - well it just seems Un-christmas to me!

I know that last year I gave you my recipe for the best ham glaze ever, but just in case you weren't around last year, here it is again, and also a photo so you will see just how lovely our ham looked on the big day!

I really think I got it right this year. Slowly basted it, every 15 minutes or so. Did not add the chopped macadamias until the ham was nice and sticky - that way they didn't all end up in the bottom of the pan, going to waste!

The Best Ham Glaze Ever!!


1 x 365g jar of ginger, lemon and lime marmalade (I used Buderim brand)
2 tbs sweet chili sauce
2/2 cup of brown sugar
2 tbs Dijon mustard
100g chopped roasted salted macadamia nuts


Preheat oven to 150C.

Position oven shelf to lowest position in the oven.

Use a large disposable roasting pan.  Line with 2 sheets of baking paper.  Remove the rind from the ham.

Use a sharp knife to score the ham fat into a diamond pattern.  Make sure that you don't cut any deeper than about 5mm.  Place the ham into the roasting pan.


Combine the marmalade, sweet chilli sauce, brown sugar, and Dijon mustard in a bowl.

Baste the ham with a thin layer of the glaze. You want to build up the layers of sweet goodness - so take it slow, and baste frequently. Once you have a good amount of stickiness, start adding small amounts of the chopped macadamias.

Total baking time will be around 1 - 1/2 hours, don't go too long though, or you may dry out the ham.

Cover and allow to rest while you make the other components of your Christmas feast!


How lovely does that ham look???

Of course that was just one component of the meal.  Roast pork and roasted vegetables sat alongside that magnificent ham!

For dessert I decided to do a tropical version of my dacquoise.  Same base - used white chocolate instead of dark, and used different fruit.  This one had sliced fresh mango, passionfruit, chopped white chocolate and some of the chopped salted macadamias from the ham!!  To add a little zing I added dollops of home made lemon butter to the middle layer along with the whipped cream!


The dacquois certainly is a great little dessert to add to your repertoire - very versatile.  You can make the "meringue" the day before, and assemble it several hours ahead of time (this allows the meringue to soften with the cream).  Change the chocolate, change the fruit, and you have a totally new dessert!!!

I like to think of the dacquoise as the "sophisticated pavlova!!"


So there you have snippets from our Christmas dinner.  I hope you all had a lovely day with your family and friends, and most of all I hope you all had good food!!!

Sunday, December 18, 2011

"Bring a Plate"

'Tis the season to be invited out for drinks, and along with that comes the line.... "Just bring a plate!"  If you are anything like me, you want to make something a little special, something a little bit different, and definitely not something that you have taken along with this group of people before!

It was time for the annual neighbourly get together.  I must say I am not feeling particularly Christmasey at the moment, and this has been compounded with the fact that I have been hit by the dreaded "lurgey" (Thanks DH!!).  I did however, manage to pull off a pretty tasty couple of plates to take along last night!!!

You can of course take the easy option with these and buy bottled sun dried tomato pesto and mayonnaise, but of course, having the Thermomix, I just couldn't help myself (sick and all as I was - I still had to "show off" - and say "I made it myself in the Thermomix!").


Crab and Corn Cakes with Spicy Tomato Mayo
Adapted from recipe found in Good Taste Magazine, December Edition

Makes approximately 24

180ml (3/4 cup whole egg mayonnaise) *
1 tbs sun dried tomato pesto **
few drops Tabasco pepper sauce (oops forgot that!!!)
2 corncobs, husks and silk removed
2 x 140g Crab Claw Meat (I used Phillips brand)

2 shallots, trimmed, thinly sliced
1 tbs finely chopped fresh coriander
lemon rind from 1 medium sized lemon
75g (1/2 cup self raising flour
3 eggs, lightly whisked
olive oil to fry
quartered grape tomatoes for garnish
fresh coriander leaves for garnish

Combine the mayonnaise, pesto (and if you like it spicy, and remember to use it!) the tabasco sauce in a bowl.  Cover and place in the fridge until required.

Cook the corn in a large saucepan of boiling water for 10 minutes, or until tender.  Drain, and set aside for at least 10 minutes to cool down.  Cut down the length of the cob, close to the core, to remove the kernels.  Transfer to a bowl, stir in the crab, shallot, coriander and lemon rind.  Season well with salt and freshly ground black pepper.  Cover and place in the fridge for 10 minutes (or longer) to chill.

Combine the flour and egg in a large bowl (the recipe actually stated 2 eggs, but I found the mixture was too stiff, so added a third - and it was much better!).  Add the crab mixture, and stir to combine.

Heat a large frying pan over medium high heat.  Add enough olive oil to have a thin even coating on the bottom of the pan.  When the oil is hot, add rounded soup spoon amounts of the corn mixture to the pan.  Flatten slightly with the back of the spoon.  Have approximately 6 fritters in the pan at a time.  Cook for 2 minutes, and then flip over, flattening slightly with the back of an egg lifter.  Cook for an additional 2 minutes, or until golden and cooked through.  Drain in a single layer on some paper towel.

Now I wasn't sure whether to serve these hot or cold, but my reasoning said that if they were too hot, the mayonnaise sauce would melt.  So they were warm when I garnished them.

Top each crab cake with a dollop of mayonnaise mixture, top with a tomato quarter, and garnish with a coriander leaf.


Even though my tastebuds were out of whack last night, I must say these little fritters were pretty tasty, and certainly a big hit with everyone!

** Sun Dried Tomato Pesto
Adapted from Recipe found on Taste.com.au

3/4 cup sundried tomatoes
1/3 cup pinenuts
2 cloves garlic
1/2 cup olive oil
1/3 cup finely grated parmesan cheese
salt and freshly ground black pepper

Place the tomatoes, garlic and pine nuts in the TM bowl.  Pulse with the Turbo button for 5-10 seconds (about 4 pulses) to get a rough, even texture.  Scrape down the bowl and repeat if necessary.

Place the olive oil in the reservoir, and process on speed 4 until all the oil has been added.

Add the parmesan cheese, and salt and pepper, and mix on speed 4 for 5 seconds.

Transfer to a jar.

* Mayonnaise
Adapted from Thermomix Everyday Cookbook

1 egg, at room temperature, separated
1 tsp dijon mustard
1 tbs vinegar
250g rice bran oil
salt and freshly ground black pepper

Insert the butterfly.  Place the egg yolk. salt, pepper, mustard, and vinegar in the TM bowl.  Mix for 1 minute of speed 4.

With the blades rotating on speed 4, slowly add the oil to the reservoir.  Make sure that you do it very slowly - you want to take between 4-6 minutes to add all the oil.

Once the mayonnaise has emulsified, you can add the egg white (optional) and season to taste with more salt and pepper, if needed.  Mix for 10 seconds on speed 4.

Transfer mixture to a bottle.

So by now Dear Readers, you should know me pretty well.  Of course, I could not stop at taking just one plate - I of course had to make another!

My second plate was a platter of spicy little chicken nibbles.  As I was frying up the fritters at the last minute, I didn't want to be frying up these as well, so I adapted the recipe to make them in the oven (cooked under the grill).


Spicy Chicken with Chilli Lime Dipping Sauce
Adapted from Women's Weekly - December edition

1 kg (approximately 8) chicken thigh fillets
2 tbs fish sauce
4 cloves garlic, crushed
2 small red chillies, seeded, finely chopped
1 tsp caster sugar
1 tbs sesame oil

Chilli Lime Dipping Sauce
2 tbs lime juice (approximately 1 medium sized lime)
1 tbs water
2 tsp caster sugar
2 tsp fish sauce
1 small red chilli, seeded, finely chopped
2 tsp finely chopped coriander stalks

Cut the chicken thighs into 4cm pieces.

Combine the fish sauce, garlic, chilli and sugar in a large ziploc bag (or a bowl - but then you have to wash it up!!)  Add the chicken, and mix well.  Refrigerate for at least 3 hours, if not longer.

Of course I took the easy way out with the dipping sauce - whizzed it up in the TM!!  You can however, just add all the ingredients to bowl and combine - make sure the sugar is dissolved!  Set aside until needed.

Here is where I deviated from the recipe.  They said to cook in a frying pan for 4 minutes each side, until browned and cooked through.  I however, decided to line a large baking tray with foil.  I then spread out the pieces in a single layer over the foil.  Placed them under the grill, on high, and grilled until cooked through and lightly browned.  Turn over and cook the other side until browned.

Place on a serving platter with a trio of sauces.  In addition to the Chilli Lime Dipping Sauce I used Sweet Chilli Sauce, and Ketchap Manis - that way people could vary the heat level to suit their preference!

So Dear Readers what is your "plate" that you take when asked to bring something???


As I have been so slack lately, and not posting as regularly as I should, I will take this opportunity to wish you all a very Merry Christmas!!

I have a very busy week this week, playing Santa, and surprising several lovely ladies with Thermomixes that their husbands have bought them for Christmas.  I can't wait to see the surprise on their faces when I show up with a big box in tow!!!!

Sunday, December 11, 2011

Sticky Coca Cola Pork Ribs

The men in my house are always asking for ribs for dinner. I usually have to say, sorry, I don't have time to make them today, as the recipe that I love the best is quite time consuming.  First make the sauce, then boil the ribs, and then the final baking. However, all that changed when I tried this recipe last night!

For me ribs have to be meltingly soft, and you must be able to almost suck the meat from the bones, and that is where time factor comes in. This recipe however, has you cooking the ribs in a sauce (if you can even call it that - just three ingredients - one of them being coca cola!). You then drain off the liquid, and baste them with another sauce (yes magic ingredient again is coca cola!). The beauty of all this is that they are baked in the oven, so virtually no work involved! Especially if you combine them with baked corn on the cob, and baked smashed potatoes!

This recipe was one that I found in the current edition of Delicious Magazine. It was, however, entitled Dr. Pepper ribs, but I couldn't find any 2 litre bottles of Dr. Pepper, and I thought it a little too extravagant to buy that many cans, so I decided to alter the recipe slightly and use coca cola instead!  Must say they were pretty good, and don't think I will try and look too hard for Dr. Pepper next time!


Coca Cola Ribs
Adapted from Delicious Magazine, December/January edition

Serves 4-6

Ribs (I usually serve 1 rack per person), each rack cut in half
4 cups coca cola
4 star anise
2 cinnamon quills
2 tbs Dijon mustard
2 tbs worcerstershire sauce
1/4 cup soy sauce
1/2 cup (firmly packed) brown sugar
1/4 cup maple syrup
1/2 cup tomato sauce (ketchup)
4 disposable foil baking trays (Saves so much washing up!)

Use 2 disposable foil baking trays. Place half of the ribs in each tray. Put 2 star anise and 1 cinnamon quill in each tray, add 2 cups of coca cola to each tray. Cover tightly with foil, and place into an oven that has been preheated to 160 degrees. Bake for 1 1/2 hours.


Meanwhile make the basting sauce.

Place 2 cups of coca cola , and all remaining ingredients in a sauce pan. Bring to the boil (watch carefully, as while the gas is escaping from the coke, it tends to bubble quite a lot!) Simmer gently for approximately 15-20 minutes, or until thick and syrupy.

Remove the ribs for the cooking liquid, discard liquid. Place the ribs into a new baking tray. Brush liberally with the basting sauce. Bake for a total of 45 minutes, basting liberally every 15 minutes. You want them to be lovely and dark, and sticky!


Serve with copious amounts of paper napkins - you will need them! These ribs are finger licking good!

So now I have no excuse not to make ribs more often - these really take no effort at all, let the oven do all the work I say!

Saturday, December 3, 2011

A Birthday Feast!

My good friend Madam T had been left high and dry by her hubby for her birthday. Sometimes the ones we love just don't realize that even after many years together we still appreciate a little bit of love and attention on our birthiday.

After I found out that she had been stood up, and had to cancel out her reservation for dinner at Marque Restaurant, I knew I had better come up with something pretty decent for her birthday feast.

A thousand menus started rolling through my brain. I was really starting to stress myself out with this meal. I mean I am no Mark Best! Saying that though, all I could do was do my "best".  I had mentioned to her something about salmon, so when I asked her in a moment of sheer panic "what do you want?" her reply was I thought we were having salmon? Ok, focus, just pick something, and go with it!

For starters I chose a simple dip.

Roasted beetroot hummus with dukkah. This of course was a little risky, because as Thermomix consultants we make hummus pretty much on a weekly basis, if not almost daily!! So you often can be a little tired of the sight of it. My version though was a beautiful pink colour, and of course hard to resist.

Roasted Beetroot Hommus

1 large Beetroot, roasted at 200 degrees for 30-40 minutes, or until tender
1 clove garlic
1 can chick peas, drained
Juice of 1 lemon
Salt and freshly ground black pepper to taste
2 tbs tahini

Place the garlic in the TM process on speed 7 for 3 seconds. Add remaining. Ingredients and process on speed 6 for 10 seconds, or until the texture is to your liking.

Sprinkle with some dukkah, and voila, a beautiful pink dip!


So now onto the main. We are supposed to be in summer now, but I think that someone in the weather department has forgotten to set the thermostat to summer heat! Unfortunately I had decided to have a cool salad type meal, too late now - it will just have to do.


Baked Salmon with Tahini and Herb Salad
From Delicious Magazine, December/January edition

Serves 3-4

Side of salmon, skinned and pin boned (mine was approx 600g)
1 tbs extra virgin olive oil
1 tbs tahini
1/2 cup thick Greek style yoghurt
1 tbs lemon juice
2 tsp sumac
2 preserved lemon quarters, flesh and pith removed and discarded, rind finely chopped
1 bunch coriander, leaves finely chopped
1 bunch flat leaf parsley, leaves finely chopped
50g toasted pine nuts

Preheat oven to 140 degrees. Line a large baking tray with baking paper. Place the salmon on the tray, sprinkle with the olive oil. Season well with sea salt and freshly ground black pepper. Bake for 20 minutes. Remove from the oven, cool completely.

Meanwhile, combine yoghurt, tahini, lemon juice and 1 tsp sumac, and season well with salt and freshly ground black pepper.

In a separate bowl, combine the preserved lemon, herbs, pine nuts, and the remaining 1 teaspoon of sumac together.


To serve place the fish on a large platter, spread the yoghurt and tahini mixture over the fish, and then scatter the herb mixture over the top of the yoghurt mixture.

So now what to serve with that - the recipe suggested roasted potatoes, but on the next page of the magazine there was a recipe for quail with a broad bean and tomato salad it looked really nice, so I decided to pair it with the salmon.

Broad Bean and Tomato Salad


400g tomato medley
1 clove garlic, crushed
1 tbs olive oil
1/2 red onion, finely sliced
1 tbs honey
1/2 tsp ground cumin
1/4 tsp ground cinnamon
200g broad beans, prodded, blanched, refreshed
1 bunch miniature asparagus

Preheat the oven to 200 degrees. Line a baking trade with baking paper. Place the tomatoes, garlic and onion, and asparagus on the tray, drizzle with the honey and oil. Scatter with the spices, then roast for 30 minutes, or until the tomatoes have softened. Allow to cool. Toss the cooled roasted tomato mixture with the broad beans. Season.


Arrange the vegetable salad around the fish.


But wait, there's more.....

I wake up every morning and read my emails, and drool over the latest food porn awaiting me in my mail box (via Food Buzz). One particular morning this led me to a food blog called Manu's Menu. What a lovely site. It certainly got my interest, because as you know I am heading off to Italy next year, and here on her blog Manu had some lovely Italian cuisine.  One recipe that caught my eye was one for Foccacia di Recco.  Manu went on to say that the foccacia that we usually eat (the fluffy kind) is not traditional. Her photos convinced me that I had to try this type of Foccacia - and let me tell you after eating her version - I am converted. It was absolutely delicious!  Oops - I forgot to take a photo - but Manu has some lovely photos on her site!

I urge you to visit her blog and try the recipe!!!

Right that was the main course over with - but it's a birthday, and what is a birthday without a sweet treat!!!

I had recently made some home made lemon curd, so I was keen to incorporate this somehow into a dessert.  Here is what eventuated!


Hazelnut and Chocolate Dacquois with Lemon Curd and Fresh Berries

4 egg whites
1 tsp white vinegar
200g caster sugar
50g hazelnuts, toasted, finely crushed
100g dark chocolate, finely grated

Vanilla Bean Whipped Cream
Lemon Curd
Blueberries
Strawberries

Preheat oven to 150 degrees.

Lightly grease and place baking paper in the base of muffin pan (with removable bases) or grease egg rings, and place on a baking tray.

Make sure that your bowl and blades are completely clean, or the egg whites will not whip up.

Place egg whites and vinegar in to the TM bowl (or electric mixer).  Whip until the egg whites have soft peaks.  Gradually add the sugar, beating well after each addition.  When the mixture is thick and shiny. gently fold in the nuts and chocolate.

Place the mixture into the prepared pans (rings).

Cook the meringue for 10-15 minutes, or until firm to the touch.  Allow to cool in the oven, with the door slightly ajar.

To serve slice the meringue in half horizontally, using 3 pieces for each dessert stack.

Place on section on serving plate, top with a dollop of whipped cream.  Place second meringue disc on top of the cream.  Place a dollop of lemon curd on the meringue, along with another dollop of whipped cream. Top with another meringue disc.  Top with a little whipped cream, and then add several blueberries.  Place some sliced strawberries and a dollop of whipped cream on the side.  Dust with a little icing sugar.


I am pretty sure, that even though this meal was not up to par with Marque, Madam T was pretty pleased with her birthday feast.  Happy Birthday my friend!!!

To team up with the birthday celebrations, I was lucky enough to receive this week, The Editor's Pick, Fantastic Foodie award!!!