WELCOME TO MY KITCHEN


WELCOME TO MY KITCHEN!!
I hope you enjoy the food!!!

Thursday, April 28, 2011

Happy Birthday to me and my Blog!!!!

Imagine my surprise today when I came home from a lovely day out to find this beautiful cake sitting on my doorstep.


The Cake Woman Extraordinaire had come to pay a visit - kind of like the tooth fairy really, but very unexpected though - perhaps I shall have to start calling her The Cake Fairy Extraordinaire (CFE)!!!!

Can this day get any better?

I started the day off with a little "me time".  Went to the "panel beaters" to get a bit of life injected back into the hairdo (read between the lines - eliminate gray hairs!!).  Then it was off to lunch!!  Mr. CCC was taking me for a seafood extravaganza by the water - the only hiccup was that it was raining - but one can overlook such minor technicalities if one has to.

So what is the big occasion you ask???  Well today is a milestone - in fact this week is a milestone.  CataCanCook, the blog, turned 1 year old!!!! and I, the author turned the big 50!!!!  So it's Happy Birthday to me and my Blog!!

Thank you to all my readers that have followed me during the past year. It has been a fun and rewarding experience for me.  I have made lots of new friends along the way, and I hope that the next year brings more of the same!

Thank you so much "CFE" for the lovely cake - you have made my day with your thoughtfulness!!!


Sunday, April 24, 2011

Surimi Pasta

Call me crazy - but on my last night of freedom before the marauding hordes came home I didn't feel like eating leftovers.  I really should have been taking advantage of the quiet - no one asking for dinner - no pressure to perform in the kitchen - but no - I just couldn't sit still in front of the TV and relax (I wish I had - they were back home for I swear 5 minutes, and I was threatening to send them back from wence they came!!!)

Unfortunately I did not have anything defrosted (I had planned on making a Malaysian Chicken Curry - but had put the chicken in the freezer thinking I was going to have the leftovers from my Pasta
e Fagioli from the other night).  No, that wasn't what I felt like - I felt like something seafoody - it was after all Good Friday isn't that what we are supposed to eat??!!  What should I make?  I did have some green prawns in the freezer - no too much fiddling around.  Then it hit me,  I remembered seeing a bag of "seafood extender" "fake crab" - Surimi - call it what you will -   when I had cleaned out the freezer recently -  this was going to be dinner!!  Easy to defrost (simply place on a plate over the air conditioning register for a few minutes - and voila - ready to prepare!!!)


This is kind of an old standby from days gone by - you could do this with prawns if you like - but the sweetness of the basil really lends itself well to the surimi!  I love how quick and easy this is!


Surimi Pasta

Serves 3 - 4


300g Surimi
3 tomatoes, diced
3 cloves crushed garlic
1 tbs tomato paste
1/2 cup shredded basil (cut into ribbons using scissors)
1/4 cup white wine
1 tsp sugar
200ml cooking cream
salt and pepper
200g pasta of choice (I used spaghetti)
grated parmesan to serve

Cook pasta in a saucepan of boiling water for 10 minutes, or until cooked.  Drain well.

Heat a frypan over medium high heat.  Add a  splash of olive oil, fry the garlic for 1-2 minutes.  Add the tomatoes, and the tomato pasea  cook for 2-3 minutes, or until starting to thicken.  Add the white wine, salt and papper to taste, and the  sugar, simmer gently for 5 minutes, or until sauce has thickened.

Add the surimi, basil and cream.  Simmer gently for 1-2 minutes, or until heated through.  Adjust seasonings if needed.


Toss through the pasta.

Serve in a bowl topped with parmesan cheese.


I can hear you saying - but doesn't this serve 3-4??  Yes - and yes I have more leftovers!  I really must learn to cook for one!!!  Too used to cooking for a crowd!!!


Friday, April 22, 2011

Pasta e Fagioli

This dish was one of the presentation dishes at a Thermomix demonstration I attended recently.  It was definitely my kind of dish - sort of like a minestrone - but not really.  All the comfort elements though - pasta, beans, cheese, and hint of chilli and tomato.  You could also make it more soupy or pasta"y" depending on your mood.

One of the beautiful things I love about life with Thermie is that if I am not in the mood to cook - simple dishes like this are a breeze.  Simply add the ingredients and sit down to watch the news!  Can't get much better than that can you?

Last night even though I am eating alone again - (sent "The Darlings" and Mr. CCC on a little vacation without me - and am I loving the peace and quiet????  What do you think????   Unfortunately though all good things must come to an end - and they are due back early tomorrow morning)  So even though this meal makes enough for 4-6 I thought why not whip up a potful and have some leftovers for another night.


Pasta e Fagioli
Adapted from Thermomix EDC Cookbook

Serves 4-6

100g parmesan cheese, cubed (to serve if desired?!)
1-2 red chillies (to taste)
1-2 cloves garlic
1 onion
50g olive oil
1 celery stalk, roughly chopped, including leaves
2 cans cannellini beans, drained
2-3 fresh tomatoes (depending on size)
2 tbs TM concentrated vegetable stock
900g water
300g macaroni pasta
wild rocket to serve

Place the parmesan cheese into the TM bowl and grate for 10 seconds on speed 9.  Set aside.

Place the chilli, garlic and onion into the TM bowl and chop for 3 seconds on speed 7.

Scrape from the sides of the bowl using a spatula.

Add the olive oil and saute for 2 minutes at 100 degrees on speed 1.

Add the celery, 1 can of the beans, the tomatoes and the stock, then pulverise for 15 seconds on speed 6.

Add the water and cook for 10 minutes at 100 degrees on speed 1.

Add the pasta and the remaining can of beans and cook for 10 minutes at 100 degrees on reverse and soft speed.

While the pasta is cooking heat your Thermoserver by filling with boiling water, allow to sie for 10 minutes while the final stages of cooking are happening.  Remove water and wipe dry.

Place the wild rocket in the base of the Thermoserver.  Top with the cooked pasta mixture and allow to sit for 5-10 minutes.  Stir the rocket through the pasta, and season with freshly ground black pepper.

Serve the pasta in a bowl, topped with the reserved grated parmesan cheese.


Pure comfort food in a bowl!!!  Yummmmm!  Might just have the leftovers tonight!!!

Now don't be daunted by the fact that this was made in the Thermomix - this can just as "easily" (well perhaps not!!) be made using conventional methods - and of course replacing the TM stock concentrate with liquid chicken stock.  Chop by hand, and boil - you know the drill!!!

So what have I been doing with all my spare time with "The Darlings" away you may ask?  Today I spent the day in the kitchen - made some yummy pull apart hot cross buns/bread - and then "precious" and I experimented and had our very first go at making macarons!!!!  Were they a success you ask - well you will just have to wait and see - we were a little adventurous - we made Fruit Tingle Fizz Macarons!!!!  Stay tuned...........


This is what is known as a teaser!!!

You will have to come back again to find out about these!!!!!

Thursday, April 21, 2011

Taquitos and Stuffed Peppers


I don't know why I had such a hard time with this fortnight's Cookbook Challenge.  The theme this fortnight was crunchy.  You would not think it would be that hard.

I sat and thought - couldn't come up with anything - even googled crunchy recipes - and all I came up with was a lot of fried stuff.  Perhaps therein lies my problem?!  We do not tend to do a lot of fried food in this house - don't like the mess it makes, and well.... we can do without it.  I did have an earlier attempt last week - decided to make honey chicken - but no, did not stop there - I thought let's fry up some rice vermicelli - that's crunchy!!!  Sadly after all the effort of making the batter (and I can't say that I was entirely happy with the batter I made), and then frying it all up - I just couldn't be bothered taking the photo - so no crunchy!!!

Now I don't like to admit defeat - so last night I thought I would rectify this non crunchy problem and make taquitos for dinner!!  Lovely little crunchy Mexican treats.  Usually fried - but I wanted to bake them instead!  Well the theory was good - but were they great???  Look, in my eyes they were what they were - crispy, crunchy little Mexican morsels.  They are not something I would probably ever order in a Mexican restaurant - so perhaps that is why I was not enamoured with them.  But in order to not fail this fortnight's challenge I present my Crunchy Menu!!

PS - I was eating alone - so I kinda just threw all the things together - measurements are all approximations!!!


Homemade Salsa


3-4 tomatoes - depending on size, cut into very small pieces
1 green shallot, finely chopped
2 chargrilled green chillies (the long kind)* finely chopped
juice of 1/2 lime
2 tbs chopped coriander
salt

* To chargrill the chillies place under a hot grill for approximately 5-10 minutes, or until skin is blistered and black.  Allow to cool, them remove skin.

Place all the ingredients in a bowl.  Season to taste, adjust chilli intensity to suit.


Taquitos


Serves 2


4 corn tortillas
BBQ chicken meat, shredded (approx 100g)
Prawn meat (approx 100g shelled weight), finely chopped
1 clove crushed garlic
Salsa
Grated Havarti Cheese
Olive oil

In a bowl combine the shredded chicken meat, and the chopped prawn meat with enough salsa and grated cheese to be just moist.  You don't want it too wet or it will make your taquitos soggy.


Lightly brush the corn tortillas with a little olive oil.  Turn the tortilla over.  Place a small amount of chicken/prawn mixture on each tortilla.  Roll up into a little "cigar shape".  Place on a baking tray.

Bake in oven that has been preheated to 200 degrees.  Bake for 15-20 minutes, or until golden brown and "crunchy"!.

Serve with extra salsa, sour cream and avocado.


You might like to add a little extra to the side of this dish - I decided to make a little stuffed pepper.  I bought the long kind that look like this - only straighter


I cut it in half lengthwise then stuffed it with the following:

Stuffed Peppers


2 long yellow peppers, halved
100g prawns meat  (approx 100g shelled weight)
1-2 cloves crushed garlic
salsa
salt and pepper
40g haloumi cheese with chillis diced
20g grated havarti cheese

Combine all the above ingredients in a bowl.  Place into the pepper halves.  Bake in the oven alongside the taquitos  (but for only 5-10 minutes, or until the prawn meat has cooked through - do not overcook as the prawn meat will become tough!)


So there you have it - my crunchy menu!!  Who would have thought it could be so hard??  I am sure now that I have laboured over it, and posted what I feel is a substandard post, I the big lightbulb in my head will go off and I will think of something infinitely better I could have made.  So be it - that is life!!!


Saturday, April 16, 2011

Gamberi alla Parmigiana

I'm sure you have all had Veal Parmigiana, and I'm sure most of you have had Chicken Parmigiana - but have you ever had Gamberi alla Parmigiana??

I had never even thought to do do prawns this way until I received my first birthday present this last week (yes my birthday is approaching - but more on that another time!!)   My dear friend Madame T gave me a lovely cookbook by Nico Moretti.  Nico is a "Celebrity Chef" from Perth who embraces the Thermomix.  While the recipes are not written specifically for the Thermomix - there is a section in the back that tells you where you can utilise it for particular recipes.

I actually found it strange that there was no adaption for this recipe - I guess the applications for this recipe were so second nature that he didn't even think to include them.  I mean we all know how to make breadcrumbs and chop parsley and garlic don't we? Of course we do, but it takes mere seconds in the Thermomix - and even the hardest, most crustiest sourdough is not match for Thermie!!

The blurb on this recipe tells us how this dish is his father's signature dish at the restaurant he owns.  He goes on to say that "Every time I make this dish I end up wishing I'd made a larger portion - they're dangerously moreish."  I took this statement as a warning, and paid no attention to the the quantity of prawns that he stated for the recipe - 3 to 4 prawns per serve!!!  Seriously, that is not going to satisfy the seafood lovers in this house!  Here is my version!


Gamberi all Parmigiana
Adapted from Cooking Passions : Food for Friends by Nico Moretti

Serves ...???? you decide how many you want


1.2 kg green prawns (this yielded approximately 56 prawns) *
4 +/- cups fresh breadcrumbs **
4 eggs, lightly beaten
flour
salt and pepper
4 cloves garlic, crushed
1/4 cup Italian parsley, finely chopped
mozzarella cheese slices
good quality comercial tomato pasta sauce ***
canola oil for frying

Preheat oven to 160 degrees.

Peel prawns, and with a small sharp knife gently cut down the back of the prawn, gently flattening as you cut.  You want a nice flat piece of prawn meat.

Place the bread in the TM bowl process for 8 seconds on speed 8.  Remove from TM bowl, place into a large bowl.

Place the parsley and garlic in the TM bowl process for 3 seconds on speed 7.

In another bowl, whisk together the eggs, salt and pepper, garlic and parsley.

Place some flour on a large plate.

Now comes the process line thing.  You need to dust the prawns in the flour, then dip in the egg mixture, then crumb in the breadcrumbs.  I used one hand to dust with the flour, then dip in the egg - then use the other hand to do the crumbing - this way hopefully you won't end up in too much of a breadcrumb caked mess!!!  Be careful though, your hand will sometimes take on a mind of it's own and want to do both jobs!! Don't let it!!

Have a large tray lined with foil, and lay the crumbed prawns out in a single layer on the tray.  When the tray is full place another piece of foil on top and start another layer.

Once all the prawns are crumbed it's time to start frying.

Heat the oil in a large frypan over medium high heat.  Cook the prawns in batches until golden brown.  This will only take a couple of minutes.  Drain the prawns on paper towels.

Warm the pasta sauce and set aside.

Place the prawns on either a serving plate that can go in the oven, or on a baking tray that has been lined with baking paper.


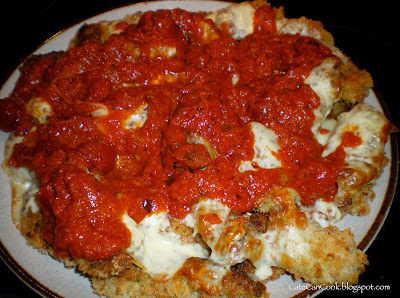
Cover the prawns with the mozzarella slices.  Place in the oven for 3-5 minutes, or until the cheese has just melted.  Top the prawns with the warmed pasta sauce and serve immediately.


Serve with a salad on the side.  This is a great dish - you will definitely want more than 3 or 4 prawns each!!!


** I used sourdough bread to make my breadcrumbs
*** I used Sacla Cherry Tomato and Basil Pasta Sauce

The number of prawns that I crumbed far exceeded the amount that I needed for this dish - Nico says in his class notes on this recipe that you can crumb the uncooked prawns the day before and refrigerate, or as he often does, freeze them overnight on a flat tray.  Once frozen, store the prawns in a conventional freezer bag.  Then when ready to use, shallow fry them from frozen (do not defrost) as required. 

I now have a approximately 18 crumbed prawns in the the freezer - ready for next time!!  Thanks Nico - a) for warning me to make more than the 24 prawns you recommend for the recipe, and b) for telling me how to be prepared for the next sitting of this dish!!!

So Dear Readers tell me, do you automatically up the amount of meat/prawns/chicken stated in a recipe knowing that there is not sufficient for the average mortal's appetite stated in most recipes - or are we just little piggies here??

Friday, April 15, 2011

Cheese and Ham Rolls and Hot Cross Buns

Even when you try and get an easy lunch on the run with the kids it can still add up dollar wise.  The other day I stopped at the local Baker's Delight as "The Darlings" were hungry and they wanted Cheese and Bacon Rolls.  At $2.70 each they are not exactly cheap.

I recently read on The Opies Family Food blogsite how she had  made Cheese and Bacon Rolls with success, and as I am gaining more and more confidence with baking bread using the Thermomix,  I decided to have a go at making them myself.  Really not hard at all.  Only problem was that I had no Bacon - so I substituted Ham.


Cheese and Ham Rolls
Original recipe from Forum Thermomix

Makes 8 Rolls

7g Yeast
2 tsp caster sugar
280g warm water
480g bakers flour
1 tsp salt
1 tbs olive oil
1 egg, lightly beaten
grated tasty cheese
100g shaved ham, cut into small pieces

Pace the yeast, sugar and warm water in the the Termomix Bowl.  Mix for 20 seconds on speed 4.  Allow to stand for approximately 10 minutes, or until frothy.

Add the salt, flour and oil.  Process for 5 seconds on speed 7.  Set dial to closed lid position and knead on interval setting for 1 minute 30 seconds.

Set aside in a lightly oiled bowl, in a warm place for 1 hour.

Punch down the dough and knead lightly until smooth.

Divide the dough into 8 portions.  Place on baking paper on a baking try.  Cover with lightly greased cling wrap.  Allow to prove again for 30-40 minutes.

Preheat oven to 200C.

Brush with the lightly beaten egg, then top with ham, then grated cheese.


Bake for 20 minutes, or until cooked through and golden.


So while we are in the baking mode - why not make some Hot Cross Buns as well....


Hot Cross Buns
From Thermomix EDC Cookbook

250g warm milk
500g bakers flour
2tsp salt
70g butter
45g sugar
1 egg
15g yeast
1 1/2 tsp ground cinnamon
1 1/2 tsp ground nutmeg
1/2 tsp ground cloves
100g sultanas
70g currants

Place the milk into TM bowl and cook for 50 seconds at 90 degrees on speed 1.

Place remaining ingredients into the bowl, excluding the sultanas and currants, and mix for 6 seconds on speed 7.  Set dial to closed lid position and knead for 2-3 minutes on interval setting.

Add the sultanas and currants and mix for 10 seconds on speed 5.

Put in a warm place to prove for 1-1/2 hours.  Dough should approximately double in size.

Shape into rolls approximately dinner roll size.  Place the buns close together on a baking sheet lined with baking paper.  Cover and let prove for a further 10-15 minutes.

Pipe with crosses - recipe follows

Cross Mixture

80g plain flour
pinch salt
1 tsp light olive oil
100g water

Place all ingredients into TM bowl and mix to combine for 30 seconds on speed 4 to obtain a thick consistency.  Place into a piping bag - (or a small ziploc bag that you cut a small corner from).  Pipe crosses onto the buns.

Bake in oven that has been preheated to 220 degrees for 10-15 minutes or until golden.

Brush with sugar syrup while still warm.

Sugar Syrup

2 tbs water
2 tbs sugar

Place sugar and water into TM bowl and cook for 2 minutes at 100 degrees on speed 4.


So how much money did I save baking these myself???  Well $2.70 x 8 = $21.60 and a dozen hot cross buns?? Well my school was selling them for $13 per dozen as a fund raiser!!!!

Aren't I the clever little spend thrift??  So tell me Dear Readers what ways do you like to save money?  Do you bake, or do you make all your own food rather than buy Take Away?


Thursday, April 14, 2011

Seafood Pie

School holiday time again - a time to take a little bit of a breather from the normal routine.

Last night was very quiet in this house - "The Darlings" had gone for a sleep over - mind you they were only next door - but it made for a quit night here!!  What to make for dinner - something simple, yet tasty.  The weather although lovely and warm during the day, tends to take a dip in temperature as soon as the sun starts to go down - or is that just here in my little sleepy hollow??

A quick dash to the shops and all was decided for dinner.  The local fish shop had a tray of salmon offcuts/sashimi - so with the addition of a few green prawns it seems that a fish pie is in order.  In the current edition of Good Taste Magazine there is a Salmon and Dill Pie - it looks delicious - kind of like your Shepherd's Pie but with fish!!!

While I sort of followed the recipe - I kind of made a few changes too (would you expect anything less?!)  The first being that I was going to make majority of this recipe in the Thermomix, and then bake it.  The second major change was that I was going to add prawns to the equation, but to compound the changes there were no leeks at the supermarket - so I had to substitute green shallots.  Here is my version of Salmon & Dill Pie


Seafood Pie
Adapted from Good Taste Magazine - April Edition

Serves 4

800g potatoes, peeled, cut in to 2cm cubes
30g butter
140g cream (approx 1/2 cup) - plus water to make up 220g - just over 3/4 cup
4 cloves garlic

6 green shallots, chopped
50g flour
40g butter
500g milk (approx 2 cups)
400g salmon, cut into small pieces
500g green prawns (including shell weight)
2tbs chopped dill
2 tsp dijon mustard
salt and freshly ground black pepper

70g (approx 3/4 cup) cheddar cheese, cut into cubes

Grate the cheese by placing the cubes into the TM bowl, process for 8 seconds on speed 7.  Remove from bowl and set aside.

Place the cream, water, garlic, salt and chopped potatoes in to the TM bowl.

Cook for 20 minutes at 100 degrees on speed 1.  Insert the butterfly.  Add the butter.  Mash for 20 seconds on speed 3.  Season to taste.  Remove from the TM bowl and keep warm in the your Thermoserver.

Just look at that creamy mash!!

Preheat oven to 180 degrees.

Now comes the truly amazing part.  If you have ever made bechamel sauce, you will know that it involves melting butter, making a roux, slowly adding the milk and stirring, stirring, stirring to make a perfectly smooth sauce.  Well with the Thermomix - you just bung it all in the bowl - and voila!!! Beautifully smooth sauce!!  I was amazed!  (You have redeemed yourself Thermie!!)

So if you are without a Thermomix - sorry - you have to make a bechamel sauce - you know how * - but here is the easy way!

Place the milk, butter, flour, dijon mustard, and 1/2 tsp salt into the TM bowl.  Cook for 7 minutes at 90 degrees on speed 4.

Now add the chopped green shallots, season with salt and pepper, and cook for an additional 2 minutes at 90 degrees on speed 2.

Add the salmon and green prawns and cook for 1-2 minutes at 90 degrees on Reverse and soft speed.  You really want the seafood "just cooked".

Lightly grease a 6 cup capacity baking dish.  Add the seafood mixture to the dish.  Top with the mashed potato.  Sprinkle the grated cheese over the top.  (You might want to place a piece of foil under the casserole dish as it does bubble up a little - well mine did anyway!!)

Bake in the oven for 20-25 minutes, or until lovely and golden.

Serve with steamed broccoli, or green veggie of your choice!


This was comfort food at it's best.  Cheesy, creamy, fishy - yum!!!

* Just in case you don't know how to make a bechamel sauce - here are the directions from Good Taste Magazine:

Melt butter in a saucepan over medium heat until foaming.  Add the green shallots, cook for 2-3 minutes, or until soft.  Add the flour and cook, stirring for 2 minutes, or until the mixture bubbles.  Remove from the heat.  Gradually add the milk, stirring constantly, until smooth.  Place the pan over medium heat and cook, stirring constantly, for 4 minutes, or until the sauce thickens.  Add the seafood and cook for 2-3 minutes, or until just cooked through.  Stir in the dill, season with salt and pepper.

Hate to brag - but it was so much easier with the Thermomix.  But saying that - this is still a pretty easy recipe.

As there were only 3 of us home for dinner last night - there are some leftovers in the fridge that are calling out to me for lunch today - can't wait!

So tell me Dear Readers does you menu start to change as the weather changes?  What is your favourite comfort food?


Wednesday, April 13, 2011

Raspberry Bliss Cake

Many years ago a friend commented that there was a particular cake shop that made a particular cake that she liked.  Me being me, decided to investigate said cake, and attempt my version of it.  Now I have never tasted the original cake - but only gazed longingly at it, and based on her description - this is what I came up with.  I have made this recipe many times over the years - and it is always a winner!!

That was however, to change this time!!  Now I know that I sing high praises of the Thermomix - I love it in oh so many ways - but this time it failed me dismally.  I only had to beat egg whites - it can't be that hard - Thermie has huge beating power - should be a walk in the park.  Now I know that you will probably tell me that perhaps I had a speck of yellow in the whites - or the bowl was not clean - or....?  But I swear I did everything right.  I even looked up in the Thermomix Cookbook how to beat egg whites - and here is where I think it's a little weird.  They actually wanted you to beat the egg whites, and have the temperature set at 50 degrees (strange??)  Look - new machine - I will do as instructed.  Dismal failure!!! I ended up with a warm white soupy mixture.

Tossed that out - looked on google for a solution - and yes several other people have said 50 degrees is too much - lower the temperature to 37.  Another 4 eggs - and I am still not happy with the mix - but I'm going to run out of eggs at this rate (particularly seeing as Mr. CCC had just come to make his breakfast!!)  The whites were fluffy - but just not as fluffy as I have had them previously.  So read the recipe - I don't think I will advocate using the thermomix other than for the chopping of the nuts and chocolate, and the whipping of the cream.  Please, if any of you out there have experience with this let me know the secret.


Raspberry Bliss Cake

4 egg whites
1 tsp white vinegar
200g sugar
50g ground roasted hazelnuts
100g white chocolate, finely chopped

To decorate
whipped cream
2cups frozen or fresh raspberries
grated dark chocolate

Preheat oven to 150 degrees.

Grease, and line with baking paper 2 x 18cm springform pans.  Grease the paper lightly.

Beat the egg whites with the vinegar until soft peaks form, then gradually add the sugar, beating well after each addition, until the mixture is thick and shiny.  Gently fold in the chocolate and hazelnuts.

Pour the mixture into the prepared pans.  Bake in the oven for 30-40 minutes, or until they are hard.  Turn off the oven, leaving the door slightly open, allow the meringues to cool in the oven.

Lightly dust serving plate with icing sugar.  Place one meringue cake on the icing sugared plate.

Top with whipped cream that has been flavoured with vanilla and sugar.  Top the cream with raspberries.  Place second meringue on top of the cream and berries.  Top the cake with more whipped cream and decorate with raspberries and grated dark chocolate.


This cake can be enjoyed either served straight away - the texture will be more crunchy - or you can assemble ahead of time - and allow the cream to soften the meringue - either way it is a delicious cake.  A real stunner - and always a favourite.


As an aside -  I am entering this as my post for the CookBook Challenge.


This fortnight's theme is eggs - being Easter I am sure there will be many talented people out there making all forms of chocolate eggs.  I say based on all the eggs I used for this cake - this is my take on the "egg theme".  Now I have to come up with a way to use all of those yolks!!!


Tuesday, April 12, 2011

Hoi Sin Chicken Canapes

As promised I am going to give you the recipe for the Hoi Sin Chicken Canapes I made the other night.

The latest edition of Good Taste Magazine had a page where they gave ideas for "Clever Canape Cases".  I have actually made a similar thing before Prawn and Avocado Cocktail Wontons - so it was just a matter of altering the filling.


Hoi Sin Chicken Canapes
Adapted from Good Taste Magazine - April Edition

Makes 36


1 packet wonton wrappers
2 chicken breasts *
2 cloves garlic
1 tbs chopped ginger
4 tbs soy sauce
1/4 cup hoi sin sauce
2 green shallots finely chopped
1/2 lebanese cucumber, finely diced

* You can use any cooked chicken - I however decided to poach a couple of breasts.

To poach the chicken breasts add the garlic, ginger and soy sauce to a frypan.  Add the chicken breasts and then enough water to almost cover the chicken.  Over a low heat bring the poaching liquid to a simmer.  Gently simmer the chicken for 10-15 minutes (with the pan covered with a lid), turning the pieces over during cooking.  Allow the chicken to cool in the poaching liquid.

Once cool, remove from the liquid, and shred the chicken meat using two forks.

Preheat oven to 180 degrees.

Lightly spray mini muffins tins with olive oil spray.  Carefully insert the wonton wrappers into the muffin pans, spray each wonton wrapper with a little more olive oil spray.

Bake for 8-10 minutes, or until golden.

Carefully remove and allow to cool.  You can actually prepare these ahead of time and keep in a covered container until needed.

Combine the shredded chicken meat with the chopped shallots, and enough hoi sin sauce to make it moist and tasty - you may need a little more, or a little less, depending on taste.

Place a teaspoon sized amount of chicken into each wonton case.  Topp with a dollop of additional hoi si sauce and garnish with a few pieces of chopped cucumber.

They definitely look classy - and taste good too!!


I dare you to stop at one!!!  Perfect for entertaining over Easter!


Monday, April 11, 2011

Food with Friends!

When you entertain it can be quite tricky.  If you don't know your guests that well how can you be sure that you will serve them food that they like/will eat.  I went under the assumption that as I was not told of any allergies - I could prepare pretty much anything.  You can however, still go wrong there - what if you decided to do seafood - and they hate it.

What to serve though - a tried and true favourite that you know will work?  Or do you be adventurous and try something that you have never made before, and have your fingers crossed the whole time, hoping that it will work out ok?

I decided to try something new.  I have been hankering to make beef ribs for a while - trouble is the days when I actually see them at the butcher shop is the days when I don't want them.  So I asked ahead and made sure he would have them on the day I needed them.

Beef ribs can be tricky as they require a lot of cooking.  The butcher assured me that you can't cook them too long - 12 hours is best!!  This of course means that you have to start cooking your dinner while you are eating your breakfast!!!  I know there are some of you out there that have a problem with having your oven going this long - but really it was OK - smelling the aroma of those ribs cooking all day was very enticing!!

Unfortunately when I ordered the ribs I did not specify to the butcher how I wanted them cut.  I assumed that it would be cut along the bone, as with pork spare ribs - this would give you a bone with a big chunk of meat on it.  When I picked them up he had cut them into long strips - so I had several small bones in a long piece of meat.  Not really a problem - but just make sure you are specific if, and when you order beef ribs!!

What ingredients should be used to flavour these ribs?  I had recently looked on Mumu Grill's website and here they talked about beef ribs (that is what got me started on the beef ribs idea actually!!) The only problem was that they were not specific in the amounts etc - so I had to do a little more research.  I then came across a recipe on the blogsite Random Cuisine.  I liked the flavours that were going on with this recipe - so I kind of combined the two concepts.  Used the marinade from Random Cuisine - but then used the beef stock idea from Mumu, and then cooked them for the butcher's time recommendation.


Slow Cooked Beef Ribs
Adapted from Random Cuisine and Mumu Grill

Serves 4-5

6 pieces of beef ribs - actual weight was around 2.3kg
1/2 cup fish sauce
bunch of coriander, stalks, roots, leaves
1/4 cup canola oil
1 lime, skin removed, quartered
4 cloves garlic
2 stalks lemongrass
1/4 cup sugar
5cm piece ginger
1 red chilli
1 litre beef stock

Cherry tomatoes and limes wedges to serve

Place the coriander, lime, garlic, lemongrass, ginger and chilli in the Thermomix bowl.  Process for 3 seconds on speed 7.  Scrape down the bowl.  Add the oil, fish sauce and sugar and process for 3 seconds on speed 7.

Place the marinade into a large ziploc bag, add the ribs and allow them to marinate overnight.

Preheat the oven to 100 degrees.  (I actually had had the oven on at 150 - I turned it down - but I did play with the temperature during the day and fluctuated between 100 and 150 - I was worried they wouldn't be cooked!?!)  I also peeked a couple of times to make sure there was still enough liquid in there - and there was - so don't worry!!

First thing the next morning place the ribs into a large disposable foil baking tray. (Don't add the marinade - but don't scrape off the marinade either - just take them from the bag and put them in the tray - whatever comes across is fine!).

Add enough beef stock to just cover the ribs (do not fully submerge them - but you want them with a lot of liquid - remember they are going to cook for 10+ hours!!!)  Cover the baking dish with several layers of foil - making sure that it is well sealed.

Put in the oven and cook for at least 10 hours!!

So what to serve with the ribs???

I am going to tease you here - and tell you - but actually post the accompaniments in a separate post (otherwise it may be a dry week recipe wise!!!)

To accompany the ribs I made a Green Bean, Edamame and Avocado Salad, Smashed Potatoes and Brazilian Cheese Bread!


We started the evening with Hoisin Chicken Canape cases, and Roasted Capsicum and Sundried Tomato and Cashew Dip.


.... but the piece de resistance for the evening was dessert!!!  Raspberry Bliss Cake!!!


The flavour in those ribs was oh so worth all that cooking time!!!  They were meltingly soft to eat as well.  I think I can safely say now, that if you are going to go to the effort to make beef ribs - go the extra distance and cook them very low and very slow - you will be rewarded for your efforts!


It actually was a great meal to make for guests as there was very little work to do - make the marinade - and then sit back and let the oven do the work!!


Sunday, April 10, 2011

Green Bean, Edamame and Avocado Salad and Brazilian Cheese Bread

Another accompaniment we had the other night with our ribs was a Green Bean and Edamame and Avocado Salad.  I have a bit of a thing about Edamame at the moment - I just love them - so when I saw this recipe I just knew I would have to try it.  I found the recipe in a New Zealand Magazine that was lent to me recently - I am not 100% sure but I think it was called Taste.  I copied several recipes out - but forgot to include the magazine title!

I have altered the recipe slightly - the original called for preserved lemons in the dressing, but as I was going for an asian theme I decided to leave them out.


Green Bean, Edamame and Avocado Salad
Adapted from Taste (New Zealand) December issue

Serves 6-8


400g green beans, stem end trimmed
2 cups edamame beans, podded
1 ripe avocado

Dressing
2 tbs finely chopped red onion
1/4 cup olive oil
2 tbs white wine vinegar
1 tsp honey
1 clove crushed garlic
1/4 tsp ground cumin
1/4 tsp paprika
1/4 cup roughly torn mint leaves
salt and freshly ground black pepper

Cook the beans in a saucepan of boiling salted water until just tender.  Remove the beans from the water and place in a bowl of chilled water.  Add the edamame beans to the oiling water and cook for 4-5 minutes.  Drain the edamame beans and refresh in chilled water.  Drain again, and dry both lots of beans well.

For the dressing soak the red onion in cold water for 10 minutes.  Drain, and squeeze dry in a clean tea towel.  Place the remaining ingredients in a screw top jar.  Add the chopped onion and season to taste with salt and pepper.

To assemble the salad place the beans in a large bowl.  Halve the avocado, remove the stone and thinly slice.  Using a spoon remove the avocado flesh.  Carefully combine the beans, avocado and dressing.  Top with the mint.

Now I know I have given you a Brazilian Cheese Bread Recipe before - but I was not 100% happy with it - so here is another try - this time it is a recipe I got from a Thermomix Cookbook - I think it's title was Travelling with Thermomix - there were recipes from all over the world in there.

I again used whole tapioca for the recipe - this gives the bread a slightly crunchy testure - which is not bad - the authentic bread uses tapioca starch and next time I will try that - it gives a smoother sponge like texture to the bread.


Brazilian Cheese Bread

150g Gruyere Cheese * I used Gouda
200g milk
100g canola oil
1 tsp salt
250g tapioca starch
2 eggs

Grate the cheese for 10 seconds on speed 9.  Set aside.

Add the milk, oil, and salt into the TM bowl - cook for 5 minutes at 90 degrees on speed 1.

Add the tapioca starch, mix for 20 seconds on speed 6.

Remove the bowl from the stand and set aside to cool for 10 minutes.  Scrape down the bowl, making sure you get the mixture form the bottom of the bowl.

Add the eggs and cheese, and knead for 2 minutes.

Allow the mixture to rest - I actually rested mine for quite a while as I wanted to pop them into the oven at the last minute.

Lightly spray mini muffin tins with spray olive oil.  Place small amounts into the prepared muffin tins.

Bake at 180 degrees for 10-15 minutes, or until golden.


Steamed Asian Style Salmon

You know what I love most about my Thermomix?

It's the fact that I can make gorgeous healthy, gourmet meals in next to no time, and with very little effort.  Our meal the other night was a case in point.

I guess you have figured out by now that we love our salmon here at this house.  Trouble is that the flavours that we like are not always what "The Darlings" will eat.  Steamed parcels of salmon give you the perfect opportunity to have different flavours, but with no more effort.


For us it was Asian Style Steamed Salmon.  This recipe is one that I used to make quite a lot when I was demonstrating how to cook seafood for our local fish shop.  You can wrap up the parcels and cook them in a pan, on the BBQ, or even place them in the oven.  I decided to make a meal in one - cook the rice in the Thermomix bowl, and steam the fish in the varoma.  Too easy!!


Asian Style Steamed Salmon

Serves 4

4 fresh eschalots
4 cm piece ginger
2-4 red chillies, seeds removed
2 cloves garlic
2 stalks lemongrass
1 tbs light soy sauce
1/3 cup coconut milk
1/3 cup coriander
1 tsp brown sugar

Now all the above ingredients need to be chopped - how you do it is up to you - by hand - in the food processor - me, I did mine in the Thermomix - just a few seconds on speed 7.

To make the parcels what you need to do is lay out two pieces of foil - in a cross formation.  That way you can wrap the first piece around the fish, then use the second to fully seal the package.

So place your foil on the bench, place a small amount of the coconut mixture on the foil.  Top with a piece of salmon, then place a little more coconut mixture on top of the fish.  Wrap up your parcel quickly (before the coconut milk tries to escape!)  Repeat with remaining fish and sauce.

Place the salmon packages in your desired cooking utensil - mine - the varoma!!

As you need liquid in the varoma to "steam" the fish - why not cook your rice instead!!!  Tonight I wanted to have coconut rice with the salmon.

Coconut Rice

400g Jasmine Rice
900g liquid - I used the remainder of the coconut milk, and made up the difference with water.
1/3 cup desiccated coconut

Rinse the rice to remove excess starch.  Place the water, coconut milk, and coconut in the TM bowl.  Place the rice in the basket.  Insert the basket into the TM bowl.  Cook for 30 minutes at Varoma temperature on speed 2.


So while Thermie does all the work for you - sit back and have a glass of wine!!  He will sound his bell when dinner is ready!


Garnish the salmon with cherry tomatoes and coriander.


"The Darlings" love Teriyaki Salmon - so I wrapped up their parcels accordingly.


There you have it - two easy meals - cooked with very little effort, and hardly and mess either!!!  You have just got to love that!

PS - don't think it is all love for the Thermomix - there are things about it that I don't love - but that's a whole other blog!!!

Friday, April 8, 2011

Spicy Mexican Bake

This was such a hit at our house the other night - they were all asking for more!!!!

It kind of defies definition - but for want of a better description it is kind of like a "Mexican Lasagne" - if there is such a thing!?!  I am not sure where I picked up this recipe - it has been in my collection for a very long time.  Don't be scared by the term spicy - it is just that there are several spices in the mix - you can alter the amounts to your personal preference.  As I was serving "The Darlings" I went easy on the chilli powder - but feel free to use more.


Spicy Mexican Bake

Serves 6

1 onion, finely diced
4 cloves garlic, crushed
1 red capsicum, seeds removed, diced
1 kg beef mince
1/2 tsp chilli powder
2 tsp ground cumin
2 tsp dried oregano powder
2 tbs tomato paste
2 cans (400g each) crushed tomatoes
1 can (400g) kidney beans, drained and rinsed
6-8 flour tortillas
250g low fat ricotta cheese
1 1/2 cups grated cheese

Sour cream, avocado, salsa, chopped tomatoes and chopped shallots to serve.

Heat a small amount of oil in a large frypan.  Add the onions and garlic, cook stirring for 2-3 minutes, or until starting to soften.  Add the capsicum and continue cooking for another 2-3 minutes, or until the vegetables and softened.  Add the mince and cook over high heat, breaking up the meat, until it is browned.

Add the spices, tomato paste and tomatoes.  Season well, and simmer for 25-30 minutes.  Stir through the kidney beans.

Preheat oven to 180C.

Lightly grease a large rectangular baking dish.  Place some of the meat onto a tortilla.  Roll up, and place seam side down in the baking dish.  Repeat, making sure you reserve enough mince mixture to place over the top of all the tortillas.

In a bowl mix together the ricotta cheese, and 1/2 cup of the grated cheese.  Season well with salt and pepper.

Spread the ricotta mixture over the tortillas.


Top with the reserved mince mixture.  Sprinkle with grated cheese.


Bake for 20-25 minutes, or until the cheese has melted, and is golden brown.

Serve topped with a dollop of sour cream, avocado slices, chopped tomatoes, and chopped shallots, and salsa to taste.


I guarantee they will be begging for more of this one!!!!