WELCOME TO MY KITCHEN


WELCOME TO MY KITCHEN!!
I hope you enjoy the food!!!
Showing posts with label Cake. Show all posts

Tuesday, December 27, 2011

Christmas Ham and Dessert

OMG!

A friend told me yesterday that she doesn't glaze her Christmas ham!!! Has never had a glazed ham in fact! How can this be? I would never dream of an unglazed ham - an unglazed ham seems almost naked in my mind.  If there is one thing that typifies Christmas to me, it is that lovely, sweetly glazed ham. So moist, and sweet, and the smell of if it the oven just makes my mouth salivate. So to think of Christmas with a ham straight out of the fridge - well it just seems Un-christmas to me!

I know that last year I gave you my recipe for the best ham glaze ever, but just in case you weren't around last year, here it is again, and also a photo so you will see just how lovely our ham looked on the big day!

I really think I got it right this year. Slowly basted it, every 15 minutes or so. Did not add the chopped macadamias until the ham was nice and sticky - that way they didn't all end up in the bottom of the pan, going to waste!

The Best Ham Glaze Ever!!


1 x 365g jar of ginger, lemon and lime marmalade (I used Buderim brand)
2 tbs sweet chili sauce
2/2 cup of brown sugar
2 tbs Dijon mustard
100g chopped roasted salted macadamia nuts


Preheat oven to 150C.

Position oven shelf to lowest position in the oven.

Use a large disposable roasting pan.  Line with 2 sheets of baking paper.  Remove the rind from the ham.

Use a sharp knife to score the ham fat into a diamond pattern.  Make sure that you don't cut any deeper than about 5mm.  Place the ham into the roasting pan.


Combine the marmalade, sweet chilli sauce, brown sugar, and Dijon mustard in a bowl.

Baste the ham with a thin layer of the glaze. You want to build up the layers of sweet goodness - so take it slow, and baste frequently. Once you have a good amount of stickiness, start adding small amounts of the chopped macadamias.

Total baking time will be around 1 - 1/2 hours, don't go too long though, or you may dry out the ham.

Cover and allow to rest while you make the other components of your Christmas feast!


How lovely does that ham look???

Of course that was just one component of the meal.  Roast pork and roasted vegetables sat alongside that magnificent ham!

For dessert I decided to do a tropical version of my dacquoise.  Same base - used white chocolate instead of dark, and used different fruit.  This one had sliced fresh mango, passionfruit, chopped white chocolate and some of the chopped salted macadamias from the ham!!  To add a little zing I added dollops of home made lemon butter to the middle layer along with the whipped cream!


The dacquois certainly is a great little dessert to add to your repertoire - very versatile.  You can make the "meringue" the day before, and assemble it several hours ahead of time (this allows the meringue to soften with the cream).  Change the chocolate, change the fruit, and you have a totally new dessert!!!

I like to think of the dacquoise as the "sophisticated pavlova!!"


So there you have snippets from our Christmas dinner.  I hope you all had a lovely day with your family and friends, and most of all I hope you all had good food!!!

Wednesday, August 17, 2011

A Flourless Chocolate Cake with a Twist!

A good friend of mine recently had a birthday, and joined "Club 50!"  In honour of this auspicious occasion I decided to try something a little different.  In a recent edition of Good Taste Magazine (The Italy Edition) there was a recipe for a Torta Caprese al Limone.  It looked fabulous - however when push came to shove I didn't think I was going to be able to produce this cake in the limited amount of time that I had to make it in!

I searched through cookbooks to try and find something similar that I could produce in the given time (it was almost like a MasterChef time challenge really!!)  I found 3 different recipes - all slightly different from each other.   Mmmm what was I to do??? What any aspiring cook would do - combine all the elements that I liked into one cake, that I could produce in the time frame given!!!

Here is my take.


Torta Caprese al Limone

250g white chocolate, broken into pieces
250g almonds
250g sugar
rind from 2 lemons (yellow part only)
150g butter, at room temperature
1 tsp vanilla extract
6 eggs
1 tsp baking powder

Lightly grease, and line base of a springform pan with baking paper.

Preheat oven to 180 degrees (non fan).

Place the chocolate into the TM bowl and grate for 6 seconds on speed 8.  Set aside.

Place the almonds in the TM bowl and mill for 4 seconds on speed 6.  Add to the chocolate.

Place the sugar and lemon peel in the TM bowl and mill for 20 seconds on speed 9.

Add the butter, eggs, vanilla, and baking powder to the bowl and mix for 20 seconds on speed 7.

Add the chocolate and almond mixture and mix for 30 seconds on speed 6.

Put mixture into the prepared cake pan.  Bake in preheated oven for 50-60 minutes, or until a skewer when inserted in the middle comes out clean (it is ok to have a little bit of moisture on the skewer - this means the cake won't be too dry!)

Well I made the time challenge (almost!!) - I had to dash out, and wasn't 100% convinced the cake was cooked - so I turned the oven off and left the oven door ajar.  Did it turn out OK?

As they say - the proof of the pudding is in the eating!!!


This cake was delicious - and will definitely be on my "make again list" - in fact  Mr. CCC has a birthday coming up and I just may make this one again for him  (if he behaves himself that is!!)

So Dear Readers tell me - do you often experiment and combine several recipes to make a new one - and are you successful?

Just as a post script - and for those that are following - Buster has made incredible inroads - yesterday I managed to get him to walk 2 metres (6 feet) or more!!!!!  Mind you I was holding one of his favourite treats in front of his nose - but how else do you do it???  I may need to seek employment in dog rehabilitation after this!!!!!

Wednesday, April 13, 2011

Raspberry Bliss Cake

Many years ago a friend commented that there was a particular cake shop that made a particular cake that she liked.  Me being me, decided to investigate said cake, and attempt my version of it.  Now I have never tasted the original cake - but only gazed longingly at it, and based on her description - this is what I came up with.  I have made this recipe many times over the years - and it is always a winner!!

That was however, to change this time!!  Now I know that I sing high praises of the Thermomix - I love it in oh so many ways - but this time it failed me dismally.  I only had to beat egg whites - it can't be that hard - Thermie has huge beating power - should be a walk in the park.  Now I know that you will probably tell me that perhaps I had a speck of yellow in the whites - or the bowl was not clean - or....?  But I swear I did everything right.  I even looked up in the Thermomix Cookbook how to beat egg whites - and here is where I think it's a little weird.  They actually wanted you to beat the egg whites, and have the temperature set at 50 degrees (strange??)  Look - new machine - I will do as instructed.  Dismal failure!!! I ended up with a warm white soupy mixture.

Tossed that out - looked on google for a solution - and yes several other people have said 50 degrees is too much - lower the temperature to 37.  Another 4 eggs - and I am still not happy with the mix - but I'm going to run out of eggs at this rate (particularly seeing as Mr. CCC had just come to make his breakfast!!)  The whites were fluffy - but just not as fluffy as I have had them previously.  So read the recipe - I don't think I will advocate using the thermomix other than for the chopping of the nuts and chocolate, and the whipping of the cream.  Please, if any of you out there have experience with this let me know the secret.


Raspberry Bliss Cake

4 egg whites
1 tsp white vinegar
200g sugar
50g ground roasted hazelnuts
100g white chocolate, finely chopped

To decorate
whipped cream
2cups frozen or fresh raspberries
grated dark chocolate

Preheat oven to 150 degrees.

Grease, and line with baking paper 2 x 18cm springform pans.  Grease the paper lightly.

Beat the egg whites with the vinegar until soft peaks form, then gradually add the sugar, beating well after each addition, until the mixture is thick and shiny.  Gently fold in the chocolate and hazelnuts.

Pour the mixture into the prepared pans.  Bake in the oven for 30-40 minutes, or until they are hard.  Turn off the oven, leaving the door slightly open, allow the meringues to cool in the oven.

Lightly dust serving plate with icing sugar.  Place one meringue cake on the icing sugared plate.

Top with whipped cream that has been flavoured with vanilla and sugar.  Top the cream with raspberries.  Place second meringue on top of the cream and berries.  Top the cake with more whipped cream and decorate with raspberries and grated dark chocolate.


This cake can be enjoyed either served straight away - the texture will be more crunchy - or you can assemble ahead of time - and allow the cream to soften the meringue - either way it is a delicious cake.  A real stunner - and always a favourite.


As an aside -  I am entering this as my post for the CookBook Challenge.


This fortnight's theme is eggs - being Easter I am sure there will be many talented people out there making all forms of chocolate eggs.  I say based on all the eggs I used for this cake - this is my take on the "egg theme".  Now I have to come up with a way to use all of those yolks!!!


Thursday, April 7, 2011

Torta Caprese (Flourless Chocolate Cake)


The theme for this fortnight's Cookbook Challenge was "Celebration".  So what defines a celebration?  Does it have to be an actual event?  Can it simply be the Celebration of Food?  Can it be the Celebration that it is Friday?

Well I pondered on this one for quite some time - and really didn't come up with an answer.  I am therefore going to enter two entries as my Celebration theme.  One is the recipe that I made last week Barramundi with Asian Broth and Sweet Potato Mash - as that simply was a Celebration of Tastes!! The other recipe is for Torta Caprese as I made this for a friend's Birthday - so that is an actual Celebration!!

This is the first time that I have made a flourless Chocolate cake in the Thermomix - let me tell you it was so easy.


Torta Caprese
(Flourless Almond Cake)
From Thermomix EDC Cookbook

250g dark chocolate, broken into pieces
250g almonds
250g sugar (I used caster)
150g butter, at room temperature
6 eggs
1 tbs baking powder
1 tbs cocoa powder

Topping

100g dark chocolate, broken into pieces
80g cream

Preheat oven to 180C (non fan)

Grease, and line the base of a 22-24cm springform pan with baking paper.

Place the chocolate into the TM bowl and grate for 5-10 seconds on speed 8.  Set aside

Place the almonds in the TM bowl and mill for 4-6 seconds on speed 6.  Add to the chocolate.

Place the remaining ingredients into the TM bowl and mix for 20 seconds on speed 7.

Add the chocolate and almonds and continue to mix for 30 seconds on speed 6.

Place the mixture into the prepared pan.  Bake for approximately 1 hour.

Allow to site in baking pan for 5-10 minutes, then remove, and place on a rack to cool.

Once the cake has cooled it is time to make the frosting.

Place the chocolate into the TM bowl and grate for 5 seconds on speed 8.

Add the cream and cook for 2 minutes at 50 degrees on speed 3.

Cover the cake with the topping, allowing it to run down the sides.


Serve with whipped cream that has had a small amount of caste sugar and vanilla added to it.


There you have a cake worthy of a 50th Birthday Celebration!!!!  Happy Birthday Jan!!!


As I had to take this somewhere I had a hard time trying to keep a piece from the marauding hordes so I could take a photo - sorry!!!


Monday, November 22, 2010

Devil's Food Cake and Afghan Cookies

A while back I did a post on old recipes and recipe books.  In it I talked about my first recipe collection - the Women's Weekly Recipe Boxed Card Set - well I ventured back into that box this weekend and made my old favourite - the Devils Food Cake.  This was a cake that I made many a time for my poor unsuspecting family.  If you read my post the other day about reading the method in recipes you will understand more.  In those days I didn't even read the method - thought I knew it all - I had watched Mum a million times - it's just a cake!!  How hard can it be???  There were several successes and just as many, if not more failures.  Fortunately as time progressed my intuition got better.

I flinch now just thinking about some of the things I inflicted on my poor unsuspecting family - Junior MasterChef I was not!!

So this was a trip back down memory lane.......


Devils Food Cake

2 1/3 cusp self raising flour
1 3/4 cups castor sugar
1 tsp bi-carb soda
155g butter (at room temperature)
2/3cup cocoa 1 cup water
1 tsp vanilla extract
3 eggs

250ml thickened cream
1 tsp vanilla extract
2 tbs icing sugar

Chocolate Icing **
250g chocolate
2 cups icing sugar
50g butter
2-4 tbs milk

Preheat oven to 180C.  Grease and line with baking paper 2 x 20cm round cake tins.

Sift dry ingredients into the large bowl of an electric mixer.  Add butter, water and vanilla.  Beat on medium speed for 3 minutes.  Add the eggs, and increase the speed slightly, and beat for a further 3 minutes.

Divide mixture between the two pans.


Bake in oven for 35-40 minutes, or until a skewer inserted in the middle comes out clean.

Allow to cool in pans for 5 minutes, then turn out onto a rack to cool completely.

When completely cold whip the cream, adding the icing sugar and vanilla once you start getting soft peaks.  Continue whipping until you get stiff peaks.

Sandwich the two layers together with the whipped cream.

To make the chocolate icing - put the chocolate and the butter in a double pan, and gently heat, stirring constantly until the chocolate and the butter have melted.  Remove from the heat.  Add half of the icing sugar, and tablespoon at a time of the milk.  Beat until smooth - until you have added all the icing sugar.  Only add enough milk to make a smooth spreading consistency.

Top the cake with the chocolate icing.


** I made more than is needed for the cake because I also made Afghan Cookies.  I don't know what got into me - perhaps my body was being channelled with the ghost of Betty Crocker??


Here is a little bit of trivia for you.  There is no actual Betty Crocker!  Apparently back in the 1920's the Washburn Crosby Company (one of the six big milling companies that merged into General Mills) were receiving so many requests for answers to baking questions that they invented the personna "Betty Crocker".  Crocker from the last name of of a retired company executive  and "Betty" because they thought it sounded "warm and friendly".  Betty's signature came from a female secretary who won a competition - and it is still the same signature used today!!

Here you see the many "faces" of Betty Crocker over the years!!
They changed Betty's face many times over the years to reflect general appeal - she became more "professional" in the 80's and even acquired some "ethnic" appeal in the late 1990's.  Oh to be Betty!!!  All without plastic surgery too!!!  I hope I look as good as Betty when I am 90!

PS In case you are wondering Sara Lee is a real person!!!

Anyway, I digress..... yesterday was a very busy day in my kitchen - for reasons I know not why!!!


When I recently posted about my cornflake cookies - the lovely Lorraine - from Not Quite Nigella reminded me about a recipe that she had recently posted called Afghan Cookies.  Now looking back at her post I see that mine do not bear much resemblance to hers.  Not sure why - but as they say the "proof is in the pudding".  So hence I made double of the icing mixture above to put on the cookies.

Here is Lorraine's recipe, including her icing, for

Afghan Cookies


Makes approximately 24 cookies

170g butter, softened to room temperature
1/2 cup brown sugar
1 1/2 cups plain flour
3 tbs cocoa
1/2 tsp baking powder
2 cups crushed cornflakes

Icing

3 tbs water
3 tbs caster sugar
3 tbs (45g) butter
1 1/2 cups icing sugar
3 tbs cocoa powder
walnut halves to decorate

Preheat the oven to 180C.

Line 2 baking sheets with baking paper.

Cream the butter and the sugar until light and fluffy.  Sift the dry ingredients on top of this mixture, and mix together.  The batter will be quite lumpy.  Knead in the cornflakes, gathering a ball of the mix.  Shape approximately soup spoon amounts of the mixture into balls.  Place the balls onto the prepared pans.  Flatten them slightly.  They won't spread too much.


Bake for 12-14 minutes (if cooking time is too short, they will be too delicate to set.)  Cool on the baking trays.

Icing

Gently heat the water, caster sugar and butter until the butter is melted and simmer for 1 minute to form a syrup.  Sift the icing sugar and cocoa.

While constantly whisking with a balloon whisk, pour the syrup onto the sifted icing sugar and cocoa.  Add some hot water to thin out the icing, if needed.  You want the icing thick enough to hold it's shape and not run, but not thick enough so that any spoon marks hold (oops - mine was too thick!! - should have made Lorraine's icing!!).

Using a teaspoon place some icing on the centre of the cookie and then add a walnut half in the centre of each.  Allow to set.


Mine do not look anywhere near as lovely as Lorraine's - but they taste good - and they have "The Darlings" seal of approval!!!  That's good enough for me!  They also have a big thick slab of chocolate icing on top!!! Yum.

Betty Crocker info from Centre for History and New Media.

Thursday, November 11, 2010

Lemon Yoghurt Syrup Cake

It seems I am not the only person who takes to baking when the weather turns inclement.  Several of my readers apparently did the same thing when Sydney's Spring weather turned sour last weekend.

On Monday while I was at the gym we got to  talking while doing the "plank" (as you do) about what we had eaten/made over the weekend - hey, you gotta do something to get your mind off the world of pain you are in while holding that "plank" for 2 minutes!!

As it turned out my gym buddy had made a Lemon Yoghurt Syrup cake that she had found the recipe for recently in the  Sydney Morning Herald.

As I trawled the internet this week looking for inspiration - what should I find on the Cuisine website - but this self same cake.  It must be fate - surely this is a sign that I must make this cake.

As luck would have it one of my good friends turned 50 this week - now I had a reason to make a cake (like I really needed one!!) I would make this cake for her and take it along to tennis to share will all our friends (have you noticed how all of us food bloggers love to cook, then have to find some way of distributing the food around, so that we don't actually eat it all ourselves!!!)


Lemon Yoghurt Syrup Cake
Printed in Sydney Morning Herald 20/10/10
Chef: Caroline Velik

125g butter, softened
250g (1 cup) castor sugar
2 large eggs
1 cup greek yoghurt
1 tsp pure vanilla extract
zest of 2 lemons
3tbs lemon juice
400g (2 cups) self raising flour
1/2 tsp bi-carb soda

Syrup
1 cup castor sugar
1 cup water
4tbs lemon juice
2 lemons, finely sliced

Preheat oven to 180C.

Cream butter and sugar in an electric mixer until light and fluffy.  Add eggs, one at a time and continue to mix until combined.  Add yoghurt, vanilla, lemon zest and juice and mix.  Add flour and bi-carb soda and gently fold through.

Put mixture in cake tin and smooth surface.  The mixture will be quite firm.  Bake for 45 minutes, or until cake is cooked through.

Meanwhile, make syrup.  Combine sugar, water and lemon juice in a small saucepan and cook over low heat to dissolve the sugar.  Add lemon slices and simmer for 10 minutes, to soften the lemon.  Set aside.

When cake is cooked, remove from the oven and poke all over with a bamboo skewer, to make lots of small holes.


Slowly pour the lemon syrup over the hot cake until all absorbed.


Place the lemon slices decoratively over the top.


Allow to cool, then remove from the tin.


I would have taken a photo of the lovely moist inside - but I thought it was a tad rude to take a "cut" cake - and it was so popular that there was none left!!!

This would make a lovely dessert cake - it is not overly sweet - but serve it with some vanilla ice cream, or whipped cream and you have a winner!!  It reminded me a lot of the lemon delicious pudding my mum used to make - lovely and moist in the middle with all the syrup!

Not sure if the tennis actually achieved anything today as the cake piled back on whatever I was hoping to burn up!  Oh well back to the gym for another recipe swap tomorrow!!

So Dear Readers what do you talk about when you are out exercising - is it food?????

Wednesday, August 11, 2010

Marble Cake with Chocolate Frosting

Yesterday I conducted my own little scientific experiment.  Could you substitute gram for gram a butter replacement for butter?  What I wanted to do was replace butter with Rice Bran Oil Spread.  Why you ask?  Well this spread is made from pure rice bran oil, it has a similar taste to butter, but has half the amount of saturated fat!!  It also contains no cholesterol.  In addition to that it contains oryzanol, which anecdotally has been said to help reduce cholesterol absorption.  So, if replacing butter gram for gram with a replacement works, why not use it more often - we can all do with reducing our saturated fat intake.

So Dear Readers, did the experiment work?  Well the proof is in the pudding, or should I say cake!!

Looks like a cake, smells like a cake, and most importantly tastes like a cake!!!

So here is the recipe for a cake with half the saturated fat of a regular cake!!

Marble Cake with Chocolate Frosting


200g Rice Bran Oil Spread (butter)
1 cup caster sugar
1 tsp vanilla extract
3 eggs
1 cup self raising flour
1 cup plain flour
2-3 drops pink food colouring
1 tbs cocoa powder, sifted


Frosting
100g soft butter
2 cups icing sugar mixture
1 tbs cocoa
2 tbs milk


Preheat oven to 180C (non fan) Lightly grease a square (I used 23 cm base measurements pan) cake pan with melted butter, line with baking paper.


Using an electric mixer beat the rice bran oil spread, sugar and vanilla in a medium bowl until pale and creamy.  Add the eggs, beating well after each addition, until well combined.  Sift together the flours.  Reserve 2 tbs of the milk.  Fold half of the flour mixture into the "butter" mixture, and then half of the milk.  Repeat with the remaining flour and milk.  Mix until well combined.


Divide the cake batter evenly among 3 bowls.  Add a few drops of pink food colouring to one bowl, mix well.  Combine the cocoa powder with the reserved milk and add to another portion.  Combine well.


Place alternate spoonfuls of the 3 mixes into the prepared cake tin, tapping the base on a flat surface to settle the mixture.  Use a skewer to gently swirl the batters together to create a marble effect.  Tap the base of the pan on a flat surface again to smooth the surface.  Bake in the oven for approximately 40 minutes, or until the a skewer inserted in the centre comes out clean.  Remove from the oven, and set aside in the pan for 5 minutes.  Turn out onto a cake rack to cool completely before icing.


To make the frosting, place the butter in the bowl of an electric mixer and beat until creamy.  Sift over the combined icing sugar and cocoa powder, beat until well combined.  Add the milk and beat until fluffy.


You will note that I didn't replace the butter in the frosting - I didn't think the consistency of the rice bran oil spread would lend itself too well to the frosting - but be my guest and give it a try.  Let me know how you fare!!!


So Dear Readers, please share with us if you have had similar experiments that have worked out - we would would love to hear from you.

Monday, June 21, 2010

Banana, Berry, Nut Bread

When I was quite young my grandmother gave me a book called "A Book for Kids" by C.J. Dennis - in it there was a poem that I still can rememmber to this day called The Circus.

"Hey, there! Hoop-La! The Circus is in town!
Have you seen the elephant?
Have you seen the clown?
Have you seen the dappled horse gallop round the ring?....."

C.J. Dennis lived from 1876 - 1938.  It was a very different circus that he wrote about compared to the one that we saw on Saturday night.

What would Mr. Dennis say if he could see a circus now??

Would he be amazed at the Wheel of Death, where "The Brazil Brothers" walked, skipped, and ran high up in the big top on a "wheel" that rotated - or would he gaze in wonder at the Globe of Death - where 4 motorcyclists whizzed around in a space that was barely big enough for one rider, let alone 4!!  The only animal acts that you will see in the circus these days will be the Shetland ponies (with the old dude - who has probably been around since C.J. Dennis' time - guiding them around the ring).  This act by the way was voted by "The Darlings" as the "gayest" act of the night!!!  Yes, it's a very different circus now!

So what does this have to do with food you say????

Absolutely nothing!!!  But it's my blog, and I am allowed to indulge in a little whimsy every now and again aren't I?  I can't just sit here and type out recipes for you every day - we need a little entertainment don't we?

Enought of that then you say - we want food!

This is a lovely cake that I "tweaked" the recipe to yesterday.


Banana, Berry, Nut Bread


150g butter, softened
1 cup brown sugar (firmly packed)
2 eggs
2 ripe (approx 1 cup) bananas, peeled (dah!!), and mashed
2 cups self raising flour
1 teaspoon baking powder
1/2 cup buttermilk *
1/2 cup fresh or frozen berries **
50g slivered almonds  ***


Preheat the oven to 180 degrees C (not fan forced).  Grease the base and sides of a 7cm deep, 11cm x 21cm loaf tin (I actually used a 5cm deep, 23x 17cm tin - it's all that I had - you choose!).  Line with baking paper, allowing an overhang on the ends.


Using an electric mixer, cream the butter and sugar until it is pale.  Add the eggs, one at a time, beating well after each egg has been added.  


Remove from the mixer stand - the rest is by hand!!  Stir in the banana.  Sift the flour and baking powder over the banana mixture.  Add the milk, and stir with a spoon until just combined.


Carefully fold in the berries and the nuts.  If you are using frozen raspberries mix them with a very small amount of flour to prevent them from sinking in the mixture.  


Spoon the mixture into the prepared pan.  Smooth the surface.  Bake for 45-50 minutes, or until a skewer inserted into the centre comes out clean.


Cool in the pan for 10 minutes, then invert onto a wire rack to cool completely.


* I used buttermilk purely because I had some left in the fridge - and buttermilk is great when used in baking as it works with the self raising flour, or baking soda creating aeration, resulting in great tasting, light fluffy baking.  Saying that if you don't have any - just use regular milk.


**  I used Cranberries as I still had some left over from Christmas in the freezer - but you can use either raspberries or cranberries.  Don't use dried cranberries though as you will not get the same result!!  I thawed the berries slightly before adding to the mixture. 


*** I didn't actually measure - just used what was left over in a bag!!  


The cake can be cut into slices and individually wrapped in plastic wrap and frozen in an airtight container for up to 4 weeks!  Perfect for school lunches!!  Or as a Dear Deader suggested today, heated up in the microwave and served with ice cream for dessert!

That kept "The Darlings" and the neighbour kid quiet yesterday afternoon.  I am quietly told that I cook better than his Mum!!  Told him perhaps I better give her my blog address!!!

Saturday, June 12, 2010

Finnish Buttermilk Cake

My mother sent this recipe to me more than 20 years ago, when I was living in the United States, and since then whenever I have needed to make a cake quickly, this is the recipe I turn to.  If you have been following the blogs lately, and have some leftover Buttermilk this recipe will help to use it up.  There are really only a couple of ingredients that you may not have on hand, but once you see how easy this recipe is to prepare, you will keep them stocked in the pantry and you will be able to prepare this cake anytime you need a sweet treat fix!!


Finnish Buttermilk Cake

2 1/2 cups plain flour
1 1/2 cups caster sugar
1 1/2 teaspoons bicarb soda
1 teaspoon baking powder
1/4 teaspoon salt
1 teaspoon ground cinnamon
1/2 teaspoon ground cloves
the grated rind of one orange
125g butter, melted
1 3/4 cups buttermilk

Preheat oven to 180 degrees C.  Grease a 23cm deep ring tin, or bundt tin.  The bundt tin certainly helps to make this cake seem more impressive!!!  Dust with approximately one tablespoon of sugar (this gives the cake a lovely crunchy sweet topping).

Sift the flour and other dry ingredients into a large bowl.  Make a well in the centre.  Pour in the orange rind, butter and buttermilk.  Stir the liquid in gradually, drawing in the flour until the batter is combined and smooth.

Pour into the prepared tin and bake for 1 hour, or until a fine skewer comes out clean.  Turn the cake out onto a wire rack and leave to cool.

Dust with icing sugar.  Great served with whipped cream or ice cream as a dessert, or simply by itself, depends on wicked you are feeling!!


I'm feeling "saintly" - no ice cream this time!!  Perhaps tomorrow night!!

I guarantee you, that once you try this recipe it will become one of your firm favourites.  It is always a hit whenever I take it anywhere.  Just don't tell anyone how easy it is to make - let them be suitably impressed with your baking skills!!!

Saturday, June 5, 2010

Salmon Fillet wrapped in Prosciutto with Herby Lentils


It was a cold, miserable day yesterday and I was glad when I was finally in for the afternoon.   All sport had been cancelled!!  Hooray!! I now had more time to make a beautiful dinner, rather than whip something onto the table when we arrived home at 7:30.

I have been hankering for a piece of salmon for ages - so tonight was the night!!  Unfortunately the price of salmon seems to be rising higher and higher these days - which means that it makes quite an expensive dinner for us all.  "The Darlings" just love their salmon - and before I had even sat at the table they had "vacuumed" it from their plates and were giving me that "Oliver Twist" look.  If they thought I was parting with mine they had another think coming!!

This is a lovely, fresh healthy meal.  To accompany the salmon and lentils I served my usual standby - "smashed potatoes".  If you are serving the potatoes with your dish you will need to get them in the oven a good 20-25 minutes before the salmon.


Salmon Fillet wrapped in Prosciutto with Herby Lentils


Serves 4


300g lentils (I used Brown lentils)
4 x salmon fillets (use the tail - no bones!!)
8 sliced of prosciutto
olive oil
juice of 1 lemon
2 good handfuls of mixed herbs (I used flat leaf parsley, mint and basil)
150g baby spinach
200ml natural yoghurt
salt and freshly ground black pepper


Preheat the oven to 220 degrees C.


Rinse the lentils under running water, then place in a medium sized saucepan, and cover with water.  Bring to the boil, and simmer for 15-20 minutes, or until tender.


Season the salmon fillets with a little freshly ground black pepper, then wrap with the prosciutto (or if you have large pieces of salmon - just lay the prosciutto on top of the flesh).  Lay the fillets on a baking tray that has been lined with foil.  Spray with a little garlic olive oil spray.  Roast in the oven for 5-10 minutes, depending on how you like your salmon.  If you like it a little pink in the middle only cook it for around 5 minutes.


Season the yoghurt with a little lemon juice, salt and freshly ground pepper.


Drain the water from the lentils, season with salt and freshly ground black pepper.  Add the lemon juice and approximately 1 tablespoon of olive oil (to taste - I don't like to much!).  Just before serving, over a high heat, stir in the herbs and spinach, until wilted.


Smashed Potatoes


New potatoes (with skin on) 2-3 per person
Garlic olive oil spray
Parmesan cheese


Boil the potatoes, until tender.  Drain.


Line a baking tray with baking paper - lightly spray with the garlic olive oil spray.  Smash the potatoes roughly on the tray.  Spray with the garlic spray - bake for 20-25 minutes or until they start to turn golden.  Top with a small amount of parmesan cheese and bake for a further 5 - 10 minutes.


So after all that, does anyone have room for dessert - I know "The Darlings" do!!
As I had some Buttermilk left from the chicken earlier in the week I trawled the internet looking for a recipe that would use up both my bananas (that were starting to head past their use by date) and the leftover Buttermilk.

Here is what I came up with.


Banana and Buttermilk Cake


100g butter, softened
3/4 cup light brown sugar, firmly packed
1 large egg
2-3 bananas, mashed (about 3/4 cup)
1/4 cup buttermilk
1 tsp vanilla extract
1 1/2 cups plain flour
1 1/2 tsp baking powder
1/2 tsp bi-carb soda
1 tsp ground cinnamon
1/8 tsp ground cloves
1/8 tsp ground nutmeg


Preheat the oven to 180 degrees C.


Grease and flour a 19cm square cake tin.


In the large bowl of an electric mixer, cream the butter and brown sugar.  Beat in the egg, vanilla and mashed banana.  Sift remaining dry ingredients together, and add to the banana mixture, mix until just combined.


Spread into the prepared pan.  Bake for 25-30 minutes, or until a skewer inserted into the middle comes out clean.


Dust with icing sugar, serve with either whipped cream or vanilla ice cream.

By now, who cares about the weather outside - we are warm and our bellies are full!

Sunday, May 30, 2010

Honey Glazed Pork with Roasted Pear & Fennel and Raspberry Cake for Dessert!

Last night I used my favourite cut of meat again - the pork scotch fillet!!

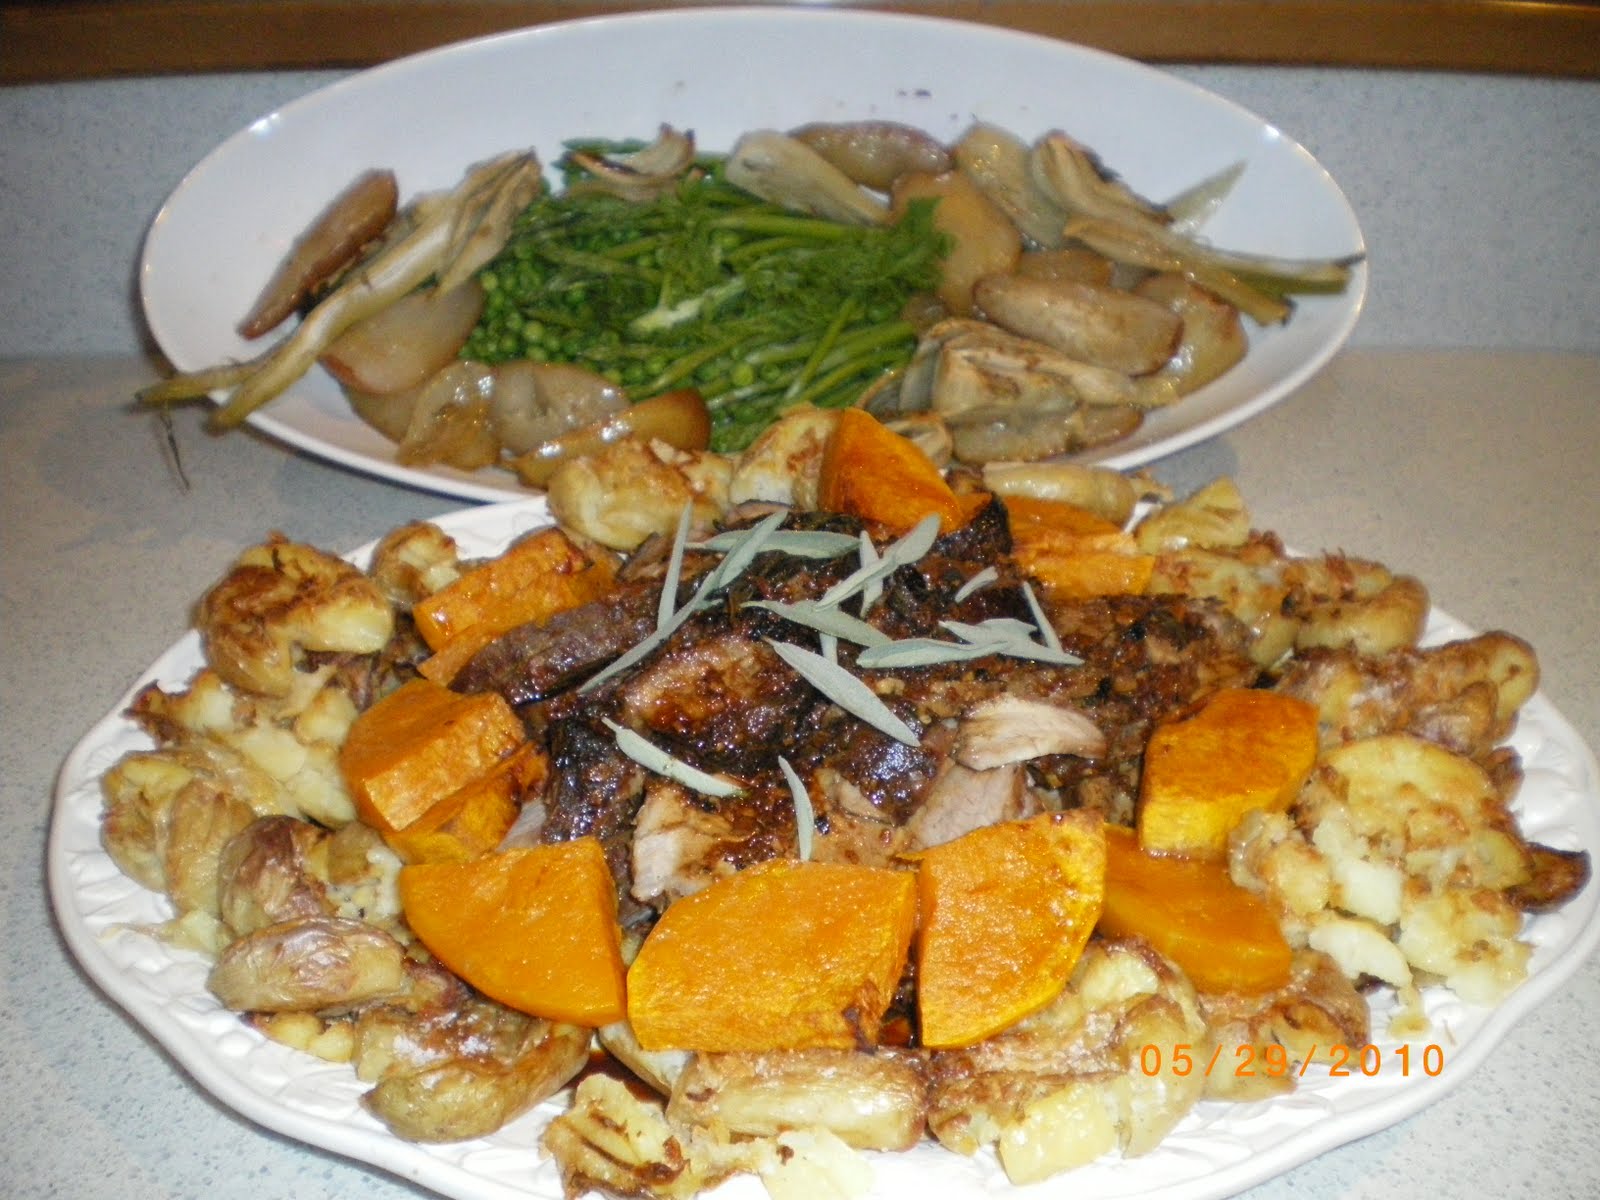
Tonight it was baked with a honey soy marinade and teamed with roasted pear and fennel, pumpkin, and some "smashed" potatoes.  We had a feast fit for a king!!  The piece of pork I used was approximately 1.9kg and cost around $15 - when you consider that we fed 7 people with it last night - it worked out a very economical meal.

Honey Soy Glaze

1/2 cup of honey
3 tbs soy sauce
3 cloves crushed garlic
2 knobs of ginger finely chopped (a knob is approximately the size of the bottom joint on your thumb)

approximately 15 sage leaves (these you add during the last hour of cooking onto the top of the pork)

A really great way to marinade any kind of meat is to place all the marinade ingredients into a large ziploc bag.  This was a tip I picked up on a Jamie Oliver show years ago - and you know it is one of the best tips I have heard.  You can "knead" the marinade into the meat really easily and - the best part is you throw it away when you are finished!

So I let the pork marinade for around 5 hours - but if you are short of time 1 hour will do.  Longer is obviously better.

It was then placed it into an oven that had been preheated to 160 degrees C and it was roasted for 2 hours.  Make sure you baste and turn it frequently - approximately every 30 minutes - this ensures even browning.

Now during this first hour is the time to get all your veggies ready.  Tonight the major accompaniment was to be fennel and pear.  I trimmed the fennel of the bushy green parts (you can use this as garnish if you like) - cut the bottoms and remove the hard outer part.  Then cut each one into 4 pieces.  The pear was quartered, and the core removed.  I coated the pear and fennel in a splash of olive oil then put them onto a baking tray with a small amount of the marinade.


Our other side dish was to be "smashed potatoes" - now this is a great favourite with "the darlings".  I simply boil new potatoes until tender (with the skin on) - drain and then place on a baking tray that has been lined with baking paper - then "smash" them and coat them liberally with garlic olive oil spray.

Tonight pumpkin was added to all the other vegetables to be roasted.

Once the pork has been in the oven for an hour, it is time to add all your other vegetables.

As you are putting all the vegetables into the oven place the sage leaves on top of the pork.

When the pork is cooked to your liking it needs to rest for 15 minutes before you cut it!

During this 15 minutes  - pour a small amount of honey over the pear and fennel just to glaze them and sprinkle your "smashed" potatoes with a small amount of grated parmesan cheese and season to taste with salt.  Bake for a further 15 minutes.

You may like to add some greenery to the meal - we had baby asparagus and peas.

The result....


mmmm doesn't that look good?


They all said YES!!!

But wait, there's more..... we still had room for dessert!!


Raspberry Bundt Cake

1 1/2 cup fresh or frozen raspberries
3 cups plain flour
3 tsp baking powder
1/2 tsp salt
2 cups caster sugar
1 cup vegetable oil
1/4 cup cranberry juice
1 tbs vanilla extract
4 eggs, lightly beaten
1 cup slivered almonds

Preheat the oven to 160 degrees (not fan forced)

Grease and lightly flour the bundt pan.

Sift together the flour, baking powder, and salt - set aside.

In a large bowl combine the sugar, oil, cranberry juice, vanilla and eggs.  Beat well until smooth.

On a plate lightly sprinkle the raspberries with a small amount of flour (this prevents them from sinking in the cake!)

With a large metal spoon stir the flour into the sugar and egg mixture.  Gently fold in the raspberries and the almonds.

Pour into the prepared pan and bake for 60-70 minutes - or until a skewer inserted into the cake comes out clean.

Let the cake cool for 10 minutes in the pan then turn out onto a rack to cool completely.

This is a fairly dense cake - it reminded me a lot of steamed puddings that my mum used to made when I was young.

With a scoop of vanilla ice cream the night was finished on a sweet note.


So Dear Readers did you enjoy dinner at our house tonight???  There is nothing better in life than sharing good food with friends is there?

Sunday, May 9, 2010

Osso Bucco & Torta Caprese

Saturdays can be quite hectic in this house - sport is often late in the afternoon - lunch is after sport and then what to do about dinner?? This week I got it sorted! I prepared the Osso Bucco in the morning, covered it with foil and put it in the fridge for cooking when we got home. Too easy!!! I then got to relax and smell the beautiful aromas of dinner cooking, while having a glass of wine by the fire! This would also be a great meal to pop in the oven as you are leaving for an evening of sports training - all cooked when you walk back in the door!

Osso Bucco

Olive oil
2 x onions, chopped
2 x carrots, finely chopped
3 x celery sticks, finely chopped
2 cloves crushed garlic
3 x 4cm long pieces of lemon rind (use a vegetable peeler, being careful not to get any white pith) remaining rind to be used in the gremolata
several springs fresh thyme and rosemary (approximately 4-5 each see photo)
3 dried bay leaves
1/4 cup plain flour
8-9 pieces of osso bucco
1 cup white wine
1 cup chicken stock
400g can diced tomatoes


Gremolata
Shredded basil leaves
remainder of lemon rind, finely grated
salt, freshly ground black pepper

If you are making this to eat straight away - preheat the oven to 160 degrees C.

In a large frying pan heat a little olive oil. Cook the onion, carrot, celery and garlic until softened. Stir in the strips of lemon rind. Transfer this mixture to a large 3.5L casserole dish - a large flat type is best.

Place the flour on a large plate, season with salt and pepper. Add the veal pieces to the flour, coat, shake off excess flour. Heat a small amount of olive oil in the frying pan over medium high heat. Cook the veal pieces for approximately 3 minutes each side - or until they are lightly browned. Transfer to a plate while cooking the remaining pieces. You may need to add a little more oil each time you cook a new batch - make sure to reheat the pan each time.

Arrange the browned pieces of veal on top of the vegetables in the casserole dish.

Add the wine to the frying pan, making sure you scrape any browned bits from the bottom of the pan (these add to the flavour!) Cook for about 1 minute. Add the stock and the tomato. Bring the mixture to the boil. Pour this mixture over the veal, making sure that the meat is covered with liquid. If not, add a little more stock. Cover the pan tightly with foil.

At this point you can put the dish in the fridge for later cooking, or you may like to even freeze for later use. Before putting the dish in the oven make sure you let the pan sit out of the fridge for about an hour before putting in the oven. If you have frozen the dish, thaw overnight in the fridge, reheat - then bake.

Bake for 2 1/2 hours, or until the veal is very tender. Set aside for 10 minutes to rest after cooked.

To make the gremolata, mix together the shredded basil and lemon rind, season to taste with salt and freshly ground pepper.

Serve the Osso Bucco on top of Creamy Polenta, topped with a small amount of gremolata.

Creamy Polenta

3 cups chicken stock
1 cup polenta
300ml cream (I used light cooking cream)
50g butter
1/3 cup grated parmesan

Bring the chicken stock to the boil in a medium sized saucepan. Once boiling, add the polenta in a slow steady stream (do not add too quickly). Continue stirring the mixture for about 15-20 minutes (a balloon wisk works well for doing this), until the polenta is cooked and no longer crunchy. When cooked, add the butter, cream and the parmesan, to taste. I have found the best parmesan to use for this is the type that you can buy on the shelf in the pasta section of the supermarket. It doesn't go too sticky like the fresh type.

Now if you still have room after that here is dessert!!

Torta Caprese


210g pecans
180g 70% dark chocolate, broken into squares
4 eggs, separated
1 cup (220g) caster sugar
220g unsalted butter, melted, cooled
1 1/2 tsp vanilla extract (buy the best you can afford - it is worth it!)
Icing sugar to dust

Preheat the oven to 170 degrees C.

Place the pecans on a baking tray lined with baking paper, and roast for approximately 10 minutes. Keep an eye on them - they can burn quite quickly - check at 8 minutes to see how they are going. Cool down.

Grease and line the base and sides of a 24cm springform cake pan, then dust lightly with flour.

Place the pecans and chocolate in a food processor and grind them in short, sharp bursts until they are finely ground. Be careful not to grind it too much and turn it into a paste!! Set aside.

In a large bowl, beat the egg yolks and sugar with an electric beater for around 4 minutes, or until they are thick, creamy and pale. Gently mix in the cooled butter and vanilla. Now stir in the pecan mixture until thoroughly combined.

In a separate bowl (make sure it is dry and clean) whisk the egg whites with a pinch of salt until they are fluffy and hold their shape - do not make them overly stiff. Whisk 1/4 of the egg white mixture into the chocolate mixture, then gently fold the remaining egg whites in. Make sure the mix is thoroughly combined, but do not stir too much or you will loose the air in your whites!!

Pour the batter into the prepared cake pan, jiggle it to make sure it is settled evenly in the pan.

Bake for 40-50 minutes, or until the edges pull away from the pan and it feels firm when you place the palm of your hand on the surface and wobble it gently.

Cool the cake in the pan on a wire rack for 10 minutes, then carefully invert it onto a rack to cool completely.

To serve, dust with icing sugar. Serve with vanilla ice cream or whipped cream.

Did you enjoy your trip to Italy???