WELCOME TO MY KITCHEN


WELCOME TO MY KITCHEN!!
I hope you enjoy the food!!!
Showing posts with label Side Dishes. Show all posts

Saturday, February 4, 2012

Blackened Salmon with Corn Salsa

I know, I seem to have let the side down in regards to posting lately, but really, I have had serious technical issues with posting.  I still am none the wiser as to what is going on, or should I say what I am doing wrong, so I am going back to the old tried and true method of posting today.

As I am now on the countdown to my trip to Italy, I am starting to curb the carbs in an effort to try and loose a little weight before I head off on my eating trip!!  I figure loose it now, so that I have some room to gain it back - but looking at my itinerary I am secretly hoping that we are on the move so much that we will walk off all that we eat!!!  To say that I am getting a little excited is a little bit of an underestimation.  I had to drag myself off the internet searching out ways to maximise my experience while away - The Sistine Chapel at dawn, The Colosseum at Night - because you see I just have to fit these things around my walking/eating tour of Rome and then and walk and wine tour of Tuscany!!!  Sounds hard to take doesn't it?  I really shouldn't brag, but I feel that  this trip has been such a long time coming, and I really deserve it - I  have saved my pennies for several years, and yes it's a luxury few can do - but what the hell I'm doing it!!  I will post a direction to the blog that I will write while I am away for those of you that are interested in following my adventure!

So what was on the menu last night in light of this new diet?


Blackened Salmon with Corn Salsa
Adapted from recipe found on Taste.com.au

Serves 4

4 salmon fillets (tail pieces are best as they have no bones!)

1 tbs sweet paprika
2 tsp dried oregano leaves
2 tsp dried thyme leaves
1/2 tsp ground white pepper
1/2 tsp ground black pepper
1/4 tsp cayenne pepper (or to taste)
1/4 tsp salt

Corn Salsa

4 cobs corn
2 spring onions (green kind) cut into 4cm pieces
1/2 large green capsicum, cut into 5cm chunks
2-4 ripe tomatoes (depending on size), finely chopped
juice of 1/2 lemon
salt and freshly ground black pepper

Place the paprika, oregano, thyme, peppers and salt in the Thermomix bowl.  Grind on speed 9 for 20 seconds.  Scrape down the bowl and repeat until you have a finely textured powder.  Place the spice mixture on a large plate until required.

Meanwhile to make the corn salsa.   Remove the corn kernels from the cobs by using a sharp knife, and running it lengthways down the cob.  Cook the kernels in a large saucepan of boiling salted water for 2 minutes.  Refresh under cold water, and drain well.

Place the green onions in the TM bowl, pulse on turbo twice for 2 seconds each.  Scrape down the bowl.  Add the capsicum pieces.  Pulse on turbo 2-3 times, for 2 seconds each, until you have a rough chop.  Place the mixture in a large bowl.  If there are any large pieces left, return them to the bowl and pulse once more.  If the mixture is too "liquidy", remove the excess liquid.

Add the corn and diced tomato to the capsicum mixture.  Add the lemon juice and salt and pepper and mix well.

To cook the salmon, firstly coat both sides of the salmon in the spice mixture.  Preheat a large frypan to high heat.  Add a little olive oil, and then place the salmon skin side down first.  Cook for 3-4 minutes, or until the skin is crispy.  Turn over and cook for an additional 3-4 minutes, or until cooked to your liking.  Remember that salmon is at it's best if slightly rare in the middle!!!

Place the corn salsa on the plates, then top with a salmon fillet. If you are not on a low carb diet you may wish to include some smashed roasted potatoes.


Wow, this was a lovely fresh dinner.  I ate so much of the corn salsa - but I still managed to have the scales reading in the right direction this morning!

I will endeavour to post as often as I can, but I am only eating vegies, vegies vegies at the moment so the posts may not be too exciting!!!!  Its all in the name of the carb fest that is to come soon!!!

Saturday, December 3, 2011

A Birthday Feast!

My good friend Madam T had been left high and dry by her hubby for her birthday. Sometimes the ones we love just don't realize that even after many years together we still appreciate a little bit of love and attention on our birthiday.

After I found out that she had been stood up, and had to cancel out her reservation for dinner at Marque Restaurant, I knew I had better come up with something pretty decent for her birthday feast.

A thousand menus started rolling through my brain. I was really starting to stress myself out with this meal. I mean I am no Mark Best! Saying that though, all I could do was do my "best".  I had mentioned to her something about salmon, so when I asked her in a moment of sheer panic "what do you want?" her reply was I thought we were having salmon? Ok, focus, just pick something, and go with it!

For starters I chose a simple dip.

Roasted beetroot hummus with dukkah. This of course was a little risky, because as Thermomix consultants we make hummus pretty much on a weekly basis, if not almost daily!! So you often can be a little tired of the sight of it. My version though was a beautiful pink colour, and of course hard to resist.

Roasted Beetroot Hommus

1 large Beetroot, roasted at 200 degrees for 30-40 minutes, or until tender
1 clove garlic
1 can chick peas, drained
Juice of 1 lemon
Salt and freshly ground black pepper to taste
2 tbs tahini

Place the garlic in the TM process on speed 7 for 3 seconds. Add remaining. Ingredients and process on speed 6 for 10 seconds, or until the texture is to your liking.

Sprinkle with some dukkah, and voila, a beautiful pink dip!


So now onto the main. We are supposed to be in summer now, but I think that someone in the weather department has forgotten to set the thermostat to summer heat! Unfortunately I had decided to have a cool salad type meal, too late now - it will just have to do.


Baked Salmon with Tahini and Herb Salad
From Delicious Magazine, December/January edition

Serves 3-4

Side of salmon, skinned and pin boned (mine was approx 600g)
1 tbs extra virgin olive oil
1 tbs tahini
1/2 cup thick Greek style yoghurt
1 tbs lemon juice
2 tsp sumac
2 preserved lemon quarters, flesh and pith removed and discarded, rind finely chopped
1 bunch coriander, leaves finely chopped
1 bunch flat leaf parsley, leaves finely chopped
50g toasted pine nuts

Preheat oven to 140 degrees. Line a large baking tray with baking paper. Place the salmon on the tray, sprinkle with the olive oil. Season well with sea salt and freshly ground black pepper. Bake for 20 minutes. Remove from the oven, cool completely.

Meanwhile, combine yoghurt, tahini, lemon juice and 1 tsp sumac, and season well with salt and freshly ground black pepper.

In a separate bowl, combine the preserved lemon, herbs, pine nuts, and the remaining 1 teaspoon of sumac together.


To serve place the fish on a large platter, spread the yoghurt and tahini mixture over the fish, and then scatter the herb mixture over the top of the yoghurt mixture.

So now what to serve with that - the recipe suggested roasted potatoes, but on the next page of the magazine there was a recipe for quail with a broad bean and tomato salad it looked really nice, so I decided to pair it with the salmon.

Broad Bean and Tomato Salad


400g tomato medley
1 clove garlic, crushed
1 tbs olive oil
1/2 red onion, finely sliced
1 tbs honey
1/2 tsp ground cumin
1/4 tsp ground cinnamon
200g broad beans, prodded, blanched, refreshed
1 bunch miniature asparagus

Preheat the oven to 200 degrees. Line a baking trade with baking paper. Place the tomatoes, garlic and onion, and asparagus on the tray, drizzle with the honey and oil. Scatter with the spices, then roast for 30 minutes, or until the tomatoes have softened. Allow to cool. Toss the cooled roasted tomato mixture with the broad beans. Season.


Arrange the vegetable salad around the fish.


But wait, there's more.....

I wake up every morning and read my emails, and drool over the latest food porn awaiting me in my mail box (via Food Buzz). One particular morning this led me to a food blog called Manu's Menu. What a lovely site. It certainly got my interest, because as you know I am heading off to Italy next year, and here on her blog Manu had some lovely Italian cuisine.  One recipe that caught my eye was one for Foccacia di Recco.  Manu went on to say that the foccacia that we usually eat (the fluffy kind) is not traditional. Her photos convinced me that I had to try this type of Foccacia - and let me tell you after eating her version - I am converted. It was absolutely delicious!  Oops - I forgot to take a photo - but Manu has some lovely photos on her site!

I urge you to visit her blog and try the recipe!!!

Right that was the main course over with - but it's a birthday, and what is a birthday without a sweet treat!!!

I had recently made some home made lemon curd, so I was keen to incorporate this somehow into a dessert.  Here is what eventuated!


Hazelnut and Chocolate Dacquois with Lemon Curd and Fresh Berries

4 egg whites
1 tsp white vinegar
200g caster sugar
50g hazelnuts, toasted, finely crushed
100g dark chocolate, finely grated

Vanilla Bean Whipped Cream
Lemon Curd
Blueberries
Strawberries

Preheat oven to 150 degrees.

Lightly grease and place baking paper in the base of muffin pan (with removable bases) or grease egg rings, and place on a baking tray.

Make sure that your bowl and blades are completely clean, or the egg whites will not whip up.

Place egg whites and vinegar in to the TM bowl (or electric mixer).  Whip until the egg whites have soft peaks.  Gradually add the sugar, beating well after each addition.  When the mixture is thick and shiny. gently fold in the nuts and chocolate.

Place the mixture into the prepared pans (rings).

Cook the meringue for 10-15 minutes, or until firm to the touch.  Allow to cool in the oven, with the door slightly ajar.

To serve slice the meringue in half horizontally, using 3 pieces for each dessert stack.

Place on section on serving plate, top with a dollop of whipped cream.  Place second meringue disc on top of the cream.  Place a dollop of lemon curd on the meringue, along with another dollop of whipped cream. Top with another meringue disc.  Top with a little whipped cream, and then add several blueberries.  Place some sliced strawberries and a dollop of whipped cream on the side.  Dust with a little icing sugar.


I am pretty sure, that even though this meal was not up to par with Marque, Madam T was pretty pleased with her birthday feast.  Happy Birthday my friend!!!

To team up with the birthday celebrations, I was lucky enough to receive this week, The Editor's Pick, Fantastic Foodie award!!!

Monday, November 28, 2011

Bouillabaisse in a Bag with Rouille

My loyal readers should know by now what a sucker I am for a gorgeous cookbook, especially one with drool worthy photos!!!

So it should come as no surprise when I tell you that when they recently offered a free copy of "Delicious Simply the Best Cookbook" when subscribing to Delicious Magazine - I said yes immediately!!!  I offer let my subscriptions lapse just so I can see what offers they will entice me with!!!  I have received many free cookbooks this way - a girl can never have too many, now can she???


The other day when the postman came and delivered my anxiously awaited parcel, let me tell you I had that envelope open before I had even left the letterbox!!!  My mouth was seriously salivating before going more than 20 pages into the book.  This book was full of serious food porn!!  Every page a beautiful full page photo - I couldn't wait to start cooking!!!

One of the first dishes that caught my attention was the one entitled Bouillabaisse in a Bag - my second love after food porn, is of course seafood!!!  This recipe looked right up my alley - and so simple too.  I ummed and aaghed  about how I was going to actually make it.  I did think about steaming it (in the varoma on my Thermomix) - but then decided as I already had the oven going making fresh bread I would just go ahead and cook it in the oven as the recipe suggested.  I did, however, make a couple of little alterations along the way (what did you expect?)


Bouillabaisse in a Bag
Adapted from Delicious Simply the Best Cookbook by Valli Little

Serves 3-4 (depending on how much you love seafood!!!)

12 green prawns, peeled, (tails intact, deveined
350g skinless, boneless white fish (I used Marlin)
350g skinless, boneless salmon fillet
12 mussels, scrubbed and beards removed
12 cherry tomatoes, halved (I used a tomato medley)
1 cup podded broad beans, blanched, and peeled
1 cup frozen baby peas
1 cup dill sprigs
4 cloves garlic, crushed
1 lemon, thinly sliced
1/2 cup (125ml) dry white wine
Extra virgin olive oil to drizzle


Preheat oven to 180 degrees.

To prepare the parcels lay out 2 sheets of foil for each package that you are making.  Place one sheet horizontally, and one piece vertically (you want them to form a cross).


Divide the seafood, tomatoes, beans, peas, 3/4 of the dill, and the lemon slices among the parcels.  Drizzle with the white wine and a little olive oil.  Seal the parcels, by gathering up the sides, and securing the tops well.  Add an additional layer of foil if necessary to ensure a tightly sealed package.


Place the parcels in the oven and bake for 10-15 minutes, or until the seafood is just cooked through and the vegetables are tender.

Now here is where I made another deviation to the recipe.  Valli suggested that you serve the dish with an aioli and boiled potatoes.

I decided that because I had lovely fresh bread that the potatoes were unnecessary, and I really didn't feel like an aioli, so instead I made a rouille.

What is a rouille you may ask??  A rouille (rhymes with bluey) is basically a mayonnaise type sauce, but with colour and texture.  The word rouille is french for rust - so it gets it's name from the deep red colour that the chillies and capsicum give to the mayo.  The textured part comes from breadcrumbs.  Typically it is used to enhance a bouillabaisse, but can also be served with roasted meats.  I am so glad I went with my gut instinct on this one - it was the perfect match for this dish!!!


Rouille
From Meat on The Menu, Thermomix Cookbook

70g stale breadcrumbs
60g water
200g roasted red capsicum, deseeded and peeled (approximately 2 capsicums)
1 long red chilli
1 clove garlic
1/2 tsp cayenne pepper
1 egg yolk
1 tbs lemon juice
sea salt to taste
60-80g extra virgin olive oil

Place the breadcrumbs into water in a small bowl and allow them to soak for several minutes.

Place the capsicum, chilli, garlic and cayenne pepper into the TM bowl, blend for 10 seconds on speed 7.  Scrape down the sides of the bowl.

Squeeze the excess moisture out of the bread using your hands.  Place the bread into the TM bowl along with the egg yolk, lemon juice and salt.  Blend for 10 seconds on speed 10.  Scrape down the sides of the bowl.

With the dial set to speed 4, add the oil to the reservoir, with the MC in place, and allow the oil to seep slowly into the TM bowl (taking approximately 2 minutes to add all the oil).

The mixture should be the consistency of a thin mayonnaise.

Note: you can make this in a food processor if you want.

To plate up the Bouillabaisse, gently empty the parcels into a wide, soup type plate.  Top with additional lemon slices, dill springs and a dollop of rouille.


Mmmmmm was this dish good!!!!  A slice of freshly baked bread comes in oh so handy, to mop up all the lovely garlicky, seafoody liquid in the bottom of the plate!!!


This was a lovely, tasty, easy dish to make - if you are having a dinner party and want to impress, this is one to try!!!  Why wait for a reason though - this is a good simple dish to try anytime!!!

So tell me Dear Readers are you addicted to food porn too???  Come on, don't be shy tell us all about it!!!

Saturday, September 24, 2011

Glazed Salmon with Simple Egg Noodle Salad with Peanut Dressing


Finally.... "The Darlings" have returned - and so has my camera cable - so better late than never - here are the photos....


Good intentions really do not count for much do they?

I have been meaning to post for days and days, but something always seems to get in the way.

Lifestyles change (you have one person away, then they come back, and another leaves, and then they come back and two more leave....) meals become different, and totally unblog worthy - and then finally you see some light at the end of the tunnel - you make a meal that is really good, and you hear the words - "make sure you put this on the make again list" - and you go to blog the meal, only to find that the last two evacuees from the home have taken your camera cable, and you are unable to download any photos!!!!! (can you hear me cursing from there???)

What can you do???  Take a deep breath, and just get on with it.

As I said life has been a little different of late.  Mr. CCC took himself off to New Zealand (on a blokey tour) to see the Rugby World Cup.  He came back, then "The One Who Can Never Be Filled" went off to camp.  He came back, and the same day "The Darlings" took off for a rugby tour of Japan.  Meanwhile I got to stay here and maintain the castle, as all good domestic goddesses do!!!  (Me thinks a trip is in the cards for me soon?!?!  You can only dream can't you?)

Yesterday was one of those days - off to the airport at the ungodly hour of 4 a.m. (makes for a very long day), then all the usual stuff - oh, and a Thermomix demo smack dab in the middle of the day too, just for good measure!!!  I'm sure I was totally brain dead at this point, but I did manage to pull it all off - not sure how how though.

Demo over, now what to make for dinner..... I picked up a couple of pieces of salmon hoping that I could make a reasonable meal with these and whatever I could find in the fridge and cupboard.  It did help of course that this week was the release date of all the new cooking magazines (there is a god!!) and I had a little inspiration in the way of Bill Granger's recipes in the latest edition of Delicious Magazine.

There was a lovely recipe for a simple Egg Noodle Salad with Peanut Dressing - looks perfect - have all the ingredients - will go brilliantly with my salmon!!!

So here is the meal that transpired!

First of all a simple glaze is in order for the Salmon - this is my usual standby when all else fails.


Easy Salmon Marinade

1/4 cup mirin
2 tbs cooking sake
1/4 cup light soy sauce
2 tbs caster sugar

Combine all ingredients in a large glass bowl.  Add salmon pieces and allow to marinate for at least 1 hour.

When ready to cook, heat a large frying pan over medium high heat.  Add a small amount of rice bran oil to the pan.  Place the salmon in the pan skin side down.  Cook for 3 minutes, or until the skin is crispy.  Turn over and cook for an additional 3 minutes, or until cooked to your liking.  During the last minute of cooking add some of the marinade to the pan and allow it to bubble up around the salmon pieces - this will give it a lovely golden glaze!!

Now onto the salad...

Simple Egg Noodle Salad with Peanut Dressing
Recipe by Bill Granger printed in Delicious Magazine, October Edition

Serves 4-6

400g medium-thick fresh egg noodles (I actually used dried)
1 1/2 tbs honey
2 tbs smooth peanut butter (I only had crunchy)
1 tbs lemon juice
1 tbs light olive oil (I used rice bran oil)
1 tbs sesame oil
2 tbs soy sauce (I used light soy)
1 tbs balsamic vinegar
1 carrot, finely julienned
1 red capsicum, seed removed, finely sliced
2/3 cup roasted peanuts, chopped (I used cashews)

Place the noodles in a large saucepan of boiling, lightly salted water and cook for 3-4 minutes or until just tender.  Drain well.

Whisk together the honey, peanut butter and lemon juice in a bowl, then gradually add in the oils, soy sauce and the vinegar.

To serve lightly toss the noodles, vegetables. and dressing in a large bowl.  Scatter with the chopped nuts.

Serve warm or cold.

This was truly a lovely salad, and yes, I will definitely be making it again.  It was made even more lovely with the addition of a splash of ketchap manis!!!

I also serve a few steamed snow peas with this dish just to add a little bit of colour.

My only regret now is that I cannot show you how lovely it all looked.... but stay tuned "The Darlings are due back in 11 days .... let's hope they don't lose my cable!!!  Photos will be downloaded then.

Today, I have spent the day cleaning out their rooms, I think a makeover is due while they are gone - tomorrow onto the painting (one of my pet hates let me tell you - but it is long overdue and might as well take advantage of them being gone!!). So dinner tonight... another throw together ..... we have some chicken, basil, chilli and coconut milk lurking in the kitchen - so a Thai inspired meal it seems to be!!!

So Dear Reader please excuse the lack of photos - but it is that or no post!!!  Blame "The Darlings"!!!!!  They will get an earful when we skype later!!!!!


Wednesday, September 14, 2011

Thai Style Pork Burgers with Pineapple Relish and Snow Pea and Mint Slaw

The other day I was at a real loss as to what to make for dinner.  So much so that I ventured into a supermarket that I don't usually buy at just to pick up their "freebie" recipe magazine for inspiration!! Thank goodness I did.  Sometimes picking up something different is like a breath of fresh air (and sometimes it isn't, as they all seem to just recycle the same ideas -but slightly differently!!  I have seen Rueben Sandwiches in two current magazines lately!!!)

Anyway I picked up Curtis Stone's "Feed Your Family" brochure.  In it were several ideas that I could quite happily have made - but the one that struck a cord was the Thai Style Burgers.  The little "reluctance motor" in my brain was working overtime (did you like how I slipped in the Thermomix theme?).  I am going to make these burgers, but I am going to make my own mince!!!  Why you ask??? Well 1) 'cos I can, and 2) I am sure that my mince is going to be so much better than what I can buy already pre packaged - I am going to use pork scotch fillet (which at $7.99 per kilo is cheaper too!!!).  So here is the meal that was - all food preparation was performed by my sous chef "Thermie".


Thai Style Pork Burgers with Pineapple Relish and Snow Pea and Mint Slaw
Adapted from recipe by Curtis Stone - Coles "Feed Your Family Brochure"

Serves 6

Burgers

1.2kg pork scotch fillet (or pork mince)
4 cloves garlic
3cm piece ginger, cut into slices
4 tsp fish sauce
4 tbs hoi sin sauce
1/2 tsp sesame oil

To make the mince - cube the scotch fillet into pieces and process in batches of 250g -300g each batch.  Place the meat in the TM bowl - set the dial to closed lid position and press Turbo 3-4 times, or until the meat has been minced to desired consistency.  Place in bowl and process remaining meat until all meat has been minced.

Place the ginger and garlic in TM bowl and process for 3 seconds on speed 7.

Place the ginger and garlic into the bowl with the mince and the add remaining ingredients.  Mix well.  With wet hands form the mixture into patties.  Place on a foil lined tray and place in the fridge until ready to cook.

Pineapple Relish

2 cups diced fresh pineapple, cut into 2cm cubes (approx 1/2 a pineapple)
1/4 cup sugar
1/4 cup rice wine vinegar
1/4 cup water
1 red chilli, seeded
2cm piece ginger, cut into slices

Place the ginger and chilli in the TM bowl and process for 3 seconds on speed 7.  Add the remaining ingredients to the TM bowl.  Cook for 25 minutes at 100 degrees on Reverse and speed soft - with the MC removed.  You want most of the liquid to have evaporated.  If there is still a lot of liquid cook for an additional 5-10 minutes.  Place the MC back on the lid and with the dial set to closed lid position press turbo 1-2 times, or until you have a chunky consistency.  Allow to cool.


Snow Pea and Mint Slaw

1 carrot, peeled and finely julienned
100g snow peas, ends and string removed, finely julienned
1/2 wombok, finely sliced
1 green shallot, finely chopped
1/4 cup fresh mint leaves, roughly torn
1/4 cup fresh coriander leaves, roughly chopped
3/4 cup finely diced fresh pineapple

Vinaigrette Dressing


1 tbs rice wine vinegar
zest and juice of 1 lime
2 tsp light soy sauce
1 tsp sesame oil
1 tsp sugar
salt and freshly ground black pepper

Place all ingredients in a small screw top jar and shake until sugar has dissolved.

Toss all the slaw ingredients in a large bowl.  Just before serving toss through the dressing.

To cook the burgers heat a large frying pan over medium high heat.  Add a small amount of olive oil to the pan and cook the patties for 4-5 minutes each side, or until browned and cooked through.  Allow to rest for a few minutes before serving.  You may also like to cook these on the BBQ - but be careful that they don't burn - the sweetness of the hoi sin sauce may over caramelise!

To serve place a mound of the slaw on the plate, a pork patty and a dollop of pineapple relish.  If you want to complete the picture add some fries!!!


This was a lovely take on the old burger - with beautiful fresh flavours.  The slaw, by adding a small amount of pineapple, really brought it all together nicely.  This would be a great meal to serve on a hot summer's evening.

Of course you can make this without using a Thermomix - simply use prepackaged mince, cook the pineapple relish on the stove, and then process in a food processor.


So as the weather is starting to show sings of changing is your menu changing too???  HAve you lightened up a "classic"?  Do tell.

Saturday, June 25, 2011

Spiced Lamb Free Form Pie with Dukkah and Yoghurt

Last night was a bit of a rush - I came in late, and a million things hit me head on that needed to be done - not the least of them was get a meal on the table to feed the starving "Darlings".

I did procrastinate a little on getting this started, but once I did it all came together quite quickly with the help of my kitchen helper "Thermie".

The recipe is my take on a recipe that I saw in the latest edition of Super Food Ideas - I of course added more meat, and kind of made it my way.....


Spiced Lamb Free Form Pie
Adapted from Super Food Ideas Magazine July Edition

Serves 6

1 1/2 cups plain flour
125 butter, chilled, cut into cubes
1/2 cup approx chilled water
1 zucchini, cut into cubes
150g sweet potato, cut into cubes
1 small bunch coriander
1 brown onion
2 cloves garlic
1 tsp paprika
1 tsp allspice
1kg lamb mince


Place the flour in the TM bowl.  Put on closed lid position and press Turbo once to "sift" the flour.  Add the butter and process on speed 4-5 until the ingredients look like breadcrumbs.  With the motor running, gradually add the water until the mixture comes together.

Knead on Interval setting for 1-2 minutes, or until the mixture is smooth.

Roll the pastry out between two sheets of baking paper until it is forms a rectangle approximately 30cm x 40cm.  Place on a baking sheet, and refrigerate for 30 minutes.

Place the zucchini in the TM bowl and process for 3 seconds on speed 7.  Place the zucchini in a strainer over the bowl, pushing out as much liquid as possible.

Place the sweet potato in the TM bowl, process for 3 seconds on speed 7.  Remove from bowl and set aside.

Place the onion, garlic and coriander in the TM bowl, process for 3 seconds on speed 7.  Scrape down sides of bowl and repeat if necessary.

Add the mince, the zucchini, sweet potato, allspice paprika and salt and pepper to taste to the onion mix in the TM bowl.

Mix the onion mixture with the spatula just enough to get a little of the meat mixture down the bottom of the bowl.

Set dial to closed lid position and and knead on interval setting for 2-3 minutes, or until all the ingredients are well combined.

Place the meat mixture in the middle of the pastry, and fold up the edges to make a rough free form pie shape.

Sprinkle the top of the pie with a small amount of dukkah.


Spray the pastry with olive oil spray.


Bake in an oven that has been preheat to 200 degrees C for approximately 1 hour, on until when a sharp knife inserted in the centre come out clean (ie no red juices flow out).

Dukkah
From EDC Thermomix Cookbook *

150gsesame seeds
100g hazelnuts & almonds (mixture)
25g cumin seeds
30g coriander seeds
1 tsp sea salt
1/2 tsp black peppercorns
1 tsp dried mint

Place the sesame seeds, hazelnuts, almonds, cumin and coriander seeds into the TM bowl and dry roast for 8 minutes at 100 degrees on speed 1.


Remove the lid and the bowl from the housing and allow to cool.

When all the ingredients are cool, add the salt and peppercorns and the mint.  Set dial to closed lid position and pulse 1-2 times on Turbo to form a coarse powder.

* I altered the amounts shown in the cookbook as I did have the full amounts in the cupboard.  This still made a lot of dukkah!!!

Yoghurt

200g greek style plain yoghurt
1/2 cup loosely packed mint leaves
1 tbs sweet chilli sauce
salt and pepper

Place the mint in the TM bowl, process for 3 seconds on speed 7.  Scrape down the side of the bowl.  Add the yoghurt, sweet chilli sauce and salt and pepper.  Mix on speed 3 for 3 seconds or until combined.

Serve the pie topped with additional dukkah and a dollop of yoghurt, and extra sweet chilli sauce to taste.


I know the photos are not that appealing - but they were ready to eat their arms off if I didn't get a meal to them - so it was plate and eat (or else!!!)

We all thought this meal was really good - and "The Darlings" even ate it all without complaining!!!  One of the them told me he knew there were vegetables in there - but it was OK because they were chopped up very small!!!

So all were happy - dinner was a little late getting to the table - but at least they all ate it!!!!

Wednesday, June 15, 2011

Prosciutto Steaks with Creamy Mushroom Sauce

This is one of those recipes that almost feels like it isn't a recipe at all.  Almost feels like cheating really, but saying that, it is published in this month's Good Food Magazine - so therefore it must be a recipe!!!

It is one of those meals that really is just "zooshing" up the "basics".  It is basically a steak and mash meal, with a lovely creamy mushroom sauce on the side.

Of course the Thermomix made it all so very simple.  I made the mash in there, and then made the sauce - but I will give you the recipe as printed in the magazine.


Prosciutto Steaks with Creamy Mushroom Sauce
From Good Food Magazine - June edition

Serves 4

600g sebago potatoes, peeled, chopped
1/4 cup skim milk
4 beef eye fillet steaks
4 slices prosciutto
2 tbs olive oil
1 tbs snipped chives

Mushroom Sauce
40g butter
1 tbs olive oil
500g mixed mushrooms, such as swiss brown, shitake, button
2 cloves garlic, crushed
1/2 cup white wine
2 tsp dijon mustard
1/2 cup reduced fat thickened cream

Place the potatoes in a microwave safe bowl.  Cover with plastic wrap.  Microwave at 100% for 4-5 minutes, or until tender.  Stand for 2 minutes.  Add the milk, and mash until smooth.  Season to taste with salt and freshly ground black pepper.

Meanwhile to make the sauce melt the butter and oil in a large frying pan on high.  Cook the mushrooms, stirring for 3-4 minutes, or until browned.  Add the garlic and cook, stirring, for 1 minutes, or until fragrant.  Add the wine and mustard and bring to the boil.  Reduce the heat to low and simmer for 2-3 minutes, or until reduced by half.  Stir in the cream.  Simmer, stirring, for 3-4 minutes, until sauce thickens slightly.  Season to taste.

Preheat a chargrill or BBQ on high.  Wrap the steak with the prosciutto slices.  Brush with a little oil.  Cook the steaks for 3-4 minutes each side, or until cooked to your liking.

Serve steak with the mash, mushroom sauce, and topped with the snipped chives.

As you can see I also served the steaks with my winter time favourite - brussels sprouts, panfried with a little prosciutto.


See ..... incredibly easy (made even easier with TM helping me!!).  It was just a great combination of flavours!!!  Often times it is the basics that produce the best results.  As it was steak - all the plates were literally licked clean at my house last night!!!  You can make all the fancy dishes in the world - but nothing beats a good steak in my books!!!

So Dear Readers what is your favourite - really fancy exotic meals, or the plain simple rustic meals - like good old steak and mash???/

Sunday, May 1, 2011

Italian Feast

Life has kind of gone back to normal now.

The long weekend is now a distant memory, the pupil free day is over, and they are all back at school again (breathe a big sigh of relief!!!)  Of course there was my birthday in there this week as well - so things have been quite topsy turvey here to say the least.  While I have been cooking as usual over the last few weeks, I just haven't had the time (or the concentration with everyone around) to blog.  So I guess I have lots to catch up on.  I take the photos, and file them away in a file, meaning to write about them, but the enthusiasm seems to wane, and well, before you know it I never wrote about them at all - and they become little lost "orphans" sitting in a file feeling very unloved.

This is the time of the month is when the new editions of several magazines hit the newsstands. The current edition of Good Taste Magazine features food from all over the world.  This meal is a trip to Italy.  (I always wanted to spend my 50th birthday in Italy, but somehow it never happend - a trip via food will have to do!)

While this looks like quite a lot to do, if you break it down it becomes quite simple.  The stew takes a couple of hours to cook - so you need to start that early.  The sides really don't take too long at all, just coordination.  Make sure that you start the bread once you have the stew under way, and you will have it all covered!


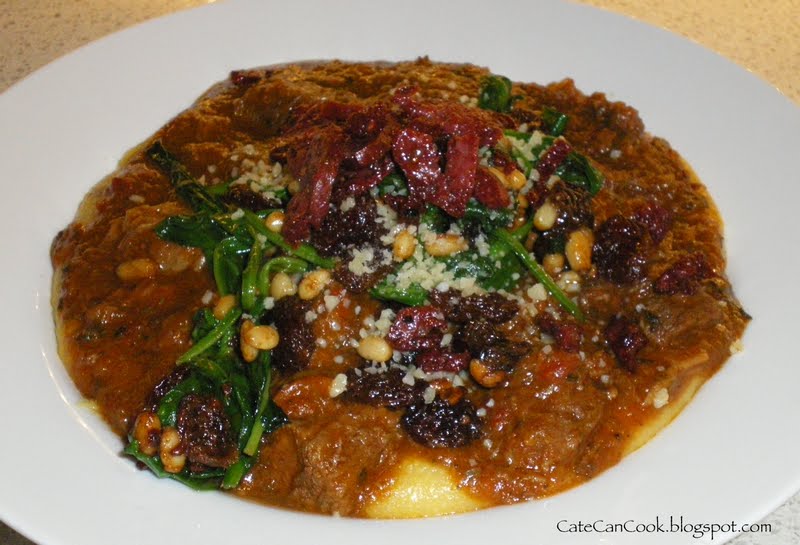
Spezzatino di Manzo (Italian Beef Stew)
From Good Taste Magazine May edition

Serves 6
1/2 cup plain flour
1.5kg beef chuck steak, cut into 5cm pieces
1/4 cup olive oil
100g pancetta, coarsely chopped *
2 carrots, peeled, finely chopped *
2 celery sticks, finely chopped *
1 brown onion, finely chopped *
2 cloves garlic, crushed *
1 cup dry white wine
400g diced tomatoes
1 1/2 cups beef stock
1 tbs chopped fresh rosemary
1 tbs chopped fresh sage
2tbs capers, rinsed, drained, chopped

Place the flour in a large plastic bag.  Season with salt and pepper.  Add the beef and shake to coat.  Heat 1 tbs of the olive oil in a large saucepan over medium high heat.  Add 1/3 of the beef and cook, stirring for 2-3 minutes, or until browned.  Transfer to a plate.  Repeat until all beef is cooked.

Add the pancetta, carrot, celery and garlic to the pan and cook stirring for 5 minutes or until browned.  Stir in the wine, and using a flat edged wooden spoon scrape the bottom of the pan to remove any bits stuck to the bottom of the pan.  Stir in the beef, tomato, stock, rosemary and sage.  Bring to the boil.  Reduce the heat to low.  Cover and simmer for 1 hour 20 minutes.  Uncover and simmer for 40 minutes, or until the beef is tender and the sauce is thick. Make sure you scrape the bottom of the pan regularly so that you don't get the sauce "stuck" on the bottom!

Stir in the capers and season to taste.  It is quite salty with the pancetta - so taste it before adding any more salt!!!

Serve with polenta and spinach on the side, and topped with the reserved pepperoni.


* I blitzed these items separately in the TM - put on closed lid position and pulsed the turbo button 2-3 times - this will ensure it is roughly chopped - not pureed!!!


Polenta con pepperoni (Polenta with Pepperoni)

Adapted From Good Taste Magazine May edition

Serves 6

4 cups chicken stock
1 cup polenta
30g butter
150g peperoni

Chop the pepperoni by placing in the TM bowl - put on closed lid position and press the turbo button 2-3 times.  This will give you nice and uneven chopping.   Remove from the bowl and place in a small frypan.  Pan fry the chopped pepperoni until crispy.  Remove and drain on a paper towel until needed.

Place the chicken stock in the TM bowl and cook for 10 minutes at 100 degrees on speed 1.

Add the polenta to the bowl and cook for 25-30 minutes at 100 degrees on speed 2.  Add the butter and half of the cooked pepperoni, and cook for another 2 minutes, or until well combined and the butter has melted through.

Spinach all Romana (Spinach with Raisins)
Adapted From Good Taste Magazine May edition

Serves 6

500g English Spinach
40g butter
1/2 cup raisins
2 tbs pine nuts
2 cloves grushed garlic

Heat the butter in a frypan over medium high heat.  Add the raisins, pine nuts, and garlic.  Cook for 5 minutes, or until the pine nuts are golden.


Add the spinach, and toss for 2-3 minutes, or until the spinach is wilted and hot.


We love our bread here - and recently while reading Not Quite Nigella she talked about visiting the Noosa Farmers Markets and showed an image of Stromboli Bread - says it was named after a volcano in Italy - and had a pocket of mozzarella cheese and garlic in the middle.  Sounds good to me!!

Here is my attempt - be warned it is not for the faint hearted - it contains serious garlic


Serious Garlic Bread

1-2 heads of fresh garlic
30g mozzarella cheese
520g bakers flour
2 tsp yeast
300ml warm water
1 tsp salt
1 tsp sugar

Preheat oven to 180 degrees.  Place the garlic heads on piece of foil.  Bake in the oven for 25 minutes, or until lovely and soft.  Allow to cool.  Once cool, gently squeeze the garlic from the skins.  Reserve.

Place the flour, yeast, water, salt, sugar, and 3/4 of the roasted garlic into the TM bowl.  Knead on interval setting for 4 minutes.  Remove from the bowl and place in a large bowl that has been lightly oiled.  Cover with cling wrap that has also been lightly oiled.  Place in a warm place and allow to rise for approximately 1 hour.

Punch down the dough and roughly shape into a large rectangle.  Down the centre of the dough place the reserved garlic (that has been roughly pureed) and the mozzarella cheese.  Fold the dough over to cover the cheese and garlic.

Lightly grease a tin and place the bread into the tin.  (At this stage I lightly sprinkled the top of the bread with a small amount of salt flakes).  Allow to rise again, in a warm place for approximately 30 minutes.

Cook in an oven that has been preheated to 200 degrees for 20-25 minutes, or until golden and sounding hollow when tapped.

After removing from the oven I sprayed lightly with olive oil spray just to give it a bit of a glisten!!!  This was serious garlic bread - if you love garlic - then you will love this!!!!  Be warned though - serious garlic breath!!!!


So while I didn't actually get to Italy for my birthday - I am still enjoying the food!!!


Sunday, April 10, 2011

Green Bean, Edamame and Avocado Salad and Brazilian Cheese Bread

Another accompaniment we had the other night with our ribs was a Green Bean and Edamame and Avocado Salad.  I have a bit of a thing about Edamame at the moment - I just love them - so when I saw this recipe I just knew I would have to try it.  I found the recipe in a New Zealand Magazine that was lent to me recently - I am not 100% sure but I think it was called Taste.  I copied several recipes out - but forgot to include the magazine title!

I have altered the recipe slightly - the original called for preserved lemons in the dressing, but as I was going for an asian theme I decided to leave them out.


Green Bean, Edamame and Avocado Salad
Adapted from Taste (New Zealand) December issue

Serves 6-8


400g green beans, stem end trimmed
2 cups edamame beans, podded
1 ripe avocado

Dressing
2 tbs finely chopped red onion
1/4 cup olive oil
2 tbs white wine vinegar
1 tsp honey
1 clove crushed garlic
1/4 tsp ground cumin
1/4 tsp paprika
1/4 cup roughly torn mint leaves
salt and freshly ground black pepper

Cook the beans in a saucepan of boiling salted water until just tender.  Remove the beans from the water and place in a bowl of chilled water.  Add the edamame beans to the oiling water and cook for 4-5 minutes.  Drain the edamame beans and refresh in chilled water.  Drain again, and dry both lots of beans well.

For the dressing soak the red onion in cold water for 10 minutes.  Drain, and squeeze dry in a clean tea towel.  Place the remaining ingredients in a screw top jar.  Add the chopped onion and season to taste with salt and pepper.

To assemble the salad place the beans in a large bowl.  Halve the avocado, remove the stone and thinly slice.  Using a spoon remove the avocado flesh.  Carefully combine the beans, avocado and dressing.  Top with the mint.

Now I know I have given you a Brazilian Cheese Bread Recipe before - but I was not 100% happy with it - so here is another try - this time it is a recipe I got from a Thermomix Cookbook - I think it's title was Travelling with Thermomix - there were recipes from all over the world in there.

I again used whole tapioca for the recipe - this gives the bread a slightly crunchy testure - which is not bad - the authentic bread uses tapioca starch and next time I will try that - it gives a smoother sponge like texture to the bread.


Brazilian Cheese Bread

150g Gruyere Cheese * I used Gouda
200g milk
100g canola oil
1 tsp salt
250g tapioca starch
2 eggs

Grate the cheese for 10 seconds on speed 9.  Set aside.

Add the milk, oil, and salt into the TM bowl - cook for 5 minutes at 90 degrees on speed 1.

Add the tapioca starch, mix for 20 seconds on speed 6.

Remove the bowl from the stand and set aside to cool for 10 minutes.  Scrape down the bowl, making sure you get the mixture form the bottom of the bowl.

Add the eggs and cheese, and knead for 2 minutes.

Allow the mixture to rest - I actually rested mine for quite a while as I wanted to pop them into the oven at the last minute.

Lightly spray mini muffin tins with spray olive oil.  Place small amounts into the prepared muffin tins.

Bake at 180 degrees for 10-15 minutes, or until golden.


Sunday, January 23, 2011

Fish and Two Tone Chips with Lemon Yoghurt Dressing

Still hanging in there, still eating healthily (oh my, how virtuous I am!!!).

Friday and the weekend are usually treat days, I allow myself a vino or two, but I am determined this week.  So no wine, let's splurge with the meals.

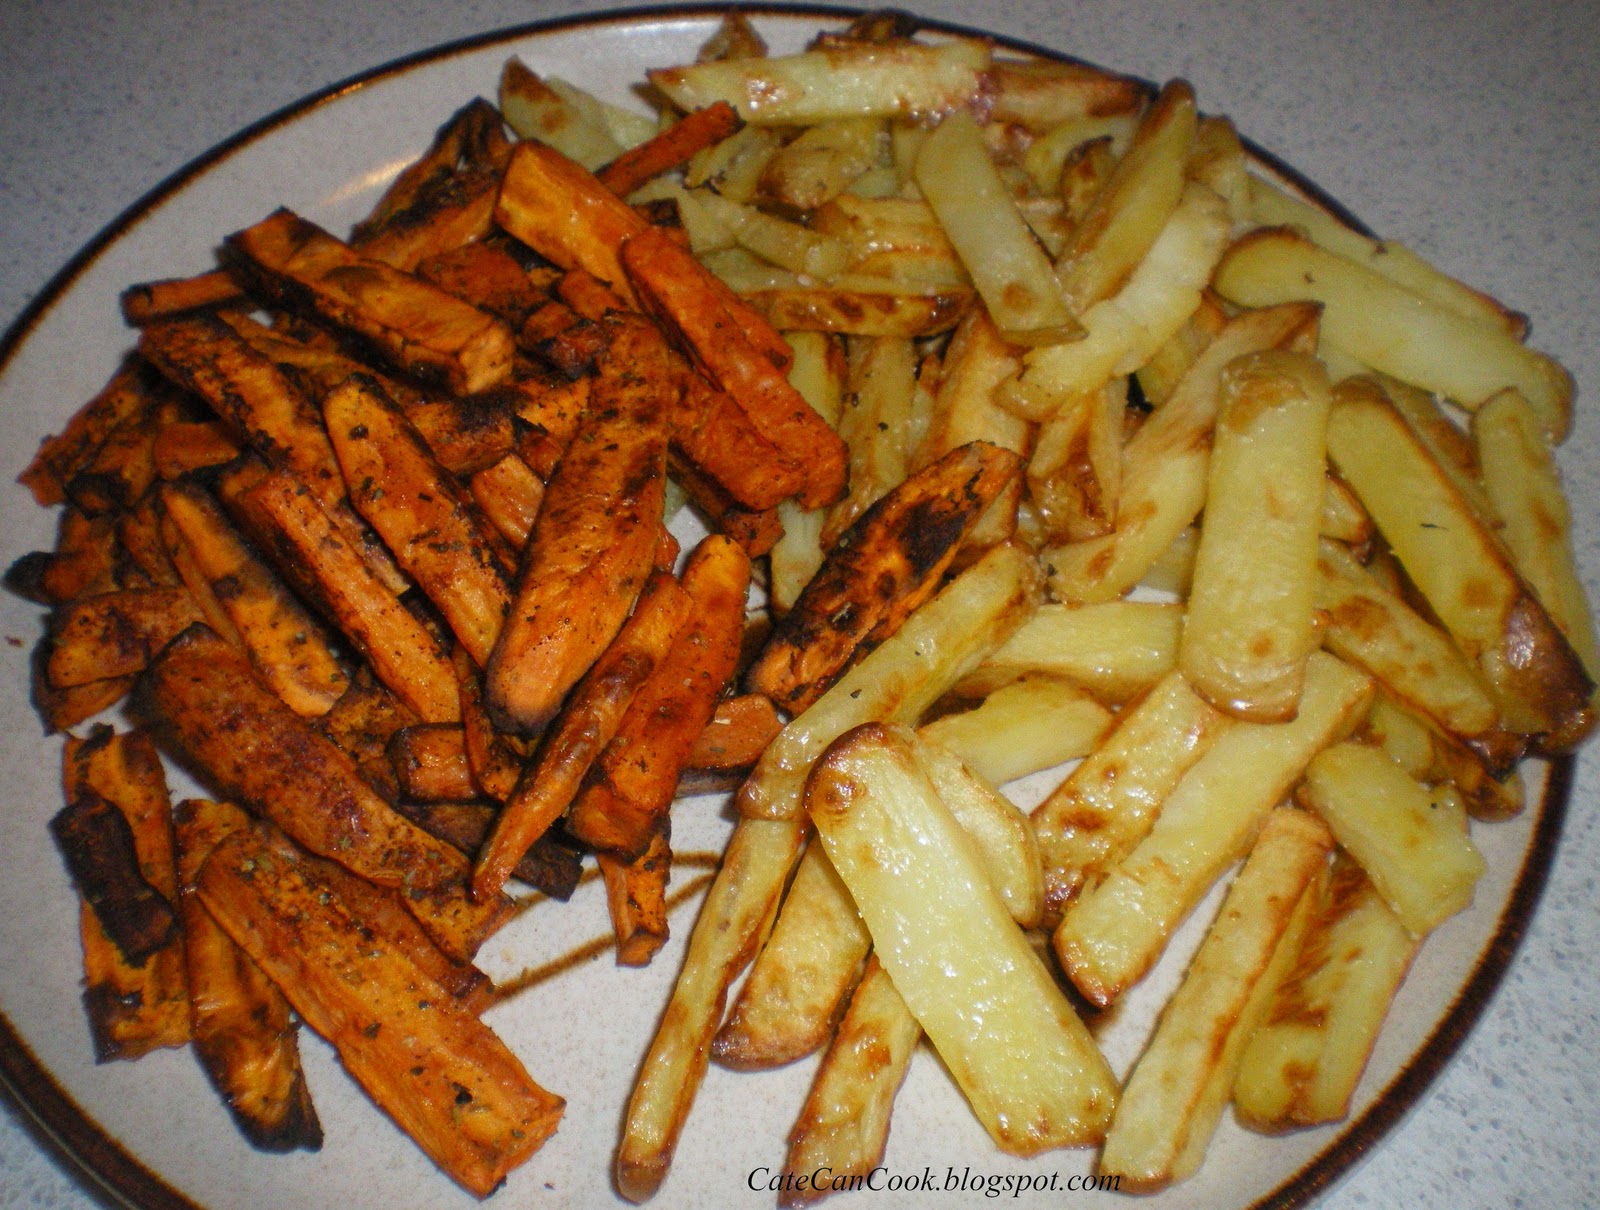
I had recently seen a recipe for sweet potato chips in the current edition of Good Taste Magazine, so I decided to go one step further (yes, you guessed the real reason - "The Darlings" wouldn't eat orange chips!!) - so I made two tone chips.  Here is my take on the recipe.


Fish and Two Tone Chips with Lemon Yoghurt Dressing
Serves 4 - 6
Adapted from Good Taste Magazine January Edition

700g sweet potato, peeled, cut into batons
700g potato, peeled, cut into batons
1tsp paprika
1 tsp dried oregano leaves
Garlic infused Olive oil spray
2/3 cup low fat natural yoghurt
1 tbs capers, rinsed, drained, chopped
1 tsp grated lemon zest *
1 tbs lemon juice *
2 tbs chopped chives

4-6 fish fillets (approx 150-200g each)
Ketchap Manis

Preheat the oven to 200C.  Line two baking trays with baking paper.

Steam the sweet potato and regular potato batons in a steamer.  I used the varoma and cooked them for 20 minutes at varoma temperature.  You want them to be just tender.  After they have been steamed, remove as much excess moisture from the chips as possible with paper towels.

Spray the baking paper with the garlic oil.  Place the regular potato chips on one tray.  On the second tray place the sweet potato chips, sprinkle these with the oregano and paprika.  Spray both lots with the garlic spray and bake for 15 minutes.  Toss the chips around, and bake for a further 15 minutes, or until lovely and golden.  Season with salt to taste.


In the meantime, combine the yoghurt, capers, lemon rind, lemon juice * I added slightly more than the recipe said as I like it nice and zesty!!, and parsely in a bowl.  Season with salt and pepper to taste.

Heat a frypan to medium high heat, add a little olive oil.  Cook the salmon pieces, skin side down first for approximately 5 minutes (this will depend on how thick your pieces are) if you are using tail pieces then do 3-4 minutes.  My pieces were quite thick to they too a bit longer).  Flip over and cook for the same time on the other side, or until cooked to your liking.  When they were almost cooked through I poured a little ketchap manis over the pieces just to give them a slightly sweet/salty flavour.  Be careful though - once you add this it will "caramelise" quite quickly in the frypan - so be prepared.  At this point you can either add a little water to stop the caramelisation and steam the fish slightly, or simply remove if it is cooked through.

Serve the fish with the two tone chips, a side serve of salad, and a dollop of the yoghurt dressing on top.


So you see it really wasn't that much of a treat - but it sure was nice.

How's that for gourmet fish and chips???  Can't go past salmon, can you?

Sunday, January 2, 2011

Ribs and all the fixin's

Yesterday was a lazy kind of day - figured why not have a lazy ole dinner out on the deck once the heat of the day had passed.

Ribs - sounded pretty good.  Yes, I know this recipe is quite a bit of work in the early part of the day - but at the end when all you want to do is sit back and relax with a cold beverage, they are easy peasy.

I have posted this recipe before - making the sauce on the stove top - but this time I am giving you the TM recipe for the sauce and all the fixin's that go along with the ribs - right down the the bread that was declared the"best garlic bread ever!"

Barbecue Sauce

Makes approx 1 litre

2 x 400g cans of chopped tomatoes
1 tbs olive oil
1 brown onion
4 cloves garlic
1 tbs sea salt
140g tomato sauce (ketchup)
55g worcestershire sauce
170g vinegar (I used cider this time)
140g brown sugar (adjust if you don't like it as sweet)
5g hungarian paprika
freshly ground black pepper
120g orange juice

6 drops of Liquid smoke (if you can get it - but not necessary)

Remove the hard end of the garlic cloves and place them in the TM bowl.  Process them on reverse speed for for 3-6 seconds to remove the skins.  Pick the skins out from the bowl.  Add the onion into the TM bowl, process for 3 seconds on speed 7.

Add the olive oil and salt.  Cook at 100 degrees reverse speed 1 for 2 minutes to sweat the onions.

Add remaining ingredients and cook at 100 degrees on speed 1 for 60 minutes (without the MC).

Once cooked blend for 10 seconds on speed 8.

We are big ribs lovers here so I usually buy one rack per person - and then cut them in half.

I use the American style baby back ribs.


While the sauce is cooking, simmer your ribs in boiling salted water for 1 hour.  Make sure to scoop off the scum occasionally.  After the hour, drain the ribs and place in a large container.

Add a very liberal amount of the barbecue sauce and let the ribs marinate for at least 1 hour - preferably longer.

Now when you are ready to cook the ribs, place them in a large disposable baking tray - making sure that they are not too crowded.  Add more sauce.  Preheat oven to 180 degrees C.  Bake for 1 - 1 1/2 hours, basting frequently.

I guarantee they will be the softest, juiciest ribs ever!!!


To serve alongside the ribs you need corn on the cob and baked potatoes!

Now I like to take the easy way out with these so I bake them in the oven along with the ribs.

First of all I made Garlic Butter

6 cloves garlic (peeled as above)
250g butter

Process the garlic in the TM bowl for 3 seconds on speed 7.

Add the butter and process for 30-40 seconds at 50C on speed 4.

For the corn - lay out a small piece of foil.  Place a small amount of the garlic butter on the piece of foil - top with a cob of corn, then brush a small amount of the garlic butter on top of the corn.


Wrap up like a bon bon.


Bake alongside the ribs for 30 minutes.

Baked Potatoes

Simply place the potatoes on a baking dish, spray liberally with garlic infused olive oil spray, bake with the ribs for 30-40 minutes depending on the potatoes size.


I decided that we needed a topping for the corn.  So......

Avocado Chilli Butter
adapted from Recipe in Good Taste Magazine, January edition

1 small red chilli
1-2 avocadoes, depending on size
juice of 1/2 lemon
salt and freshly ground black pepper

Process the chilli in the TM bowl for 3 seconds on speed 7.

Add the avocado, lemon juice, salt and pepper and mix for 30 seconds on speed 4.


As we had an extra mouth to feed that night that I hadn't counted on, so I thought I better make some garlic bread.

I have found this wonderful site called Forum Thermomix - there are some great recipes and tips there - and they are a really friendly bunch of people.  So if you are looking for more information and ideas for what you can do with the Thermomix this is a great resource.

I found a recipe for bread rolls that everyone was raving about - Chookie's  Plain White Rolls and then I combined the idea she had about garlic bread Garlicky Bread Plait and came up with my own version!!!

The Best Garlic Bread Ever!!! (as decreed by "The Darlings!!")
Adapted from Chookie's Recipe found on Forum Thermomix

520g white plain flour
2tsp yeast
300ml warm water
1 tsp salt
1 tsp sugar

Add all ingredients to the TM bowl.  Knead for 4 minutes.

Remove the TM lid.  Get a piece of cling wrap large enough to cover the bowl and smear a small amount of olive oil on the wrap.  Cover the TM bowl loosely and allow the bread to rise in the bowl until it doubles (coming up to the top of the bowl!!).

Punch down and remove from the TM bowl.  Weigh the dough and divide into 2 equal portions.  I simply held the bread in my hand and let it fall into a rustic baguette shape.

Place on a baking tray that has been lined with baking paper.  Allow the baguettes to rise again for 30 minutes.

Bake in the oven (with everything else!!) for 25-30 minutes or until golden and cooked through.

Remove from the oven and allow the bread to cool until it is just cool enough to handle.

While the bread is cooling add approximately 20g of grated parmesan cheese to the leftover garlic butter.

Slice the bread (but not the whole way through!!)  Using a pastry brush liberally brush the cut sides of the bread, and then the top of the loaf as well with the garlic butter.

Return to the oven for approximately 10 minutes, or until the top is crispy and golden with the butter.

And there you have it - Ribs with all the Fixin's


All you need now is to make sure you have lots of paper serviettes - because I guarantee you are going to get messy!!