WELCOME TO MY KITCHEN


WELCOME TO MY KITCHEN!!
I hope you enjoy the food!!!
Showing posts with label Thermomix. Show all posts

Saturday, July 14, 2012

Thai Inspired Risotto with Salt and Pepper Seafood

Since coming back from Italy I have been making all manner of Italian food - which has meant lots and lots of pasta.  "The Darlings" love it, so I figure why not?  Sometimes its best to take the road of least resistance, when it comes to meal times.

Last night though I craved something like a thai curry but with an underlying urge for seafood.  Mmmm what should I make?  I have always wanted to make an Asian style Risotto, so I decided to give it a go!

So while last night's dish may have had its origins in Italy, it has travelled a completely different path.

I used all the basic principles of a true Italian risotto, I just altered the flavour combinations.

Instead of my "soffritto" having onion and garlic, I used garlic and lemon grass with a dollop of thai red curry paste.

I still added the white wine to coat the rice, but instead of the usual chicken stock I used fish stock and coconut milk - this resulted in a lovely creamy texture.  While it may not win the MasterChef Risotto challenge, it certainly won our taste buds over.

I have used the Thermomix to make this risotto, but if you use the basic principles of cooking a traditional risotto - adding hot stock slowly, and stirring, stirring, stirring - you will end up with the same results.


Thai Inspired Risotto with Salt and Pepper Seafood

Serves 4

3 cloves garlic
1 stem lemongrass, white part only
4 kaffir lime leaves, finely shredded
30g olive oil
400g arborio rice
100g white wine
375ml fish stock
400ml coconut milk
water (to make up 1000g or 1 litre)
1 piece (approx 300g) salmon fillet, skin removed, and pin boned - cut into thin strips
3 squid hoods, scored, and sliced into 3cm strips
500g green prawns. shells removed - tails intact on 16
salt to taste
100g white rice *
2 tsp rock salt
1 tsp mixed peppercorns

chopped red chilli, for garnish

oil for frying

Firstly make your coating for the salt and pepper seafood.  Place 100g white rice, the rock salt and peppercorns in the TM bowl.  Mill on speed 9 for 1 minute.  Remove from bowl and keep to one side.

* If you do not have a thermomix - simply use rice flour, and sea salt flakes, and freshly ground black pepper.

Place garlic and lemongrass into TM bowl, process on speed 7 for 3 seconds.  Scrape down the sides of the bowl.  Add the olive oil and the red curry paste.  Saute for 2 minutes at 100 degrees on speed 1 with the MC off.

Insert the butterfly.  Add the rice and the wine to the TM bowl, and saute for 2 minutes at 100 degrees and Reverse and Speed Soft.

Add the coconut milk and fish stock, and enough water to equal 1000g.  Add 3/4 of the shredded kaffir lime leaves.  Cook for 14 minutes at 100 degrees on Reverse and Speed Soft.

Add the prawns that have the tails removed, and 3/4 of each of the salmon slices and squid strips.  Season to taste with salt.

Cook for an additional 3 minutes at 100 degrees and Reverse and Speed Soft.

Remove from the TM bowl and place in a Thermoserver, or large bowl and keep warm.

Meanwhile in a large ziploc bag add the rice and salt and pepper mixture, and the reserved seafood.

Shake well to coat the seafood in the rice mixture.

Heat 2-3cms of oil in a wok, or large frypan over high heat.  Cook the seafood in batches, until all cooked, and crisp - 2-3 minutes.

Serve the risotto topped with a selection of the salt and pepper seafood, reserved kaffir lime leaves, and chopped red chilli.


The verdict was split on this - Mr. CCC loved it the way it was, but I loved the addition of a slurp of ketchap manis.  I leave this totally up to you.

The flavours in the meal were just what I was looking for.  You have the punch of the curry, the zip of the salt and pepper seafood, and the lovely creaminess of the rice in the risotto!!!

Just what the doctor ordered!


So Dear Readers, what basic recipes have you tweaked to travel on a totally different path?

Tuesday, April 3, 2012

Two Great Salads

A meal is never set in concrete until it actually hits the table here! Take last night for example, I had planned to make sweet and sour pork chops, with the associated trimmings, that was until I received the phone call from DH at the 11th hour telling me that he was going to play tennis that evening.  He was playing, then he wasn't, and now of course because I had a meal organised it was back on again!!!!

That then cast an entirely different view on the meal. Had to be quick and light, and prepared early (which given that we had just turned back the clocks to end daylight savings was not a problem. Is it just me, or do you get yourself out of kilter for a couple of days when the clocks change?).

Normally I wouldn't blog about side dishes, but these two were punchy little numbers that deserve some attention. With the Easter holidays coming up, and many people entertaining these would make a great addition to any table.

The first one is a new take on the old Thermomix Beetroot salad. Everyone who has been to a Thermomix demo will have tasted their version of a fresh Beetroot salad. This recipe was given to me by a customer, so I am unsure exactly of its origins. The flavours in this salad are amazing. It combines the freshness of the raw beetroot and carrot with a punchy little dressing of pomegranate molasses and orange juice. Wow! Try it - you have to!


Beetroot Salad
Adapted from a recipe found in a book I believe is called Ripe Recipes, possibly of NZ origin

500g fresh Beetroot, peeled
600g carrot
1/2 bunch fresh mint
30g Sunflower seeds, toasted
30g pumpkin seeds, toasted
80g raisins

Dressing
2 tbs Pomegranate molasses
2 tbs balsamic vinegar
Juice of 1 orange
1/4 cup Olive oil
1 tbs honey
Freshly ground black pepper to taste

Now this recipe says to have the carrot and beetroot grated, and the mint chopped. What I did was make it the same way as I make the Thermomix version. I bunged the mint, carrots and beetroot in the bowl and gave them a chop on speed 5. Just make sure that you move it around with the spatula, as there is quite a lot of veggies in the bowl!

To make the dressing, simply place all the ingredients in a screw top jar. Shake to combine.

Place beetroot, carrot, mint, pumpkin seeds, raisins and sunflower seeds in a large bowl. Toss through the dressing. Make sure you toss again prior to serving so you get all those lovely flavours mixed through.


The next salad combines two of my favorites - haloumi cheese and quinoa. I just love quinoa, and like to use it now in place of couscous. It's one of natures super foods, low in GI, high in protein and with a great flavour to boot!


Warm Quinoa Salad with Haloumi
Recipe from Good Food Magazine April edition

2 tbs olive oil
1 red onion, thinly sliced
270g jar chargrilled red capsicum, thickly sliced
200g quinoa, rinsed, drained
2 cups vegetable stock *
1/2 cup finely chopped flat leaf parsley
1/2 tsp sugar
Zest and juice of 1 lemon
250g haloumi, sliced


* I used 1 tbs concentrated tm vegetable stock, and 2 cups of water

Heat 1 tbs of the oil in a medium saucepan, on medium high heat. Cook the onion and capsicum, stirring, for 2-3 minutes, or until the onion softens. Add the quinoa and cook for 3 minutes. Add the stock, cover and reduce heat to medium low. Cook for 15-20 minutes, or until the quinoa has softened and all of the liquid is absorbed. Stir through half of the parsley.
Mix the sugar, lemon zest and juice with the remaining oil and parsey.
Heat a frypan over medium high heat. Cook the haloumi slices 3-4 minutes each side, or until golden and crisp.

Toss the dressing and the haloumi through the quinoa.


 I apologise for the photos - I am experimenting with the iphone camera so that I can use it when I am blogging on the run in Italy!!

Monday, February 13, 2012

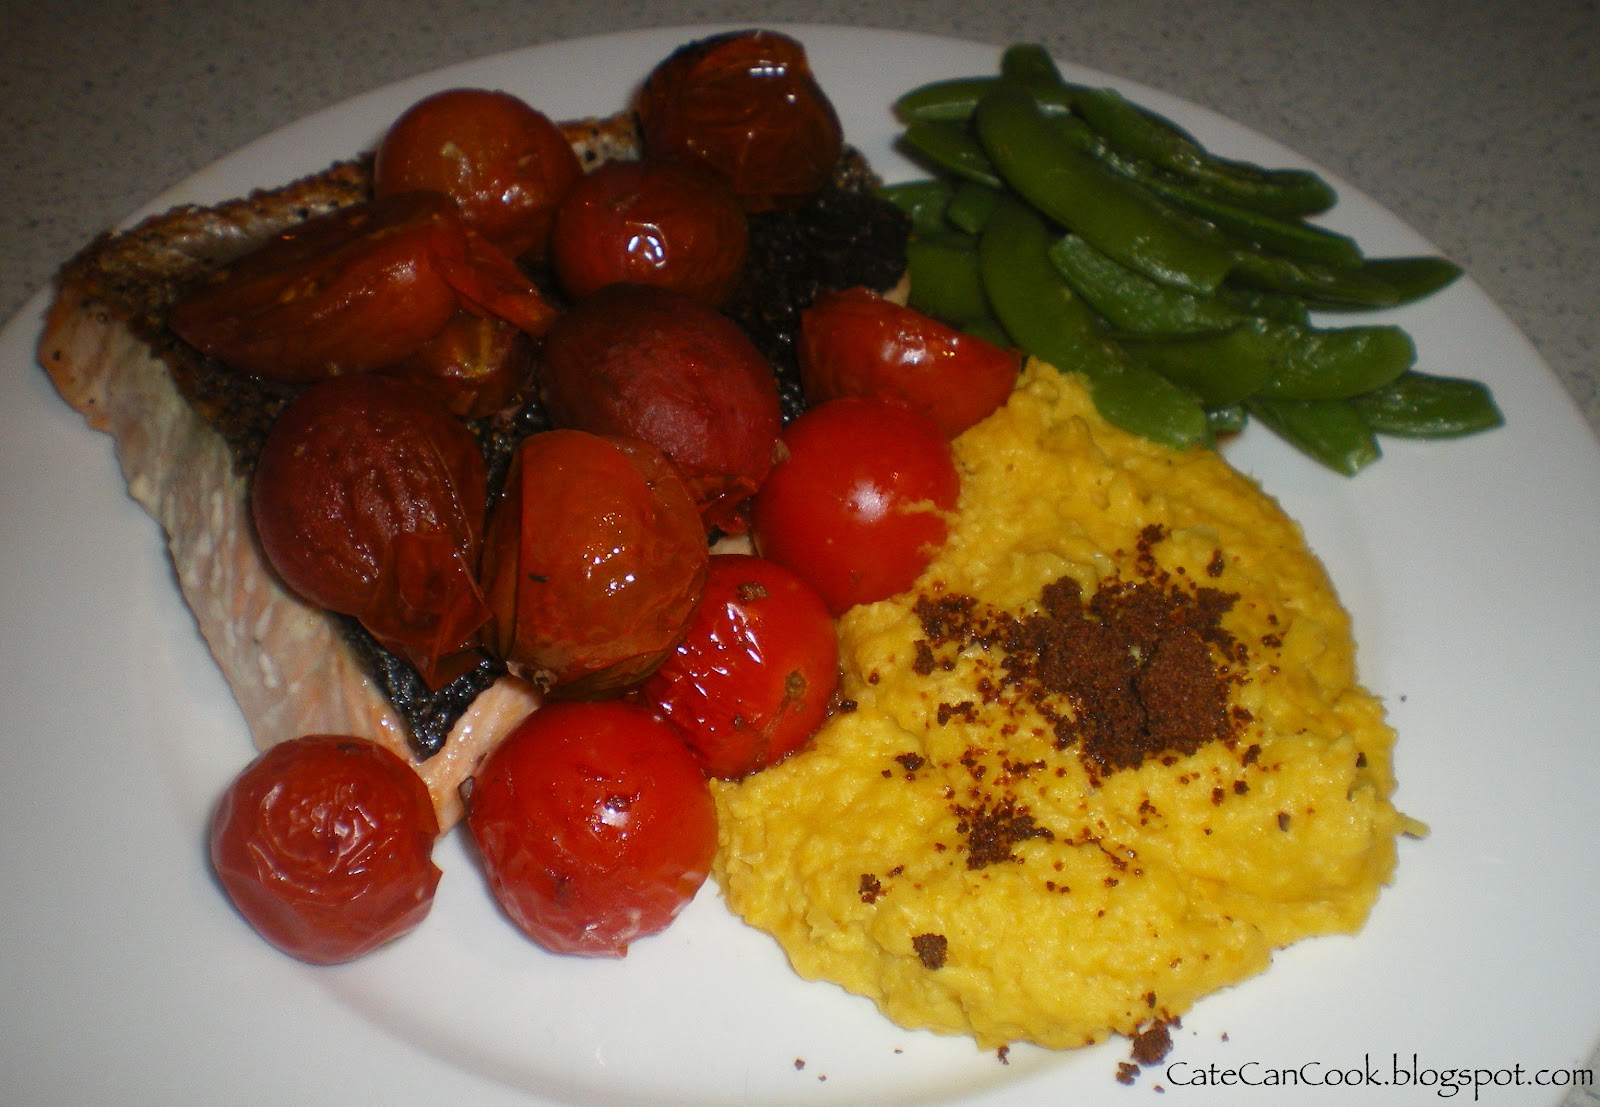
Salmon with Roasted Tomato Salsa, Creamed Corn and Virtual Bacon Dust


When we use the term "virtual" what exactly do we mean?

The Merriam Webster Dictionary gives the following definitions for virtual:

- being such in essence or effect though not formally recognized or admitted

- of, or relating to, or using virtual memory

- being on or simulated on a computer or computer network......

Wikipedia gives a definition that I like:

Virtuality, the quality of having the attributes of something without sharing its (real or imagined) physical form.

So bearing this all in mind, I kind of felt that in order to prepare last night's meal I should perhaps be donning a lab coat and protective eyewear, rather than the usual apron!

Virtual Bacon Dust???  What exactly is it?  What is it made of?  We have been bouncing the term around a little in Thermomix circles of late, as it is a recipe that is featured in the new Dani Valent Cookbook.  What exactly is it though?  I must say my interest was piqued when Madame T mentioned to me that we might be able to make it in an upcoming cooking class.  My hand shot up immediately!!  I'll make that!!!  As it turned out, it wasn't allowed for the that particular menu, but I was not to be deterred.  I decided I would add it to my own personal menu for the weekend!

The ingredients came as a little bit of a surprise, as did the results.

I am going to give you the recipe as it is printed.

Virtual Bacon Dust
Recipe by George Calombaris, printed in In The Mix Cookbook, by Dani Valent


100g brown sugar
100g sesame seeds
100g dashi

Preheat the grill - if you have a temperature setting - to 150 degrees

In a bowl combine the brown sugar, sesame seeds and dashi powder.

Line a baking sheet with baking paper.  Spread the mixture evenly over the prepared tray.

Place under the grill, stirring whenever it starts to caramelise.  After each stir, spread the ingredients as thin as possible to ensure they cook evenly.

When the mixture has caramelised, set aside to cool completely.

When cool place in the Thermomix bowl and blend for 20 seconds on speed 10.


Note:  This caramelises very quickly.  You need to stay close by, and stir often.

Unless you are catering for "The Press Club" or plan to eat this with "virtually" everything for the next 6 months, I highly recommend halving the recipe!!!

What I found amazing was the transformation that occurred with these ingredients.  I wish I had taken a before and after shot.  On the baking tray you had this mixture which looked like - what it was - sesame seeds and bits of burnt sugar, but after processing - it changed colour - to a, well, cooked bacon colour!  I took the lid off and exclaimed - WOW!  Stuck my finger in, tasted it, and said OMG - it tastes like bacon!!!

So what would you use this on?  A garnish for soups - such as pumpkin, cauliflower.  Sprinkled on scrambled eggs, caesar salads, green salads.  Grilled chicken - for that BLT flavour.....I guess the list is endless.  George pairs it with a decadent pumpkin soup.

I chose to make my own creamed corn, and of course garnished it with the virtual bacon dust.

Creamed Corn
Adapted from recipe found in Good Food Magazine, March Edition

Serves 4-6

6 corn cobs, husks and silks removed
100g light cooking cream
15g butter
salt and pepper to taste

Cook the corn cobs in a large saucepan of boiling water for 20 minutes.  Drain, and cool the corn until it is cool enough to handle.  Using a sharp knife, cut the kernels from the cobs.  Place the kernels in the TM bowl.  Add the cream, butter and salt and pepper.  Process on speed 9 for 20 seconds, or until creamed to desired consistency.

To heat up, cook for 9 minutes at 100 degrees on Reverse Speed 1.

Roasted Tomato Salsa
Adapted from recipe found in Good Food Magazine, March Edition

400g tomato medley mix, large tomatoes, halved
250g cherry tomatoes
4 cloves garlic, crushed
1 tbs balsamic vinegar
2 tsp brown sugar
1 tsp sea salt flakes

Preheat oven to 200 degrees (fan forced).

Combine all the above ingredients in a disposable foil baking tray.  Roast the tomato mixture in the oven for 10-15 minutes, or until the tomatoes are nice and soft, and split, when slight pressure is applied.

For the salmon, I am going to suggest an alternate method than what was offered in the magazine.  I found that the salmon cooked their way, was too dry for my liking.  I think that I would almost rather pan fry the fish totally.  Cooking skin side down first for 3-4 minutes, or until the skin is brown and crispy.  Then flip over and cook the other side for 3-4 minutes, or until cooked to your liking.

This however, is what they suggested:

Pat the salmon dry with paper towels. Rub with oil, and season.  Heat a frying pan on high.  Cook skin side down for 3-4 minutes, until skin is brown and crispy.  Turn and cook for 1 minute.  Transfer salmon, skin side up to a baking tray that has been lined with baking paper.  Cool slightly.  Cover with plastic wrap and refrigerate.

When you place the tomato salsa in the oven place the salsa on the bottom shelf, and the salmon on the top shelf.  Cook for 10 minutes.

I found that the 10 minutes was not enough for the tomato mixture, and too much for the salmon!  You decide your method of cooking - but I know what I will do next time around!!!

So how was it??  Well the creamed corn with the bacon dust was great - in fact it would make an excellent breakfast food, alongside a lovely poached egg, and some homemade toast.  How smug would you feel about that!!


The salsa and the salmon - a lovely combination.  So all in all, a wining combination!!!

While it did look like a big meal, with components that were a little on the naughty side - the scales still dropped this morning!!!!  So it couldn't have been too bad!!

Saturday, February 11, 2012

Chicken Cacciatore in the Thermomix

Sometimes all you need is a little pat on the back to give you the motivation you need to keep on going.

This week was the annual pilgrimage out to the Children's Hospital for the usual pokes, prods, and WEIGH IN for "The Child Who Cannot Be Filled!". The words the doctors uttered were not so much the pat on the back I needed, although I was told that all things considered we were traveling very well along the bumpy road of Prader Willi Syndrome. It was more the look of utter disbelief that I encountered when I met up with a doctor, and please excuse me if that is it not your actual title, you probably are a Professor now! But anyway, when I ran across this particular medical professional in the stairwell, as we travelled between appointments, to say that she literally had to pick up her jaw up off the floor would be a little bit of an understatement. She could not believe that this child that had been given the sentence of "PWS" 14 years ago, was the same child/young man that stood/towered above her now!

The look on her face, was the pat on the back that I needed to say "hey you are doing a great job". It made it seem like all the hard, hard work that I have put into the last 14 years have not been in vain.

As you face these hurdles in life, you often belittle the hardships and challenges you face? Do you take it all in your stride, buckle down and just get on with the job at hand? Do you say to yourself, it's not that bad, it could be worse, what am I complaining about? Sometimes though, inevitably, you leave to take stock, and you realize that what you are actually doing is in fact something out of the norm.

So as I face the week with a renewed sense of self. I pat myself on the back and say "good work, you are doing ok!"

After we came back from the hospital "The Child Who Cannot Be Filled" was also feeling pretty good about himself, so we sat down to a meal that night without a challenge. He seemed to understand (maybe) the reasons why the meals etc are the way they are. He accepted that he could have a massive plate full of food, if it was the right kind meal! So we had a beautiful Chicken Cacciatore, with a mega serve of vegetables!  Everybody was happy!


Chicken Cacciatore
Original Recipe by CateCanCook

Serves 6

1kg Chicken Breast, sliced into 2cm thick pieces
1 onion, quartered
4 cloves garlic
100g pancetta, roughly chopped
1kg tomatoes, roughly chopped
2 carrots, sliced thickly
10g oregano leaves
1tbs TM concentrated vegetable stock
100g white wine
200g swiss brown mushrooms, quartered
olives (if desired)


Place the pancetta into the TM bowl, pulse on turbo twice (1 second each).  Remove from bowl, set aside.  Place the onion and garlic in the TM bowl, chop on speed 7 for 3 seconds.  Add a small amount of olive oil.  Saute for 2 minutes at 100 degrees on speed 1 (with the MC off).  Add the pancetta, and saute for an additional 2 minutes at 100 degrees on speed 1.

Add the roughly chopped tomatoes, stock concentrate, oregano leaves and wine, and cook for 20 minutes at 100 degrees on Reverse, Speed Soft, with the basket over the lid to stop any splatters.

Place the sliced chicken in the varoma tray and receptacle, making sure you don't cover all the holes.

Add the carrots and mushrooms to the tomato mixture in the TM bowl.  Place the varoma on top of the TM bowl.

Cook for 45 minutes at varoma temperature on Reverse, Speed Soft.

Season with salt and freshly ground black pepper to taste.  Place the tomato mixture into a prewarmed (put boiling water in it for 5-10 minutes).  Add the chicken and mix through.

At this point you could either then steam your vegetables in the varoma, by putting 1 litre of boiling water into the TM bowl, and cooking for 30 minutes at varoma temperature on speed 4.  OR you may just wish to steam your vegetables separately.


If you are not on a low carb diet, serve with some steamed rice.

This was an incredibly satisfying meal, and you really did not feel deprived by not having the rice with it.  The best part though - the scales continued to decline in numbers the next day too!!!

So another pat on the back!!!

So Dear Readers how do you face those tough obstacles in life?  Do you buckle down, or buckle in?  It's OK either way!


Saturday, February 4, 2012

Blackened Salmon with Corn Salsa

I know, I seem to have let the side down in regards to posting lately, but really, I have had serious technical issues with posting.  I still am none the wiser as to what is going on, or should I say what I am doing wrong, so I am going back to the old tried and true method of posting today.

As I am now on the countdown to my trip to Italy, I am starting to curb the carbs in an effort to try and loose a little weight before I head off on my eating trip!!  I figure loose it now, so that I have some room to gain it back - but looking at my itinerary I am secretly hoping that we are on the move so much that we will walk off all that we eat!!!  To say that I am getting a little excited is a little bit of an underestimation.  I had to drag myself off the internet searching out ways to maximise my experience while away - The Sistine Chapel at dawn, The Colosseum at Night - because you see I just have to fit these things around my walking/eating tour of Rome and then and walk and wine tour of Tuscany!!!  Sounds hard to take doesn't it?  I really shouldn't brag, but I feel that  this trip has been such a long time coming, and I really deserve it - I  have saved my pennies for several years, and yes it's a luxury few can do - but what the hell I'm doing it!!  I will post a direction to the blog that I will write while I am away for those of you that are interested in following my adventure!

So what was on the menu last night in light of this new diet?


Blackened Salmon with Corn Salsa
Adapted from recipe found on Taste.com.au

Serves 4

4 salmon fillets (tail pieces are best as they have no bones!)

1 tbs sweet paprika
2 tsp dried oregano leaves
2 tsp dried thyme leaves
1/2 tsp ground white pepper
1/2 tsp ground black pepper
1/4 tsp cayenne pepper (or to taste)
1/4 tsp salt

Corn Salsa

4 cobs corn
2 spring onions (green kind) cut into 4cm pieces
1/2 large green capsicum, cut into 5cm chunks
2-4 ripe tomatoes (depending on size), finely chopped
juice of 1/2 lemon
salt and freshly ground black pepper

Place the paprika, oregano, thyme, peppers and salt in the Thermomix bowl.  Grind on speed 9 for 20 seconds.  Scrape down the bowl and repeat until you have a finely textured powder.  Place the spice mixture on a large plate until required.

Meanwhile to make the corn salsa.   Remove the corn kernels from the cobs by using a sharp knife, and running it lengthways down the cob.  Cook the kernels in a large saucepan of boiling salted water for 2 minutes.  Refresh under cold water, and drain well.

Place the green onions in the TM bowl, pulse on turbo twice for 2 seconds each.  Scrape down the bowl.  Add the capsicum pieces.  Pulse on turbo 2-3 times, for 2 seconds each, until you have a rough chop.  Place the mixture in a large bowl.  If there are any large pieces left, return them to the bowl and pulse once more.  If the mixture is too "liquidy", remove the excess liquid.

Add the corn and diced tomato to the capsicum mixture.  Add the lemon juice and salt and pepper and mix well.

To cook the salmon, firstly coat both sides of the salmon in the spice mixture.  Preheat a large frypan to high heat.  Add a little olive oil, and then place the salmon skin side down first.  Cook for 3-4 minutes, or until the skin is crispy.  Turn over and cook for an additional 3-4 minutes, or until cooked to your liking.  Remember that salmon is at it's best if slightly rare in the middle!!!

Place the corn salsa on the plates, then top with a salmon fillet. If you are not on a low carb diet you may wish to include some smashed roasted potatoes.


Wow, this was a lovely fresh dinner.  I ate so much of the corn salsa - but I still managed to have the scales reading in the right direction this morning!

I will endeavour to post as often as I can, but I am only eating vegies, vegies vegies at the moment so the posts may not be too exciting!!!!  Its all in the name of the carb fest that is to come soon!!!

Friday, February 3, 2012

Soy and Lemongrass Prawns

I seem to have been having lots of problems with this post.  Normally I would just post another, and get on with it..... But I thought this recipe was too good to get forgotten.

The audioscape to life outside my bedroom window is constantly changing.  For days on end (it actually seems like weeks!) All we have heard is the monotony of constant rainfall.  The rain has been falling so intensely at times, that when you looked out you felt like you were within a wall of water.  I should explain here, you see I live in a treehouse, well not an actual treehouse per se, but more like a house seemingly suspended up within the trees. My "treehouse" does not have regular walls as most people have, instead we have glass walls, so hence when it rains, you feel like you are living within the rain (for the most part we manage to stay dry, that is except for times when the velocity of water is so great that it has nowhere else to go but within our abode.)


The rain when it falls like it has of late, is noisy to say the least, as it beats on all surfaces around us.  At times it sounds like you are living within a rainforest during monsoon season.  It makes rivers wherever it can just to escape, and waterfalls where there was once a trickle of water!  Just beyond my bedroom window there is what we loving refer to as "the creek".  It's not really a creek, just an easement drain really, but of late you could be confused into thinking it is the Zambezi River heading over Victoria Falls!


Once the rains abate the waterfall continues on its merry course for several. This is the view from my bedroom! The "creek" is hiding in those trees!

They say the sound of water is soothing, but this just sounds angry at times, as it fights it's way down the ravine.  As the velocity of water decreases the wildlife starts to return. The first day or so after the waters subside the frogs come out in full force. The cacophony of their singing made it difficult to sleep the other night!  Oh, how the frogs love this weather!  Not to worry though, they only stay for a day or two, and life returns back to normal, they go back to whence they came, and the usual noises can be heard, today it is the sounds of real summer, the crickets, and the usual bird noises!


It was during one of these lulls in the rain that I decided to take advantage of the break in the weather and light up the barbecue. There haven't been too many "barbies" here this summer I can tell you!


I have had my eye on a recipe I found in the January issue of the SBS magazine "Feast".  Last night seemed as good a night as any to try it out!

Soy and Lemongrass Prawns

Adapted from recipe found in Feast Magazine, January edition

Serves 4

2 stalks of lemongrass, white part only, roughly chopped
4 kaffir lime leaves, finely sliced
1 long red chilli, chopped
4 cloves of garlic
4cm piece of ginger, peeled, sliced
1 large bunch of mint, leaves only
1/3 cup olive oil
2 tsp sesame oil
1 tbs Japanese soy sauce
1 kg green prawns, peeled, leaving tails intact

Sweet Soy Dressing

4 tbs Mirin
4 tbs Japanese soy sauce
4 tsp brown sugar
2 tsp sesame oil

Place the lemongrass, kaffir lime leaves, chill, garlic, ginger, mint, both oils, and the soy sauce into either a food processor, or the Thermomix.  Process on speed 8 for 10 seconds.  Scrape down bowl and repeat until all ingredients are finely chopped.

Place the mixture into a large ziploc bag.  Add the prawns and mix well.  Allow to marinate for at least 1 hour, longer if time permits.

To make the dressing, whisk together the Mirin, soy sauce, sugar and oil in a bowl.

When ready to cook the prawns, thread them onto skewers.

Preheat the BBQ over high heat.  Cook the prawns, turning occassionally, for 4 minutes, or until pink and cooked through.

Serve with sushi style rice, and cucumber ribbons and pickled ginger.


Sushi style rice

400g sushi rice
2 tbs Mirin

Place the steaming basket in the Thermomix bowl. Weigh in 400g of sushi rice. Remove the basket, and rinse the rice well under running water. Place the basket with the rice back into the Thermomix.  Add 1 tsp of salt, and 900g of water. Cook the rice for 16 minutes at varoma temperature on speed 4.  Remove the basket, using the spatula, from the Thermomix bowl.  Place the rice, and a small amount of the cooking water in a large bowl.  Cover with glad wrap, and allow it to sit for 5-10 minutes, or until all the water has absorbed.

Add the mirin, and using the spatula mix it gently through the rice.

For the cucumber ribbons I just used a vegetable peeler, and peeled long pieces from the sides of the cucumber, making sure not to get the seeds! I tossed these in a bowl with the pickled ginger and a small amount of sushi vinegar.


It was lovely to enjoy a BBQ in the dry last night, but I am not holding my breath that we have seen the last of the rain. You see school goes back tomorrow, and I will bet my last dollar that it will rain at 3 o'clock on the dot, just as the kids are making their way home from school!

On that note, "the Darlings" have their first day at high school tomorrow! & Oh my, where have the years gone? Life in this house is about to get exciting, all those testosterone fueled fights that are heading our way! Better batten down the hatches!

As a post script to this post, I have to report that all went well the first week at high school!  Both now have "girlfriends", and all's good with the world!  Tomorrow "The Darlings" turn 12, not babies anymore!

Saturday, December 31, 2011

A Cuban Feast

As I sit here on board a boat in the Whitsundays, and contemplate my New Year's dinner (and before you think luxury let me tell you this has been a poorly executed/planned trip, and we are only having BBQ sausages and pre-packaged salads)- anyway I am drawn back in longing memory to a wonderful meal we had last week. A Cuban feast in fact!

The meal consisted of two meat dishes - Cuban Shredded Beef with Capsicum or as it is called by the locals Ropa Vieja which literally means "old clothes". The second was Mojo Chicken, or Pollo Con Mojo. Added to this was Black Beans and Rice, or Arroz Congri, and a salad of tomato and avocaod, with a chilli, olive oil and coriander dressing. The piece de resitance was the desert which was a Three Milks Cake, or Pastel de Tres Leches!

I was drawn to this meal by the front cover of the latest SBS magazine called Feast. On the front cover there was a wonderful looking desert, you got it Pasel de Tres Leches!

This entire feast can be found in the January edition of Feast Magazine.

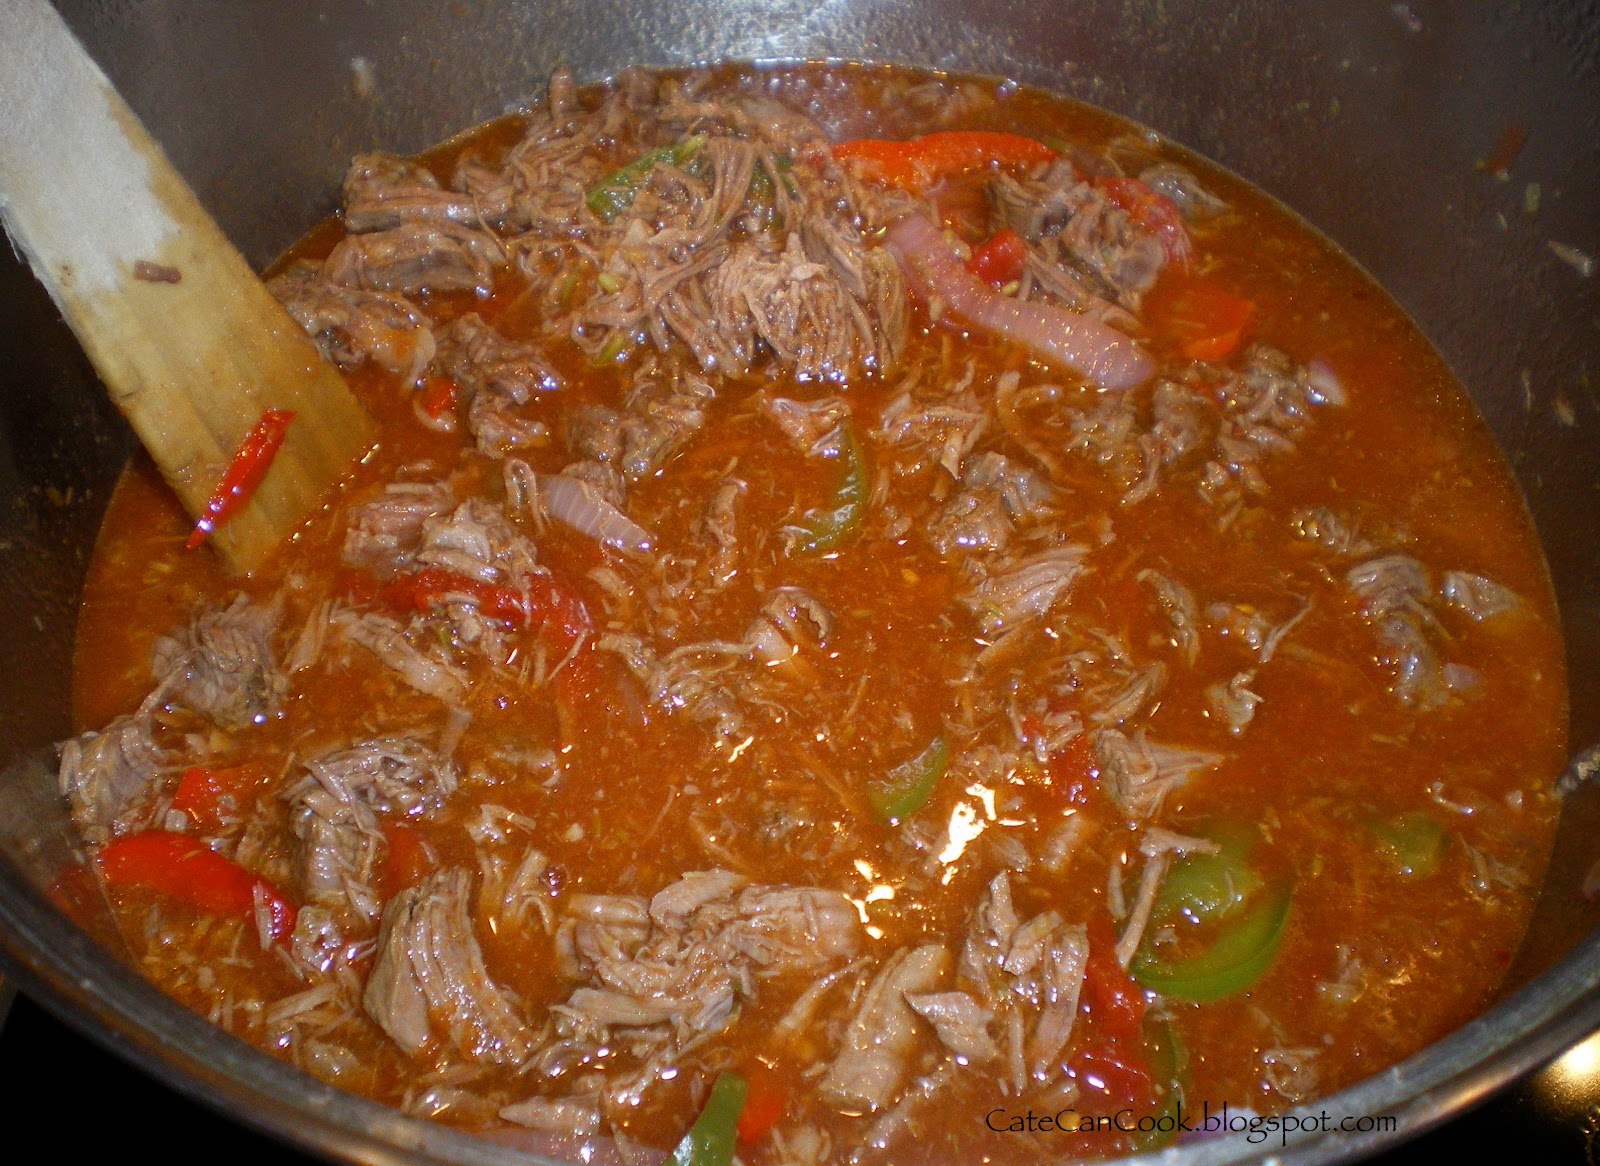
Cuban Shredded Beef with Capsicum
Ropa Vieja

Serves 6 as part of a banquet

60ml (1/4 cup) olive oil
1kg skirt or chuck steak, cut into 6 large pieces
1 large onion, chopped
1 liter beef stock
1 bay leaf
1 red onion, thinly sliced
1 large red capsicum, thinly sliced
1 large green capsicum, thinly sliced
1 bunch coriander, leaves picked, roots and stems finely chopped
2 cloves garlic, finely chopped
2 tsp ground cumin
2 tbs red wine vinegar
1 tbs tomato paste
400g can chopped tomatoes

Heat 2 tbs olive oil in a large saucepan over high heat. Cook the beef in batches, for 1 minute each side, or until lightly browned. Add the onion, stock, 250ml water and a the bay leaf, and bring to the boil. reduce the heat to low, cover and simmer for 1 1/2 hours or until the beef is tender. Transfer the beef to a plate, and drain the cooking liquid. Reserve 500ml. Wipe pan clean and put aside.


Cook the meat


Heat the remlaining 1 tbs of oil in the reserved pan over medium heat. Cook the onions and capsicums, stirring occassionally, for 10 minutes, or until soft. Add the coriander roots and stems, garlic and cumin, cook for 30 seconds, or until fragrant. Stir in the vinegar and tomato paste, then add the tomatoes and bring to the boil. Reduce heat to low and simmer for up to 10 minutes, or until the mixture is reduced slightly.


Using a fork, shred the meat and add to the capsicum, tomatoes mixture. Add in the reserved cooking liquid from the beef. Bring to the boil, then reduce the heat to low and simmer for up to 30 minutes, or until the mixture has reduced and thickened. Scatter the beef mixture with coriander leaves.


Voila!


Black Beans and Rice
Arroz Congri

2 tbs olive oil
1 onion, finely, finely chopped
1 green capsicum, finely chopped
2 cloves garlic, finely chopped
1 fresh bayleaf
1/2 tsp ground cumin
2 tbs red wine vinegar
2 tbs tomato paste
200g (1 cup) long grain rice
400g can black beans, rinsed, drained *
625ml 2 1/2 cups) chicken stock

Heat oil in saucepan over medium heat. Add onion and capsicum, and cook, stirring, for 5 minutes or until the onion has softened. Add the garlic, bay leaf and cumin, and cook for a further minute or until fragrant. Stir in the vinegar and tomato paste until combined.


Add rice, beans and stock, and bring to the boil. Reduce heat to low, cover and simmer for 15. Invites or until rice is al Dante.

Remove from heat and stand, covered, for 10 minutes or until the rice is tender.


Mojo Chicken
Pollo con Mojo

I used thigh cutlets and drumsticks for ease say 1 piece of each per person
Lime and orange wedges for garnish

Mojo Marinade
2 cloves of garlic
1 long red chilli
2 oranges, 1 zested, both juiced
2 limes, juiced
1 tsp dried oregano
1 tsp ground cumin
2 tbs olive oil

To make the marinade, either use a mortar and pestle, food processor, or Thermomix! Grind the garlic, chilli and 1 tsp of salt to a fine paste. Add the orange zest and juice, lime juice, oregano, cumin and oil.

Place the marinade in a large ziploc bag, then add the chicken pieces. Combine the marinade with the chicken, and leave to marinate for at least overnight (I actually marinated mine for 2 days and the flavour was fantastic!).

Heat a barbecue or chargrilled pan over medium heat. Drain and discard marinade. Cook the chicken, turning occassionally, for 25 minutes or until. Oozed through. The chicken will blacken due to the orange juice.

Serve with orange and lime wedges as garnish.


Of course a welcome addition to this meal was some Brazilian Cheese Bread. I have given you the recipe before, so here is the link to it. If you haven't made this bread before I strongly urge you to give it a try. Simply fantastic!

Brazilian Cheese Bread

Here is the link

Brazilian Cheese Bread

And now for dessert!

Three Milks Cake
Pastel de Tres Leches

250ml (1cup) evaporated milk
395g can sweetened condensed milk
2 tbs white rum
275g (1 1/4 cups) caster sugar - plus 2 tbs extra
500g fresh pineapple, peeled, thinly sliced
140g unsealed butter, softened
2 tsp vanilla extract
5 egg yolks
250g (1 2/3 cups) self raising flour
250ml (1 cup) milk
250ml (1 cup) thickened cream
1 tbs icing sugar
1 passionfruit,or other fruit for garnish

Preheat the oven to 140 degrees. Combine the evarated mi, condensed milk and rum in a small jug. Set aside.

To make the roasted pineapple, dissolve the extra 2 tbs of sugar in 2 tbs water in a small saucepan over medium heat. Place a sheet of baking paper one baking tray. Place the sliced pineapple in a single layer on the baking tray. Brush with the sugar syrup. Roast for 30 minutes or until slightly dehydrated. Set aside to cool.

Grease and line a 22cm springform pan.

Increase the oven temperature to 160 degrees. Using an electric mixer, or the TM, beat the sugar and butter and 1 tsp vanilla extract until pale and fluffy (speed 4 in the TM). Add the egg yolks one at a time, beating well after each addition. Fold in the flour, alternating with the milk. Mix well until combined. Pour mixture into the prepared tin.

Bake for 1 hour, or until a skewer inserted into the middle comes out clean.

Pierce the cake all over with a skewer, then pour over the evaporated milk mixture. (make sure you have the base of the pan covered well with foil in case the pan leaks - otherwise you will end up with milk everywhere!). Stand the cake in the pan for at least 3 hours, or until the cake is cooled completely. I actually left mine overnight, and it was fine.


Soaking the cake with the milk


Whisk the cream with the vanilla and icing sugar until stiff peaks form. When the cake is cooled completely, top the cake with the whipped cream, then top with the roasted pineapple and passionfruit pulp. You may also like to top with some chopped pistachios.


What a meal! The flavours all around, were spectacular! This is such a great meal to have if you are having company. Absolutely great for sharing!

So I leave you Dear Readers with the memory of a fabululous meal, and anticipate a New Year's Eve meal that to say the least will be quite ordinary - I do however have a spectacular view to more than make up for it though.

How are you spending your New Year's Eve Dear Readers, please share.

Happy New Year to all of you, may 2012 be a fantastic year for us all!

PS please excuse any typos of the human or pre emptive kind - I am at sea and the boats rocking!

Sunday, December 18, 2011

"Bring a Plate"

'Tis the season to be invited out for drinks, and along with that comes the line.... "Just bring a plate!"  If you are anything like me, you want to make something a little special, something a little bit different, and definitely not something that you have taken along with this group of people before!

It was time for the annual neighbourly get together.  I must say I am not feeling particularly Christmasey at the moment, and this has been compounded with the fact that I have been hit by the dreaded "lurgey" (Thanks DH!!).  I did however, manage to pull off a pretty tasty couple of plates to take along last night!!!

You can of course take the easy option with these and buy bottled sun dried tomato pesto and mayonnaise, but of course, having the Thermomix, I just couldn't help myself (sick and all as I was - I still had to "show off" - and say "I made it myself in the Thermomix!").


Crab and Corn Cakes with Spicy Tomato Mayo
Adapted from recipe found in Good Taste Magazine, December Edition

Makes approximately 24

180ml (3/4 cup whole egg mayonnaise) *
1 tbs sun dried tomato pesto **
few drops Tabasco pepper sauce (oops forgot that!!!)
2 corncobs, husks and silk removed
2 x 140g Crab Claw Meat (I used Phillips brand)

2 shallots, trimmed, thinly sliced
1 tbs finely chopped fresh coriander
lemon rind from 1 medium sized lemon
75g (1/2 cup self raising flour
3 eggs, lightly whisked
olive oil to fry
quartered grape tomatoes for garnish
fresh coriander leaves for garnish

Combine the mayonnaise, pesto (and if you like it spicy, and remember to use it!) the tabasco sauce in a bowl.  Cover and place in the fridge until required.

Cook the corn in a large saucepan of boiling water for 10 minutes, or until tender.  Drain, and set aside for at least 10 minutes to cool down.  Cut down the length of the cob, close to the core, to remove the kernels.  Transfer to a bowl, stir in the crab, shallot, coriander and lemon rind.  Season well with salt and freshly ground black pepper.  Cover and place in the fridge for 10 minutes (or longer) to chill.

Combine the flour and egg in a large bowl (the recipe actually stated 2 eggs, but I found the mixture was too stiff, so added a third - and it was much better!).  Add the crab mixture, and stir to combine.

Heat a large frying pan over medium high heat.  Add enough olive oil to have a thin even coating on the bottom of the pan.  When the oil is hot, add rounded soup spoon amounts of the corn mixture to the pan.  Flatten slightly with the back of the spoon.  Have approximately 6 fritters in the pan at a time.  Cook for 2 minutes, and then flip over, flattening slightly with the back of an egg lifter.  Cook for an additional 2 minutes, or until golden and cooked through.  Drain in a single layer on some paper towel.

Now I wasn't sure whether to serve these hot or cold, but my reasoning said that if they were too hot, the mayonnaise sauce would melt.  So they were warm when I garnished them.

Top each crab cake with a dollop of mayonnaise mixture, top with a tomato quarter, and garnish with a coriander leaf.


Even though my tastebuds were out of whack last night, I must say these little fritters were pretty tasty, and certainly a big hit with everyone!

** Sun Dried Tomato Pesto
Adapted from Recipe found on Taste.com.au

3/4 cup sundried tomatoes
1/3 cup pinenuts
2 cloves garlic
1/2 cup olive oil
1/3 cup finely grated parmesan cheese
salt and freshly ground black pepper

Place the tomatoes, garlic and pine nuts in the TM bowl.  Pulse with the Turbo button for 5-10 seconds (about 4 pulses) to get a rough, even texture.  Scrape down the bowl and repeat if necessary.

Place the olive oil in the reservoir, and process on speed 4 until all the oil has been added.

Add the parmesan cheese, and salt and pepper, and mix on speed 4 for 5 seconds.

Transfer to a jar.

* Mayonnaise
Adapted from Thermomix Everyday Cookbook

1 egg, at room temperature, separated
1 tsp dijon mustard
1 tbs vinegar
250g rice bran oil
salt and freshly ground black pepper

Insert the butterfly.  Place the egg yolk. salt, pepper, mustard, and vinegar in the TM bowl.  Mix for 1 minute of speed 4.

With the blades rotating on speed 4, slowly add the oil to the reservoir.  Make sure that you do it very slowly - you want to take between 4-6 minutes to add all the oil.

Once the mayonnaise has emulsified, you can add the egg white (optional) and season to taste with more salt and pepper, if needed.  Mix for 10 seconds on speed 4.

Transfer mixture to a bottle.

So by now Dear Readers, you should know me pretty well.  Of course, I could not stop at taking just one plate - I of course had to make another!

My second plate was a platter of spicy little chicken nibbles.  As I was frying up the fritters at the last minute, I didn't want to be frying up these as well, so I adapted the recipe to make them in the oven (cooked under the grill).


Spicy Chicken with Chilli Lime Dipping Sauce
Adapted from Women's Weekly - December edition

1 kg (approximately 8) chicken thigh fillets
2 tbs fish sauce
4 cloves garlic, crushed
2 small red chillies, seeded, finely chopped
1 tsp caster sugar
1 tbs sesame oil

Chilli Lime Dipping Sauce
2 tbs lime juice (approximately 1 medium sized lime)
1 tbs water
2 tsp caster sugar
2 tsp fish sauce
1 small red chilli, seeded, finely chopped
2 tsp finely chopped coriander stalks

Cut the chicken thighs into 4cm pieces.

Combine the fish sauce, garlic, chilli and sugar in a large ziploc bag (or a bowl - but then you have to wash it up!!)  Add the chicken, and mix well.  Refrigerate for at least 3 hours, if not longer.

Of course I took the easy way out with the dipping sauce - whizzed it up in the TM!!  You can however, just add all the ingredients to bowl and combine - make sure the sugar is dissolved!  Set aside until needed.

Here is where I deviated from the recipe.  They said to cook in a frying pan for 4 minutes each side, until browned and cooked through.  I however, decided to line a large baking tray with foil.  I then spread out the pieces in a single layer over the foil.  Placed them under the grill, on high, and grilled until cooked through and lightly browned.  Turn over and cook the other side until browned.

Place on a serving platter with a trio of sauces.  In addition to the Chilli Lime Dipping Sauce I used Sweet Chilli Sauce, and Ketchap Manis - that way people could vary the heat level to suit their preference!

So Dear Readers what is your "plate" that you take when asked to bring something???


As I have been so slack lately, and not posting as regularly as I should, I will take this opportunity to wish you all a very Merry Christmas!!

I have a very busy week this week, playing Santa, and surprising several lovely ladies with Thermomixes that their husbands have bought them for Christmas.  I can't wait to see the surprise on their faces when I show up with a big box in tow!!!!

Saturday, December 3, 2011

A Birthday Feast!

My good friend Madam T had been left high and dry by her hubby for her birthday. Sometimes the ones we love just don't realize that even after many years together we still appreciate a little bit of love and attention on our birthiday.

After I found out that she had been stood up, and had to cancel out her reservation for dinner at Marque Restaurant, I knew I had better come up with something pretty decent for her birthday feast.

A thousand menus started rolling through my brain. I was really starting to stress myself out with this meal. I mean I am no Mark Best! Saying that though, all I could do was do my "best".  I had mentioned to her something about salmon, so when I asked her in a moment of sheer panic "what do you want?" her reply was I thought we were having salmon? Ok, focus, just pick something, and go with it!

For starters I chose a simple dip.

Roasted beetroot hummus with dukkah. This of course was a little risky, because as Thermomix consultants we make hummus pretty much on a weekly basis, if not almost daily!! So you often can be a little tired of the sight of it. My version though was a beautiful pink colour, and of course hard to resist.

Roasted Beetroot Hommus

1 large Beetroot, roasted at 200 degrees for 30-40 minutes, or until tender
1 clove garlic
1 can chick peas, drained
Juice of 1 lemon
Salt and freshly ground black pepper to taste
2 tbs tahini

Place the garlic in the TM process on speed 7 for 3 seconds. Add remaining. Ingredients and process on speed 6 for 10 seconds, or until the texture is to your liking.

Sprinkle with some dukkah, and voila, a beautiful pink dip!


So now onto the main. We are supposed to be in summer now, but I think that someone in the weather department has forgotten to set the thermostat to summer heat! Unfortunately I had decided to have a cool salad type meal, too late now - it will just have to do.


Baked Salmon with Tahini and Herb Salad
From Delicious Magazine, December/January edition

Serves 3-4

Side of salmon, skinned and pin boned (mine was approx 600g)
1 tbs extra virgin olive oil
1 tbs tahini
1/2 cup thick Greek style yoghurt
1 tbs lemon juice
2 tsp sumac
2 preserved lemon quarters, flesh and pith removed and discarded, rind finely chopped
1 bunch coriander, leaves finely chopped
1 bunch flat leaf parsley, leaves finely chopped
50g toasted pine nuts

Preheat oven to 140 degrees. Line a large baking tray with baking paper. Place the salmon on the tray, sprinkle with the olive oil. Season well with sea salt and freshly ground black pepper. Bake for 20 minutes. Remove from the oven, cool completely.

Meanwhile, combine yoghurt, tahini, lemon juice and 1 tsp sumac, and season well with salt and freshly ground black pepper.

In a separate bowl, combine the preserved lemon, herbs, pine nuts, and the remaining 1 teaspoon of sumac together.


To serve place the fish on a large platter, spread the yoghurt and tahini mixture over the fish, and then scatter the herb mixture over the top of the yoghurt mixture.

So now what to serve with that - the recipe suggested roasted potatoes, but on the next page of the magazine there was a recipe for quail with a broad bean and tomato salad it looked really nice, so I decided to pair it with the salmon.

Broad Bean and Tomato Salad


400g tomato medley
1 clove garlic, crushed
1 tbs olive oil
1/2 red onion, finely sliced
1 tbs honey
1/2 tsp ground cumin
1/4 tsp ground cinnamon
200g broad beans, prodded, blanched, refreshed
1 bunch miniature asparagus

Preheat the oven to 200 degrees. Line a baking trade with baking paper. Place the tomatoes, garlic and onion, and asparagus on the tray, drizzle with the honey and oil. Scatter with the spices, then roast for 30 minutes, or until the tomatoes have softened. Allow to cool. Toss the cooled roasted tomato mixture with the broad beans. Season.


Arrange the vegetable salad around the fish.


But wait, there's more.....

I wake up every morning and read my emails, and drool over the latest food porn awaiting me in my mail box (via Food Buzz). One particular morning this led me to a food blog called Manu's Menu. What a lovely site. It certainly got my interest, because as you know I am heading off to Italy next year, and here on her blog Manu had some lovely Italian cuisine.  One recipe that caught my eye was one for Foccacia di Recco.  Manu went on to say that the foccacia that we usually eat (the fluffy kind) is not traditional. Her photos convinced me that I had to try this type of Foccacia - and let me tell you after eating her version - I am converted. It was absolutely delicious!  Oops - I forgot to take a photo - but Manu has some lovely photos on her site!

I urge you to visit her blog and try the recipe!!!

Right that was the main course over with - but it's a birthday, and what is a birthday without a sweet treat!!!

I had recently made some home made lemon curd, so I was keen to incorporate this somehow into a dessert.  Here is what eventuated!


Hazelnut and Chocolate Dacquois with Lemon Curd and Fresh Berries

4 egg whites
1 tsp white vinegar
200g caster sugar
50g hazelnuts, toasted, finely crushed
100g dark chocolate, finely grated

Vanilla Bean Whipped Cream
Lemon Curd
Blueberries
Strawberries

Preheat oven to 150 degrees.

Lightly grease and place baking paper in the base of muffin pan (with removable bases) or grease egg rings, and place on a baking tray.

Make sure that your bowl and blades are completely clean, or the egg whites will not whip up.

Place egg whites and vinegar in to the TM bowl (or electric mixer).  Whip until the egg whites have soft peaks.  Gradually add the sugar, beating well after each addition.  When the mixture is thick and shiny. gently fold in the nuts and chocolate.

Place the mixture into the prepared pans (rings).

Cook the meringue for 10-15 minutes, or until firm to the touch.  Allow to cool in the oven, with the door slightly ajar.

To serve slice the meringue in half horizontally, using 3 pieces for each dessert stack.

Place on section on serving plate, top with a dollop of whipped cream.  Place second meringue disc on top of the cream.  Place a dollop of lemon curd on the meringue, along with another dollop of whipped cream. Top with another meringue disc.  Top with a little whipped cream, and then add several blueberries.  Place some sliced strawberries and a dollop of whipped cream on the side.  Dust with a little icing sugar.


I am pretty sure, that even though this meal was not up to par with Marque, Madam T was pretty pleased with her birthday feast.  Happy Birthday my friend!!!

To team up with the birthday celebrations, I was lucky enough to receive this week, The Editor's Pick, Fantastic Foodie award!!!

Monday, November 28, 2011

Bouillabaisse in a Bag with Rouille

My loyal readers should know by now what a sucker I am for a gorgeous cookbook, especially one with drool worthy photos!!!

So it should come as no surprise when I tell you that when they recently offered a free copy of "Delicious Simply the Best Cookbook" when subscribing to Delicious Magazine - I said yes immediately!!!  I offer let my subscriptions lapse just so I can see what offers they will entice me with!!!  I have received many free cookbooks this way - a girl can never have too many, now can she???


The other day when the postman came and delivered my anxiously awaited parcel, let me tell you I had that envelope open before I had even left the letterbox!!!  My mouth was seriously salivating before going more than 20 pages into the book.  This book was full of serious food porn!!  Every page a beautiful full page photo - I couldn't wait to start cooking!!!

One of the first dishes that caught my attention was the one entitled Bouillabaisse in a Bag - my second love after food porn, is of course seafood!!!  This recipe looked right up my alley - and so simple too.  I ummed and aaghed  about how I was going to actually make it.  I did think about steaming it (in the varoma on my Thermomix) - but then decided as I already had the oven going making fresh bread I would just go ahead and cook it in the oven as the recipe suggested.  I did, however, make a couple of little alterations along the way (what did you expect?)


Bouillabaisse in a Bag
Adapted from Delicious Simply the Best Cookbook by Valli Little

Serves 3-4 (depending on how much you love seafood!!!)

12 green prawns, peeled, (tails intact, deveined
350g skinless, boneless white fish (I used Marlin)
350g skinless, boneless salmon fillet
12 mussels, scrubbed and beards removed
12 cherry tomatoes, halved (I used a tomato medley)
1 cup podded broad beans, blanched, and peeled
1 cup frozen baby peas
1 cup dill sprigs
4 cloves garlic, crushed
1 lemon, thinly sliced
1/2 cup (125ml) dry white wine
Extra virgin olive oil to drizzle


Preheat oven to 180 degrees.

To prepare the parcels lay out 2 sheets of foil for each package that you are making.  Place one sheet horizontally, and one piece vertically (you want them to form a cross).


Divide the seafood, tomatoes, beans, peas, 3/4 of the dill, and the lemon slices among the parcels.  Drizzle with the white wine and a little olive oil.  Seal the parcels, by gathering up the sides, and securing the tops well.  Add an additional layer of foil if necessary to ensure a tightly sealed package.


Place the parcels in the oven and bake for 10-15 minutes, or until the seafood is just cooked through and the vegetables are tender.

Now here is where I made another deviation to the recipe.  Valli suggested that you serve the dish with an aioli and boiled potatoes.

I decided that because I had lovely fresh bread that the potatoes were unnecessary, and I really didn't feel like an aioli, so instead I made a rouille.

What is a rouille you may ask??  A rouille (rhymes with bluey) is basically a mayonnaise type sauce, but with colour and texture.  The word rouille is french for rust - so it gets it's name from the deep red colour that the chillies and capsicum give to the mayo.  The textured part comes from breadcrumbs.  Typically it is used to enhance a bouillabaisse, but can also be served with roasted meats.  I am so glad I went with my gut instinct on this one - it was the perfect match for this dish!!!


Rouille
From Meat on The Menu, Thermomix Cookbook

70g stale breadcrumbs
60g water
200g roasted red capsicum, deseeded and peeled (approximately 2 capsicums)
1 long red chilli
1 clove garlic
1/2 tsp cayenne pepper
1 egg yolk
1 tbs lemon juice
sea salt to taste
60-80g extra virgin olive oil

Place the breadcrumbs into water in a small bowl and allow them to soak for several minutes.

Place the capsicum, chilli, garlic and cayenne pepper into the TM bowl, blend for 10 seconds on speed 7.  Scrape down the sides of the bowl.

Squeeze the excess moisture out of the bread using your hands.  Place the bread into the TM bowl along with the egg yolk, lemon juice and salt.  Blend for 10 seconds on speed 10.  Scrape down the sides of the bowl.

With the dial set to speed 4, add the oil to the reservoir, with the MC in place, and allow the oil to seep slowly into the TM bowl (taking approximately 2 minutes to add all the oil).

The mixture should be the consistency of a thin mayonnaise.

Note: you can make this in a food processor if you want.

To plate up the Bouillabaisse, gently empty the parcels into a wide, soup type plate.  Top with additional lemon slices, dill springs and a dollop of rouille.


Mmmmmm was this dish good!!!!  A slice of freshly baked bread comes in oh so handy, to mop up all the lovely garlicky, seafoody liquid in the bottom of the plate!!!


This was a lovely, tasty, easy dish to make - if you are having a dinner party and want to impress, this is one to try!!!  Why wait for a reason though - this is a good simple dish to try anytime!!!

So tell me Dear Readers are you addicted to food porn too???  Come on, don't be shy tell us all about it!!!

Friday, November 18, 2011

Coconut Crusted Salmon with Passionfruit Mayonnaise

The summer fruit has all arrived in the fruit shops, but somehow the summer weather seems to have made a wrong turn somewhere en route to Sydney!

Monday, we were all rushing to find our shorts or the coolest of clothes, as we sweltered in unbearable heat.  The night that followed was no cooler, and we wrestled with the bed sheets trying to sleep in the oppressive heat.

The next day the air was filled with the smell of bushfires (thanks to backburning that had gone a little awry!!) and all of this makes you think that summer has finally arrived, and hot glorious days are here to stay - then

WHAMMO!

It's cold again!  Today I sit here rugged up in jeans and a sweater, and wonder what warm comforting food I can make for dinner tonight!  I tell you it's crazy!

This meal was from last weekend when the nights were balmy, and I was dreaming of summer!  Perhaps those nights will come again, and this is the perfect meal to serve then!!

It's a little left of centre - but in a really good way.  I wondered what the passionfruit mayonnaise would be like, and I must say I really liked it.  The quantity the recipe makes will leave you with some left over, and I am contemplating using it with some prawns and mango - in a some kind of salad.

The recipe says that it serves four - but I found that the coconut crust was enough to make a fairly substantial topping for two large tail pieces of salmon.  I will give you the recipe as it appears in the magazine, and let you make the judgement call on what size, or how many pieces of salmon to use.


Coconut Crusted Salmon with Passionfruit Mayonnaise
From Good Food Magazine, December issue - Recipe by Ross Dobson

Serves 4

1/4 cup (60ml) coconut cream
1/4 cup (35g) unsalted raw cashews, lightly roasted *
1 cup mint leaves
2 tbs lime juice
1 tbs fish sauce
700g salmon fillet, skin on **
lemon wedges to serve

Passionfruit Mayonnaise

2 egg yolks
1 tsp lemon juice ***
3/4 cup (185ml) light olive oil ****
3 tbs passionfruit pulp (approximately 2 large passionfruit)

Place the coconut cream, cashews, mint, lime juice and fish sauce in a food processor (or the Thermomix).  Process to a thick, smooth paste.

Place the salmon, skin side down, on a lined baking tray.  Rub the cashew mixture all over the salmon flesh, and refrigerate for 30 minutes.

To make the passionfruit mayonnaise, whisk the egg yolks and lemon juice in a small bowl.  Whisk in the oil a little at a time, until the mixture is combined and thick.  Stir in the passionfruit, and set aside.

Note:
Of course I made the mayonnaise in the thermomix - here is my version.  With the butterfly in place, add the egg yolks and lemon juice to the TM bowl.  Put on speed 4 and mix until the the egg yolks and juice are combined.  With the motor still running on speed 4, add the oil to the reservoir, making sure that it drips slowly.  Continued whisking until the mayonnaise is totally emulsified - this should take between 2 - 3 minutes.  It will make quite a thick consistency.  Add the passionfruit pulp to the mayonnaise, mix gently on speed 3 until combined.  Season well with salt and freshly ground black pepper.  Set aside.  I really does need seasoning - the salt really picks up the passionfruit flavour!!

Preheat the oven to 200 degrees (fan).  Roast the salmon for 15-20 minutes, or until golden and medium rare, or cooked to you liking. (You may need to place under the grill to crisp up the crust - but watch it carefully if you do!)  Cover loosely with foil and allow to rest for 5 minutes.

Serve with vegetables or salad of choice, passionfruit mayonnaise, and lemon wedges.


My changes:
* oops - I forgot to toast the cashews - it was fine.  You could also just buy already roasted, unsalted cashews.

** I used 2 x tail pieces - you could also use 4 x smaller pieces of salmon.

***  I used lime juice as it was leftover, and I couldn't be bothered cutting a lemon for 1 teaspoon worth of juice!  Added a nice zing to the mayo!

**** I used light olive oil, but I think next time that I would actually prefer to use an even lighter flavoured oil, such as rice brain oil (which is what I usually use when making mayo).

This was a great summertime meal - and really quite easy if you are entertaining.  You can make the crust ahead of time, and place it on the salmon.  Make the mayo in advance and then just serve it with a lovely salad.  Your guests will be suitably impressed I am sure!