WELCOME TO MY KITCHEN


WELCOME TO MY KITCHEN!!
I hope you enjoy the food!!!
Showing posts with label Kid Friendly. Show all posts

Wednesday, May 30, 2012

Lamb Meatballs with Chickpea and Potato Mash and Tomato Sauce

Finally, finally, finally, a meal to get me out of the blogging doldrums!

You see it's not so much that I haven't been cooking, it's just that the meals that I have been cooking haven't really been up to blogging standard.

There was the home made ravioli that still needs a little tweaking.  We won't even mention the mozzarella that lived it's days under the aspersion that it was ricotta!  Then there was the sad, sad pork belly that just did not pass muster.  I was so pinning all my hopes on that one too!  It was a Maggie Beer recipe that I diligently copied to my phone as I sat at the chiropractor's office last week.  That one held so much promise, I mean when does pork belly ever go wrong?  When you are hoping to use it as a comeback recipe that's when!  I don't know what went wrong with that one, but to me it seemed like it needed at least another 3 hours of cooking (that would be 6 in total!).  It did redeem itself though as a comeback queen in the next night's pizza topping!  I did, however, make a pasta all'amatriciana that was good, but I forgot to take a photo of it!

So when last night's dinner had a resounding Yum! I thought I just better get straight onto it, and blog about it!


 Lamb Meatballs with Chickpea and Potato Mash and Tomato Sauce
Adapted from recipe found in MasterChef Magazine, June edition 

Serves 4-6

Meatballs 

1.2 kg lamb mince
6 shallots (green onions) finely chopped
1 cup loosely packed mint leaves, finely chopped
1 cup loosely packed flat leaf parsley, finely chopped
3 cloves garlic, finely chopped
200g feta cheese, crumbled
salt and pepper to taste

Place all the ingredients in a large bowl, and with your hands mix well.  Roll into golf ball size meatballs, and place on a tray.  Cover and allow to sit in the fridge for at least 10 minutes.

When ready to cook place on baking dish, and bake at 200 degrees for approximately 45 minutes, or until golden, and cooked through.  Make sure you turn at least once during cooking.

Now to start on the mash....

Chickpea Potato Mash 

 kg potatoes, peeled, cut into 2cm pieces
4 cloves garlic
400g can chickpeas
1-2 tbs sour cream
Salt and pepper to taste

Drain the chickpeas, leaving a small amount of liquid with them.  Place the potatoes, chickpeas and garlic into a large saucepan of salted water.  Bring to a simmer over medium high heat and cook for 10-15 minutes, or until the potatoes are tender.  Drain.

Mash the potatoes with a potato masher (or fork).  Add the sour cream and season to taste with salt and pepper.  Don't add too much sour cream, you don't want the mixture too sloppy!

While the potatoes are cooking, it's time to get onto the tomato sauce....

Tomato Sauce 

1 red onion, finely chopped
400g can of diced tomatoes
4 Roma tomatoes, finely chopped
1/2 cup chicken stock
1 tbs balsamic vinegar
1 tsp sugar
Salt and pepper to taste

Place the onion in a medium sized saucepan with a little olive oil.  Sauté gently for 5 minutes, or until softened, and starting to turn golden.  Add the chicken stock, and bring to the boil.  Simmer until reduced slightly.

Add the canned and fresh tomatoes, and bring to the boil.  Simmer for 5-10 minutes, or until thickened slightly.

Add balsamic vinegar, sugar, and salt and pepper to taste.

Place the mash on the bottom of a serving dish.  Top with the meatballs, then top with the tomato sauce.


As a friend of mine would say "Yumbo Scrumbo!"

And so now I am back in the game!  Let's see if I can continue!

OK, so I must apologise with the photos - I am using my iphone (yeah I know!!)  I will get back into the swing of things here I promise!!!

Just to keep me honest - tonights dinner is Slow Cooker Chicken Cordon Bleu - stay tuned if it's a success I will post (fingers crossed!)

Thursday, November 17, 2011

Home Made Fast Food

I have had several comments lately from loyal readers commenting that my posts have been somewhat irregular of late.  I explained that I have been (as most people) a little time poor lately and have simply been churning out quick and easy dinner solutions.  I was then asked, well what kinds of things have you been making?  Can't you share those with us, we need a little inspiration to??

So here is what I churned out last night - fast food, but home made and healthy!

As "The Darlings" have a love of anything that comes wrapped in flat bread I was sure I would be onto a winner here.  They didn't even comment about the pieces of green stuff in the meatballs, probably because once it was all wrapped up, they were so intent on devouring it, they didn't even see it!!!!  Saying that - they didn't eat the tabbouli - but you can't expect miracles now can you???


I started off by making a hommus - it appears going back through my blog, that I haven't given you the recipe for this before, but it is a stock standard Thermomix recipe.

Hommus
From Thermomix EDC Cookbook

1 clove garlic
400g can chick peas, drained
juice of 1 lemon
2 tbs tahini
40g olive oil
salt and freshly ground black pepper to taste

Place the garlic in the TM bowl and chop for 3 seconds on speed 7.

Add all other ingredients and mix 30 seconds (for a coarser style dip) or up to 1 minute (for a creamy style dip) on speed 4.

Remove approximately 90% of the dip, place in a container, and refrigerate until needed.

With the 10% of the hommus left in the TM bowl, it's time to make the tabbouli.

Tabbouli
Adapted from Meat on the Menu - Thermomix Cookbook

1 cup of burghul
2 green onion/shallots, cut into approximately 6 cm pieces
2 bunches of continental parsley, broken into halves
1 large bunch mint
juice of 2 lemons
50g olive oil
sea salt and freshly ground black pepper
3-4 large roma tomatoes, halved, and seeds removed
1 lebanese cucumber, halved, seeds removed, then halved again

Place the burghul in a bowl and cover with boiling water for approximately 30 minutes.  After 30 minutes, drain well, before adding to salad.

Place the shallots, parsley, and mint into the TM bowl (along with the remaining hommus).  Chop for 5 seconds on speed 6.  Scrape the bowl down, and repeat if necessary.

Add the lemon juice, olive oil, tomatoes and cucumber.  Place on closed lid position, and press turbo 2-3 times until the desired consistency is achieved.

DO NOT RINSE OUT THE BOWL!!!!  One of the great things about the Thermomix is that you don't need to keep washing the bowl all the time - often times you want the transference of flavours to the next thing you are making - of course, make sure you wash it well after mincing the meat!!!!!

Note:  I find that using the turbo function gives you much more control and a lovely uneven chopped consistency - as opposed to simply "processed".

Add the well drained burghul and season well with sea salt and freshly ground black pepper.  Place in a bowl and place in refrigerator until needed.

Now onto the Meatballs......

Beef and Feta Meatballs
Adapted from Meat on the Menu - Thermomix Cookbook

large handfull continental parsley
large handful mint
4 cloves garlic
3 green onions/shallots, cut into approximately 6cm pieces
1kg rump steak, trimmed and cut into large cubes
2 tsp cumin powder
100g fresh breadcrumbs
1 egg
200g feta cheese

Place the shallots, mint, parsley and garlic in the TM bowl and process for 3 seconds on speed 7.  Scrape down the bowl and repeat if necessary.  Remove from the TM bowl, and place into a large bowl.

Place the bread into the TM bowl and process on speed 8 for approximately 10 seconds, or until fine breadcrumb stage.  Remove from TM bowl and add to the herb mixture.

In 200-250g lots process the rump steak by putting in closed lid position and pressing turbo 2-3 times, this will give you a lovely inconsistent texture - some large some small.  Remove from TM bowl and place in large bowl with other ingredients.  Repeat until all the steak is minced.

Crumble the feta cheese, and in closed lid position hit turbo 1-2 times, or until the cheese is just crumbled.  Add the cheese to bowl with all the other ingredients.

To the bowl containing the mince and herbs add the egg, cumin, and season well with salt and pepper.  Using your hands mix the mince and seasonings until well combined.

To save washing up I like to use disposable aluminium trays - spray one or two (depending on size) well with olive oil spray.

Take a small handful of the mince mixture and shape into a torpedo shape.  Place in the prepared aluminium tray.  Repeat until all mince has been shaped.  Cover and place in the fridge for 30 minutes.

Preheat oven to 220 degrees.

Spray the tops of the meatballs with olive oil spray and bake for 110-15 mintes, or until starting to turn golden.  Turn over, spray the other side with olive oil spray and cook for an additional 10-15 minutes, or until cooked through.

To assemble your meal, heat a pice of lebanese flat bread in the microwave for 20-30 seconds.  Spread the bread with a good lashing of hommus, top with 2 meatballs, add a large dollop of tabbouli, then garnish with sauce of your choice - mine is hot chilli sauce!!!!


So there you have our fast and easy dinner last night!!!!


Hope it gives you some inspiration for your dinner tonight!!!  I know it appears that there are a lot of steps to this - but in reality it all took between 30-60 minutes to prepare and all of the hard work was done by thermie.  The most time consuming thing was shaping the meatballs!!!

For all those out there that always ask me "Do you really use your Thermomix?" - there you have your answer!!!  It made making this meal oh so simple - no laborious chopping - just a couple of seconds of button pushing!!!!  I use Thermie practically everyday in some way or another!!!  Don't know how I ever did without my little friend!


Saturday, March 26, 2011

Asian Style Meatballs with Rice Noodles

It seems that I am on a bit of a roll at the moment, in more ways than one!  (no pun intended!!)

I was stuck for a dinner idea this week, I remembered how well the Italian Style Meatballs went down the night before, so I decided to make an Asian version, but instead of using pasta, using rice noodles.  "The Darlings" love Chinese Spag Bol - so let's just use the same basic ingredients and turn it into a meatballs dish.

One thing I learnt while mincing the chicken for the meatballs in the Thermomix is that different meats mince differently.  The breast meat minced very easily - the thigh meat however, took a little longer, I guess because of more sinew or something.  Not sure - but if you are mincing your own meat - be aware of this.  I wanted to add some thigh meat for the little bit of extra fat - meatballs can be quite dry with absolutely no fat in them - also I think thigh meat has a little more flavour.


Asian Style Meatballs with Rice Noodles

Serves 6


1 x red onion
4 cloves garlic
5cm piece ginger
100g fresh breadcrumbs
2tbs dark soy sauce
1 egg, lightly beaten
500g chicken breast fillets
500g chicken thigh fillets
1/2 cup hoi sin sauce
1/2 cup Shaoxing Cooking Wine
1kg fresh rice noodles
300g endamame beans
1 tbs sesame oil
2 green shallots, finely sliced

Place the bread into the TM bowl, process for 10 seconds on speed 8.  Remove from the TM bowl and place in a bowl.

Add the onion, garlic and ginger to the TM bowl, process for 3 seconds on speed 7, scrape down bowl, and repeat until chopped to desired size.  Remove and place with the breadcrumbs.

Mince the chicken in 200-300g lots by processing for 15 seconds on speed 7.  Repeat until all meat has been minced.

Place the breadcrumbs, chopped onion mixture, and all the chicken mince back in the TM bowl.  Add the beaten egg, and the dark soy sauce.  Place lid on TM - put in the closed lid position and process on interval speed for 2-3 minutes, or until the mixture is well combined.

Taking small spoonfuls, and with wet hands, roll the meat into walnut sized meatballs.  Place on a foil lined tray.  Put in the fridge for 30 minutes to firm up.

Heat a small amount of oil in a large frypan over medium heat.  Cook meatballs for approximately 5 minutes, turning often, or until cooked through.

Steam the endamame beans for 5 minutes, or until cooked through.

Pierce the bag of rice noodles with a knife, and place in the microwave for approximately 5 minutes, or until warmed through.

Return all the meatballs to the pan, and the sesame oil, hoi sin sauce and cooking wine.  Add the warmed up rice noodles, chopped up green shallots, and 1/2 cup of water.  Combine well, adding more liquid if needed.


Serve topped with endamame beans. (No, of course "The Darlings" didn't eat those - don't be silly - they are green!!!  The "Fussy Darling" even picked out the shallots!)
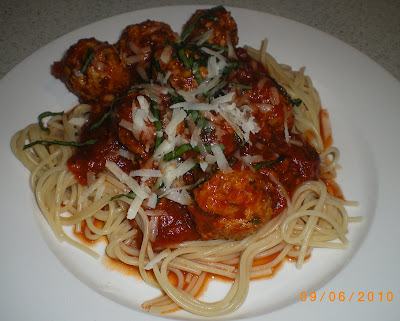


The verdict - "The Meatballs Darling" was in raptures again!!!  The way I see it - it was ostensibly the same meal two nights in a row - but with different flavours - nothing wrong with that in my books!!  It all got eaten - that is the main thing.

So tell me Dear Readers if you find a winner - do you repeat often, but perhaps with slight variations??


Friday, March 25, 2011

Italian Pork Meatballs

When is a sausage not a sausage? When you turn it into something that both you and the kids love!!! I saw this recipe in the current edition of Delicious Magazine - and knew straight away that it would be a winner with "The Darlings".  Of course I have "tweaked" it a little - as I usually do!!!  Here is what we ended up with!


Italian Pork Meatballs
Adapted from Delicious Magazine - March Edition

Serves 6


1kg Pork, Sage and Onion Sausages
2 tbs each oregano and rosemary
120g fresh breadcrumbs
1 onion
4 cloves garlic
2 x 700g bottles passata
red wine
2-3 tbs tomato paste
1 tbs TM vegetable stock concentrate
500g dried spaghetti
handful of fresh basil, chopped

Parmesan and crumbled fetta to serve

Place the breadcrumbs in the Thermomix bowl - process for 10 seconds on speed 8.  Place in a bowl.  To the TM bowl add the onion, garlic, oregano and rosemary, process fro 3 seconds on speed 7, scrape down bowl and repeat until processed to your liking.  Squeeze the meat from the sausages into the TM bowl along with the chopped herbs/onion.  Add the breadcrumbs and process on Interval speed, closed lid position, for 2 minutes.

Taking small spoonfuls, make meatballs approximately the size of walnuts.  Allow to sit for 20 minutes in the fridge to firm up.

Heat a frypan to medium high heat, and brown the meatballs in batches, until they are slightly golden.


Place in a large saucepan, add the passata (now here is what I did - I added a good slug of red wine to the passata bottle to ensure I got it all from the bottle - so this is not an exact science!!)  Add the tomato paste, and the stock concentrate.  Season with salt and pepper, and  basil. Simmer for 10 - 15 minutes, or until the meatballs are cooked through.  In the meantime cook your pasta, drain well.

Add the cooked pasta to the meatballs and sauce.

Serve with crumbled fetta, and or grated parmesan cheese.


One of "The Darlings" said to me "Mum, this is the best meal ever - Only one thing would have made it better - your garlic bread!!  (Sorry, didn't have time for that today - perhaps next time!!!) Music to my ears!!!

So the humble sausage had a makeover, and turned itself into a family friendly Italian Meatballs dish that had everyone coming back for seconds!!!


Monday, March 14, 2011

BBQ Chicken and Pineapple Skewers

Travelling around food blogs is fun!!

You can catch a glimpse into what others are serving at their table.  A lot of the time though I get terrible food envy.  I envy those bloggers who don't have children, and can dine on the fine stuff all the time, I envy the bloggers who have children who will eat vegetables without complaining, but most of all I envy other people's ability to take such beautiful photos.  Perhaps one day I will get a real camera and I too will have lovely photos adorning my blog!!!

When you visit other blogs you get inspiration, and often come away thinking "I am going to make that" - the trouble is there are so many recipes running around in your head that if you don't do it then and there, you often forget where you saw the recipe.  Recently when I was visiting Pam's house I saw that she had made this lovely recipe - BBQ Chicken and Pineapple Skewers.  This was a must, and was quickly added to the menu for the up coming week.  The flavours in the BBQ sauce are great, and the combination of the chicken and pineapple is a winner.


BBQ Chicken and Pineapple Skewers
From The Love of Cooking website 


1 cup tomato sauce (ketchup)
1/4 cup soy sauce
1/4 cup honey
1/4 lemon, juiced
1 tbs yellow mustard
1/4 cup brown sugar
4 cloves garlic

1/2 fresh pineapple, diced
3-4 chicken breasts (depending on size) diced *

Combine the tomato sauce, soy sauce, honey, mustard, brown sugar, lemon juice and garlic in a small saucepan.  Cook over medium heat for approximately 20 minutes, stirring often.

Allow to cool.

Place diced chicken in a large bowl.  Add approximately 1/2 of the BBQ sauce, mix well and allow to marinate for at least 1 hour.

Thread diced chicken and pieces of pineapple onto skewers.  Place under under a hot grill and cook for 5-10 minutes, turning often, or until golden and cooked through.


Serve with steamed rice, salad and or vegetables.

I think the next time I make this recipe I will actually use thigh fillets - I found that the breasts were a little dry for my liking - but I will leave that up to you.

We had a skewer left over - so guess what - tonight being pizza night there will be a BBQ and pineapple pizza on the menu!!!!!

Thanks Pam for your inspiration for dinner!!!  Sorry my photos do not do it justice!


Thursday, February 3, 2011

Oaty Chocolate Caramel Rice Bubble Bars

Well by now the kids will have settled back into school.

If you are lucky/unlucky enough to be here in Sydney, the poor kids will have not only had to settle back into the classrooms, but they have had to deal with the extreme heat that we have been experiencing  (I feel like I am melting!!!).

If you are looking for a little something to add to their lunchboxes here is a really easy recipe that they will love to eat.


Oaty Chocolate Caramel Rice Bubble Bars
adapted from a recipe found in Good Taste February edition

Makes 14 bars


Melted butter to grease pan
4 cups rice bubbles
1 cup rolled oats
1 can (395g) condensed mik (skim if you like)
60g butter
80ml (1/3 cup) honey
230g milk chocolate chips

Grease a 20 x 30cm cake pan with the melted butter.  Line the base and both long sides with baking paper, just make one long piece and drape it in!!

Place the rice bubbles and the oats in a large bow, mix to combine.  Make a well in the centre.

Combine the condensed milk, butter and honey in a small saucepan.  Stirring constantly over low heat, cook for 10 minutes, or until the mixture turns pale caramel in colour. (Do not take your eyes off the mixture, or stop stirring - or it will turn on you in an instant!!!!.

Add the caramel mixture to the oat and rice bubble mixture.  Stir until well combined.  Add approximately 1/2 of the packet of chocolate chips to the mixture - they will melt - but that is OK - it makes it kind of chocolately and caramel at the same time!!

Press the mixture into the prepared baking tray, pressing firmly.

Sprinkle over the remaining chocolate chips, pushing them gently into the mixture.

Place in the fridge for several hours to set.

Cut into bars - and voila - you have happy kids!!!!

Store in an airtight container in the fridge!!


PS the big kids like these too!!!

So Dear Readers do you have any tips for surviving the heat - please tell!!!

Friday, October 15, 2010

Muesli Slice

In a baking mode the other day I made several things to include in the kid's school lunch boxes.

It's not easy filling boys and it's not easy keeping track of all their likes and dislikes (of which there are many!!)  So often I will have to have several options, and remember who doesn't like which, or else I'm in trouble.  Can you believe one of "The Darlings" hated" the Banana Chocolate loaf I made the other day - see what I am dealing with here???  I tell you I am just about ready to trade the lot of them in and advertise for a new family - one who loves food!  It seems at the moment the simpler the better is our way of eating.  Do they grow out of this, and if so WHEN???? - Or do they just become fussy men?

Anyway, if you are looking for something to give them when they come in from school, or something to throw into the lunch box - here is a good option.


Muesli Slice

1 cup untoasted museli
1 cup self raising flour
1 cup rolled oats
3/4 cup coconut
125g dried apricots, chopped
1/2 cup firmly packed brown sugar
185 butter
2 tbs golden syrup
1 egg

Preheat oven to 180C

Lightly grease and line a lamington tin ( 28cm x 18cm) with baking paper

Mix the muesli, sifted flour, oats, coconut, apricots and sugar together in a bowl.


Melt the butter and golden syrup together over low heat, pour into the muesli mixture.  Stir in the lightly beaten egg, mix all ingredients well.


Spread into the prepared tin.


Cook in oven for 25-30 minutes, or until golden.

Allow to cool in tin.  Cut into squares or slices.


I got two out of three that liked it - Mr Fussy wouldn't even try it!  Kids!!

So Dear Readers do you have fussy eaters in your house, how do you deal with it?  Are you continually making several meals/alterations a night?  And more importantly do you have any advice??

Friday, October 8, 2010

Cheap & Cheerful - Tuna Croquettes

Not a lot has been happening in the kitchen at CCC this week - well nothing of real note.  It has been quick and easy, get it on the table stuff.

I will share the following recipe you - although it was not a huge success for me.  You see "The Darlings" don't like tuna!  Once I got them to eat it in a pasta dish - when cornered for a name I called it Chicken of the Sea!  As soon as I had uttered those words they started gagging, and they were not to be fooled this time!  I actually quite like a good tuna croquette - but you can't please everyone!  I haven't had much success with making these in the past - but I must say although not a success on the table they were a success as far as the making of them was concerned.


Tuna Croquettes


Mades 15 croquettes


500g potatoes
500g can tuna in brine
3 shallots, finely chopped
1 egg
cornflake crumbs


Peel, and cook the potatoes in boiling salted water until tender.  Drain well.  Mash - do not add anything!!  Transfer to a shallow bowl and put in the freezer for 5 minutes.


Remove from the freezer and add the flaked tuna, chopped shallots, and season to taste with salt and freshly ground black pepper.


Take a small handfull of the mixture and shake into a croquette shape.  I found it was best to shape them all before I attempted to crumb them.


Place the cornflake crumbs in a large flat plate.  Roll the croquettes in the crumbs, then place on a tray that has been lined with baking paper.


Place the crumbed croquettes in the freezer for 5-10 minutes.


Heat about 1/2cm of oil in a frypan, and lightly fry all sides of the croquette, until golden, and heated through.


They may not be everyone's cup of tea, and they are certainly not gourmet - but if you are looking for something to stretch the budget a little further they certainly are a cheap meal.

Wednesday, September 29, 2010

Marshmallow Rice Bubble Slice

I am not going to make any excuses for the following recipe, other than to say it is school holidays!!!  All you mums out there know what that means.  Hungry tummies home all day, extra children over (I think I had six in total here yesterday!).  All you seem to hear is I'm hungry can I have something to eat?

So I raided the pantry trying to figure out what I could make quickly, trying to remember what someone had told me recently about making "homemade LCMs" - and here is what I did.


Marshmallow Rice Bubble Slice


6 cups rice bubbles
1 pkt marshmallows (125g) - plus I had a few random ones in a pack
65g butter
pink food colouring
100g chocolate


Lightly grease a lamington pan with butter, then line the base with baking paper.


Place the rice bubbles in a large bowl.


Put the marshmallows and butter in a saucepan over medium low heat.  Stir the mixture constantly until all the butter and marshmallows are melted.  Add a few drops of pink food colouring, until desired colour.


Pour the marshmallow mixture into the rice bubbles.  Mix quickly, making sure that all the rice bubbles are coated in the marshmallow mixture.


Place the mixture into the prepared tin.


Melt the chocolate over low heat, until all the chocolate is melted.


Using a spoon drizzle the chocolate over the marshmallow slice.


Put in the fridge for 20-30 minutes, or until set enough to cut into squares.

You are now ready for the next tummy rumble!!!


Tuesday, September 14, 2010

Gnocchi with Meatballs and Brown Bread Ice Cream

We had a bit of a disjointed weekend this weekend - or should I say hectic.  I was watching one of "The Darlings" compete at an athletics carnival all day Friday and then we flew to Byron Bay for the weekend to celebrate a milestone birthday in the family.  So, not a lot was prepared in the food department this weekend, and not a lot of preparation (read grocery shopping) was done either!

Needless to say yesterday, although feeling a little wiped out from the weekend, I decided that a little time in the kitchen would fix that.  I had one of "The Dalrings" home yesterday - he too was wiped out!!  I asked him what he would like for dinner, and the response was gnocchi!!  What should I do - the usual spag bol type thing, or something creamy????  I had the gnocchi already, and most of the things to add whichever way I went - just needed to decide on the meat.  After wandering aimlessly in the meat department I stumbled upon these..


They were on special too - 2 packs for $8.00!!  Bargain.  So it was decided Gnocchi with meatballs.

This is the quantity that I made - it made a lot - enough for 6 with leftovers!!

Gnocchi with Meatballs


Serves 6


2 x 500g packets of sausages of choice 
1 x 500g bottle of good quality pasta sauce
1 x 400g can chopped tomatoes
1 x onion, finely chopped
2 cloves crushed garlic
150g bacon, diced
1 large zucchini, quartered, then cut into chunks
3/4 cup of frozen peas
2 x 500g packets gnocchi (shelf kind or fresh)
150g grated cheese
100g grated parmesan cheese


Preheat oven to 180 C.


Make a small cut in the end of the sausages, and squeeze out small amounts to make little meatballs.  Gently fry in a non stick frying pan over medium heat for approximately 5 minutes, or until cooked.  Remove from pan, and place on a plate that has been lined with a paper towel to remove any excess fat.  Repeat with remaining sausages, until all cooked.


Now cook the onion, bacon, garlic for approximately 3 minutes, or until the onion starts to soften, now add the zucchini and peas and cook for a further 3-4 minutes, or until the zucchini starts to soften, and the peas are no longer frozen.


Add the pasta sauce, tomatoes, and the sausages.  Season to taste with freshly ground black pepper, and any salt if needed.


Cook the gnocchi according to directions on the packet.  Drain.


Place the sausage, tomato mixture into a large ovenproof dish.  Cover with the gnocchi, then top with the grated cheeses.  Bake in the oven for approximately 15-20 minutes, or until the golden on top.


There you have it a really easy meal.  Of course "The Darlings" picked out the green things - but oh well, such is life!!!  I am resigned to the fact that they will never eat a green thing!!!

And for dessert ........

Brown Bread Ice Cream


2 litres of good quality vanilla ice cream 
150g fresh brown/wholemeal bread (approx 3 slices)
150g brown sugar
50g caster sugar


Leave the ice cream out of the freezer for approximately 30 minutes, depending on weather - or until/ soft enough to incorporate mixture with a spoon.


Preheat oven to 200 C.


Line a baking sheet with baking paper.


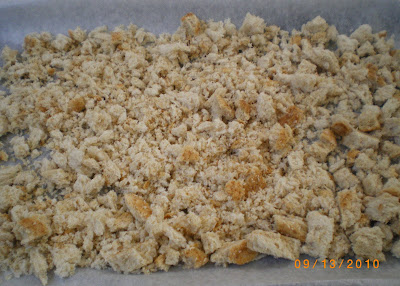
Process the bread into breadcrumbs.  Lay out on the baking paper.  Sprinkle the sugar over the top of the breadcrumbs, making sure that there is sugar all over the crumbs.


Bake in the oven for 8-10 minutes, or until the sugar starts to caramelise.  Now be very careful here - it may take a little longer - but once the sugar starts to caramelise it turns very fast.  Mine actually "caught" around the edges - but that's ok - just take the middle bits - there are heaps of crumbs!


Allow the crumbs to cool.  Break apart into small chunks.  Place the ice cream into a large bowl, and carefully incorporate the crumbs into the ice cream, working fast so that you don't end up with a sloppy milk mixture!!


Put the ice cream back into the container, and freeze for several hours (at least 6).


Serve with fresh strawberries.


You really must try this.  It doesn't taste anything like what you think it will.  The brown bread turns into crunchy toffee - and unless you are told, you would probably never guess it was actually bread in there!!

Friday, September 10, 2010

Honey Chicken

We went from one extreme to the other in this house this week.  Supremely healthy one night, then disgustingly fried the next!!  Oh well we don't do it that often so I guess it's OK!

I don't know what came over me?  A flood of a warm tenderness towards "the Darlings" - you see this is their ultimate favourite dinner - they order this whenever we go to a Chinese restaurant.  In fact it is just about all they order at the Chinese Restaurant.

So with not a vegetable in sight this is what I made them for dinner the other night!


Honey Chicken


Served 2 "vultures" and a couple of others!


1.2 kg chicken breasts (actually I bought 1 x double breast, and 1 x single breast), cut into 3cm cubes
1/2 cup cornflour
1/2 cup plain flour
1/2 teaspoon salt
1 teaspoon baking powder
3/4 cup cold water
1 egg white
oil for frying
3/4 cup honey, warmed
sesame seeds for garnish


Steamed rice to serve


Sift the dry ingredients together into a large bowl.  Gradually add the water, mixing to a smooth batter.  Just before using the batter, beat the egg white until soft peaks form.  Gently fold the egg white into the batter.


Add the chicken pieces to the batter, and gently stir to coat.


Add the oil to a large deep saucepan to a depth of approximately 5cm.  Heat over medium high heat.  In batches cook the chicken pieces until golden, and cooked through.  Removed to a paper lined plate to drain.  Keep warm while cooking remainder of the chicken.


To serve place on a serving plate, then pour over the warmed honey, and sprinkler with sesame seeds.  Serve with the steamed rice.

Don't turn your back though......


Or the "Vultures" may pounce!!!

So were "The Darlings" happy???  You bet they were!!!  Can we have that again Mum???? PLEASE????

Thursday, September 9, 2010

Light Butter Chicken

I love Indian food, but sometimes you come away with a heavy feeling.  When I saw this recipe for butter chicken, I looked mainly at the ingredients, they were all light and healthy.  Then I looked at the method, and saw that it was prepared in a way that was different to how I had ever made this before - interesting!  I did slightly alter the recipe (as usual) I hope it's for the better.


Butter Chicken


Serves 4-6


1/2 cup butter chicken curry paste (I used Pataks)
200g Greek style yoghurt
1.2 kg chicken thighs, fat removed, cut into 3cm pieces
1 tbs oil
1 large onion, cut in half, then into thin wedges
2 cloves crushed garlic
400g can diced tomatoes
120g baby spinach leaves
1/2 cup chopped coriander


Steamed basmati rice to serve
roasted cashews and coriander sprigs, to garnish


Combine the curry paste and yoghurt in a glass or ceramic bowl.  Add the chicken, stir to combine.  Cover with plastic wrap, and allow to marinate for at least 2 hours.


Heat the oil in a large deep saucepan over medium high heat.  Add the onion and garlic, cook stirring for 5 minutes, or until the onion is soft.  Add the tomatoes, cook for 2-3 minutes, or until the mixture comes to the boil.


Add the chicken and yoghurt mixture, stir until combined.  Bring to the boil, then reduce the heat until just simmering.  Simmer uncovered for 15-20 minutes, or until the chicken is cooked.  Stir through the spinach and coriander.


Spoon the rice into bowls, top with the butter chicken, garnish with chopped coriander and cashews.


This is a really lovely mild curry that even the kids will like.  To increase the intensity of the curry try adding a spoonful of hot mango chutney on top, and stirring through.  Everyone is happy then!!!!

Tuesday, September 7, 2010

Chicken Meatballs and Spaghetti

It's Monday night - back to the old routine - sport, in and out, people leaving early - and a meal has to fit in there somewhere!!

I liked the look of this recipe - you have the meatballs - who doesn't love meatballs, but you didn't have to pre-cook them - just pop them into the simmering sauce, cover and wait 20 minutes!!  How easy is that?  They were pretty tasty too!


Chicken Meatballs and Spaghetti


Serves 6


1 tbs olive oil
1 onion, finely chopped
2 cloves crushed garlic
100g pancetta, finely chopped
3 tbs tomato paste
500g bottle of good quality tomato pasta sauce with basil added
400g chopped tomatoes
1/4 cup torn basil leaves, plus extra to serve
500g dried spaghetti


Meatballs


1kg chicken breast mince
1/2 bunch of flat leaf parsley, chopped finely
1 cup fresh breadcrumbs
1/2 cup freshly grated parmesan cheese
50g pine nuts, toasted *
1/4 cup pesto


Process the bread in a food processor, and put to one side.  Use the food processor to chop the onion and garlic for the sauce, put to one side.  Then use the food processor to chop your parsley.  If you have the right attachment, you can also grate your parmesan.  Now I can hear you now "Madame T" "if you had a Thermomix you could do it all in there!!!"  Well I don't so I have to make do!! Of course you can do all this manually, but why make it hard on yourself??


Mix all the meatball ingredients together in a large bowl.  Shape into small walnut sized balls.  Place on a foil lined tray and place in the fridge for 15 minutes to firm up.  Just a tip - having slightly wet hands makes for easier meatball rolling!!!


Heat the oil in a large saucepan over medium heat.  Cook the onion and garlic for 1 minute, or until fragrant.  Add the chopped pancetta and cook for 4-5 minutes, or until the onion is soft.  Add the tomato paste, and stir to combine.  Add the pasta sauce, tomatoes and basil.  Season with salt and freshly ground black pepper.  Bring to the boil, then reduce heat to low.  Add the meatballs, try and stir the meatballs gently into the sauce (without breaking them - so that they are immersed in the sauce).  Cover with a lid and cook for 20 minutes, or until the meatballs are cooked through.


Serve over spaghetti that has been cooked according to packet directions.  Top with more shredded basil and grated parmesan cheese.


* To toast pine nuts - heat a non stick frypan over medium heat, add the pine nuts, and constantly stir over the heat until they have browned.  Once browned remove immediately from the pan, or they will continue cooking and burn.


The beauty about this dish is that there is hardly any fat in the dish - and not having to pre cook the meatballs really saves you time and mess!!  Yes, I admit making the meatballs takes a little time - but it is so much nicer than just having the usual spag bol!!!  Get the kids involved (if you dare!!!) let them make the meatballs!!!!

Wednesday, September 1, 2010

Swedish Meatballs

There are lots of recipes out there for Swedish Meatballs - and a lot of them involve cream - creamy sauce, and cream in the actual meatballs.  I liked the look of this recipe - it was another of Valli Little's - so I knew it was going to be easy!!  Easy it was, and very tasty too!!


Swedish Meatballs


Makes 24


400g pork mince
1 egg
1 onion, grated
1 1/4 cups fresh breadcrumbs
1/2 tsp allspice
1/4 tsp ground cloves
pinch of nutmeg
1 tbs olive oil
20g unsalted butter
150ml beef stock
2 tbs brown sugar


Cranberry sauce, sour cream, boiled potatoes, baby cos leaves to serve.


Place the mince, egg, onion, breadcrumbs and dry spices in a food processor, season with salt and peppe and process to combine.


With damp hands, form the mixture into 24 walnut sized balls.  Place the meatballs on a baking trap that has been lined with foil.  Cover with plastic wrap and chill in the fridge for 15 minutes to firm up.


Heat the oil and butter in a frypan over medium heat.  In batches, cook the meatballs, turning, for 3-4 minutes, or until golden.  Remove from the pan and set aside.


Wipe the frypan clean, then add the stock and sugar.  Cook over medium-low heat, stirring, for 3-5 minutes, or until syrupy.


Return all the meatballs to the pan and warm through, coating the meatballs in the glaze, for a further 1-2 minutes until warmed through.


Serve the meatballs with cranberry sauce, sour cream, potatoes and lettuce.


Note:  I wanted to serve 6 so I increased the mince to 1kg and doubled all the other ingredients.  This gave me 60 meatballs!!!  This is a lovely dish - I did end up with some left over meatballs, which I planned to turn into a pizza - but "Precious" had other ideas - she liked them so much she devoured them the next day before I could get to them!!!  Had to come up with Plan B for the Pizza!!!

HINTS: What I did was use the food processor for all the processes.  I made the breadcrumbs first, put them to one side, then used the food processor to finely chop the onion.  Then added back the breadcrumbs and all the other ingredients, and processed.  This makes for very easy preparation!!

This dish would make a lovely "appetiser" dish - just serve on a platter with bowls of cranberry sauce and sour cream (or even combine the sour cream and the cranberry sauce!!!).

Saturday, August 14, 2010

Four Ingredient Pasta

Sometimes you have to produce a meal out of nowhere.  You may have planned something, but the circumstances change and you are left wondering what you can now have.

The other day Mr. CCC took me out to lunch - we had my favourite - Bibimbap!!  Needless to say afterwards we didn't feel like too much for dinner.  So the dukkah crusted chicken with quinoa salad was put on the back burner, and something quick and easy was needed for "the Darlings".

If you have three basic ingredients on hand, you are well on the way to making a dinner that even the fussiest of kids will love.


So what is the fourth ingredient?  You can add whatever meat you have on hand - ham, a BBQ chook, or even tuna!!


Four Ingredient Pasta


Serves 6


500g macaroni
415g can tomato soup
1 x BBQ chicken, meat removed from the bones 
150g grated cheese


Preheat oven to 180 C.


Cook macaroni in boiling salted water, according to packet directions.  Drain.  Add the can of tomato soup, and chicken meat.  Mix well to combine all ingredients.  Place pasta mixture in a greased casserole dish.  Sprinkle grated cheese on top.  Bake in oven for approximately 15 minutes, or until cheese is melted and golden.


How easy was that???  How cheap was it to make?  With the pasta at around 59c and the soup less than $1  I say it has got to be one of the cheapest meals ever!!!  The kids love it - I think because the tomato soup is a little sweet, as opposed to regular pasta sauce.  Whatever the reason, all the people that I have told about this recipe say their kids love it too!!

Keep these basic ingredients on hand and you will never be at a loss for a meal again!!!

Thursday, August 12, 2010

Sang Choi Bow

Dear Readers can you see me doing a little dance of happiness???  Not only did I get one of "The Darlings" to eat some vegetables last night, but my little budding Junior MasterChef cooked the dinner as well!!!  What joy!


Together we tasted, and came up with this recipe as our version.

Sang Choi Bow


Serves 4-6 (depending on how much they like it!!!)


1kg pork mince (you can also use chicken mince)
1tbs sesame oil
4 shallots (green onions) diced
1 tbs ginger, finely diced
2 cloves crushed garlic
1 carrot, shredded
1/2 - 3/4 can (230g) water chestnuts, finely diced
150g rice vermicelli
3 tbs Shao Xing cooking wine
3 tbs soy sauce
3tbs oyster sauce
4 tbs hoi sin sauce
50g toasted sesame seeds
1 iceberg lettuce


Now the hardest part of this recipe is separating the lettuce leaves.  I have tried several ways - smashing the core on the bench (nup - just bruises the base of the lettuce) - I think the best way is to cut the core out - supposedly if you run cold water into the lettuce it magically separates - but I really haven't had huge success with that either.  So just cut the core out and gently prise the leaves apart.  Wash under cold water and drain well.


In a frypan over medium high heat add the sesame oil.  Gently fry the shallots, ginger and garlic for approximately 3 minutes, or until the shallots have softened.  Increase the heat to medium-high.  Now add the pork mince.  Breaking up the mince as you go, cook the mince until it has all browned.  At this stage I like to discard the excess fat.  I do this by tipping up the frypan and absorbing it all with paper towels.  Mr. Jr. MC wanted me to show you how we did it .....


Now that the meat is cooked, it is time to soften the rice vermicelli.  Simply place the noodles into a bowl and cover with boiling water, leave for 5 minutes.  After 5 minutes, snip with a pair of scissors (to make sure you don't have too many long pieces!!)


Back to the mince, now it is time to add all the sauces, cooking wine and the vegetables.  Taste - adjust to your personal tastes.


To toast the sesame seeds heat a small frypan over medium heat, stirring constantly, cook until the seeds start to brown.  Remove from the heat and the pan.


Add the sesame seeds to the mince mixture.


Serve in lettuce cups.  Enjoy!!!

And enjoy it he did after all that hard work!!!


It just goes to show you that if you give them some "ownership" of the meal you can get them to eat things they may not normally eat!!!