WELCOME TO MY KITCHEN


WELCOME TO MY KITCHEN!!
I hope you enjoy the food!!!
Showing posts with label Easy. Show all posts

Saturday, July 21, 2012

Exceptional Jasmine Thai Salmon

"That smells disgusting" says one, "That smells really bad" mutters another.

Not great words to hear, as you are rushing to prepare dinner, two hours later than normal, after the day from hell.  The mood that I was in this late in the evening, and before the first glass of wine had had a chance to mellow me out - well my response was - "that's too bad, it's dinner - eat it or not!!!!"

Silently I am hoping that it wasn't going to be as bad as they thought it would be, that it was just the underlying smell (the one that they all dislike) of fish sauce, and that once they got over the smell, and tasted the dish, everything would be fine.

Saying that though, this recipe did have a rather unusual element to it - jasmine tea leaves!!  Now this is when I began doubting myself, and thinking that the way that this day had unfolded, the meal would probably be a disaster too!!!

Calm down, take another sip / gulp of wine, and keep on cooking......

Given that I was running so late getting this dinner underway, the saving grace of this meal was how incredibly simple, and quick it was to make.

I found the recipe in a little supplemental cook book that came with a Delicious magazine several months ago.  In it was an advertisement for Dilmah Teas - entitled Tea Gastronomy.  The picture below shows the tea bags used in the recipe.


I did make a couple of changes - I will highlight what I have done.


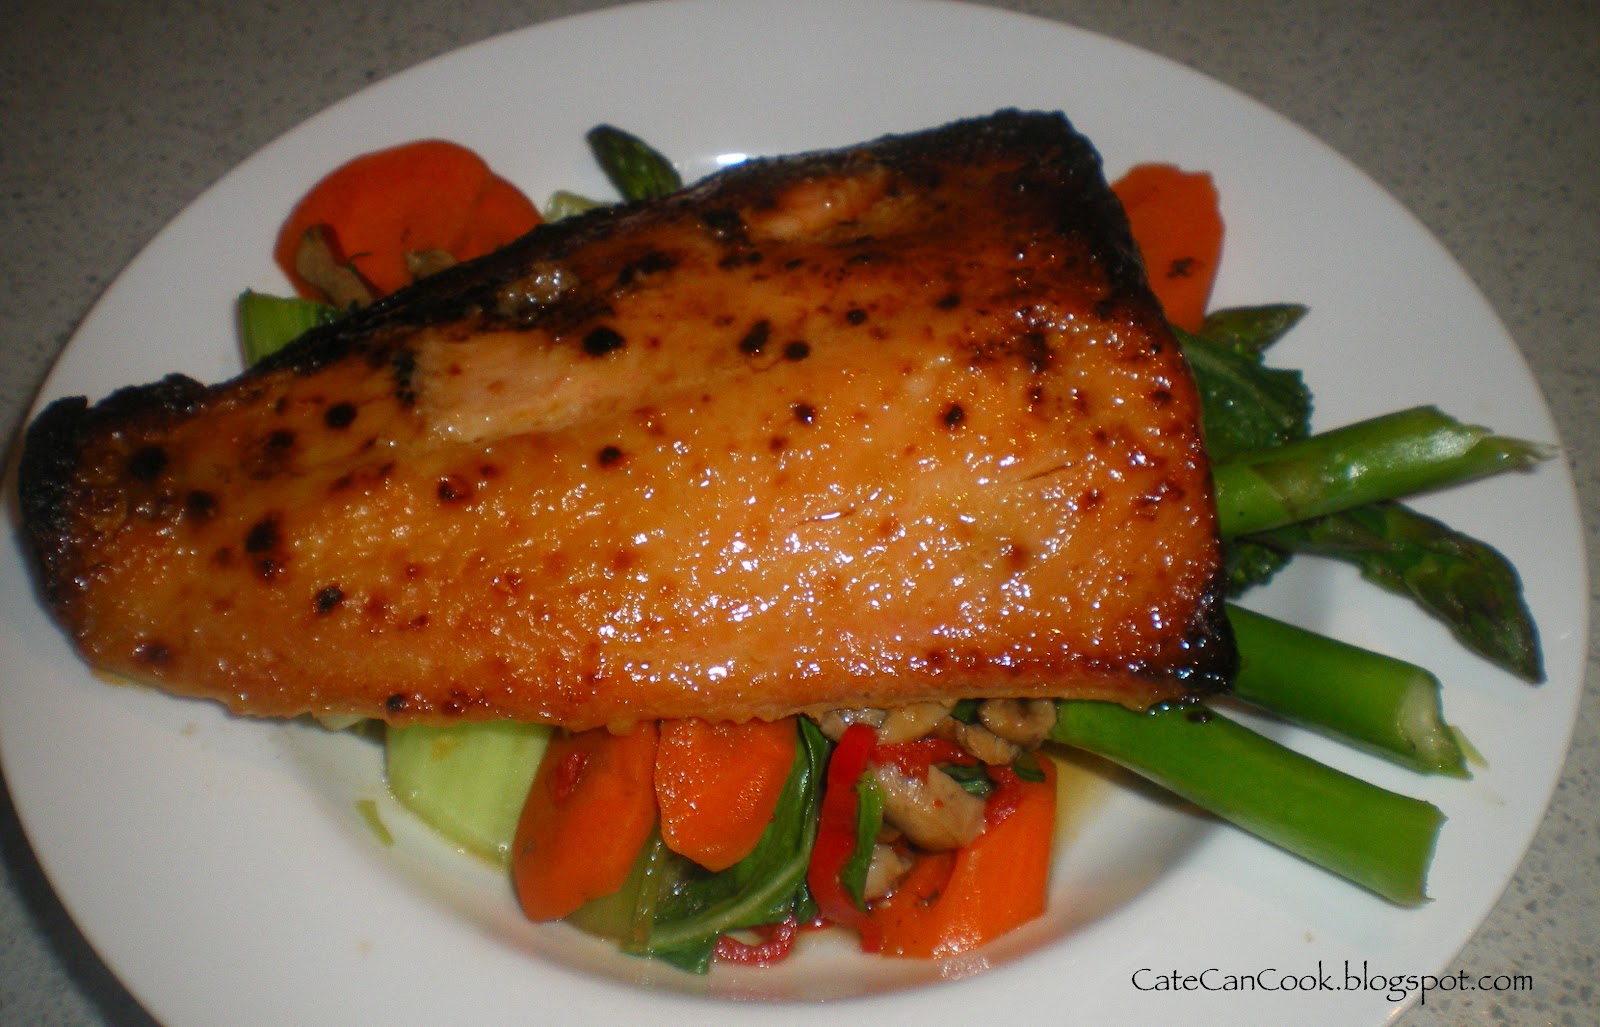
Exception Jasmine Thai Salmon
From an advertisement for Dilmah Teas in a Cookbook called Seasonal Flavours - from Delicious Magazine

Serves 4


2 x Dilmah Fragrant Jasmine Green Real Leaf Tea bags
1/2 cup water
3/4 cup fish sauce
2 tbs lime juice
2 tbs sweet chilli sauce
2 tbs oil
1 tbs brown sugar
4 x salmon fillets
1/3 cup roughly chopped cashews

Salad
snow peas, finely shredded
english spinach leaves
lebanese cucumber slices

Sesame oil drizzled over the salad.

Coconut rice to serve

Preheat oven to 200 degrees.

Tear the teabags open and sprinkle the tea leaves into a frying pan.  Stir in the water, fish sauce, sweet chilli sauce, lime juice, oil and brown sugar.  Bring to the boil over medium high heat.  Simmer for 1 minute. *

Add the salmon and cook each side for 30 seconds.  Transfer the salmon and liquid to a baking dish and bake for 5 minutes, or until cooked to your liking. **

Combine the salad ingredients, drizzle with sesame oil.  Serve with the salmon.  Sprinkle with the chopped cashews.


* I actually simmered the liquid for several minutes - I did wonder if I was in fact stewing the tea, but it worked out OK.  I wanted to get the sauce to a little thicker consistency.

I didn't put the liquid with the salmon in the oven - basically because I wasn't reading the recipe correctly.  Cooking for 5 minutes still left the middle of the salmon quite raw, so if you like it cooked through - cook for a few (say 3) minutes longer.  While the salmon was in the oven I left the sauce simmering on the stove top.  When I served the meal, I poured a little of the sauce over the top of the salmon, and served the rest alongside the dish in a little jug.

The end result, after all those exclamations of disgust at the beginning of the cooking???


This was a beautiful, light, refreshing, healthy meal!!!  Loved by all who ate it!!!

Definitely one to make again - perhaps I will plug their noses next time!!!

So Dear Readers is there a particular ingredient that you use that people dislike the smell of, but once in the meal all complaints are gone?


Wednesday, July 11, 2012

Calamari all'amatriciana

On our first night in Rome, after our twilight, highlights of Rome from a bus tour, we were treated to a meal at a local trattoria.  One of the pasta dishes we tried that night was bucatini all'amatriciana.  This dish was soon to become one of our favourites as we travelled around the different areas of Italy.  Of course, as with anything there were variations at each place that we tried it.

Amatriciana is a classic dish, and one of simplicity.  Traditionally it is made only with smoked pork (guanciale), tomatoes (oh how I loved those sweet Italian tomatoes!), a kick of chilli, and then topped off with some grated pecorino cheese.  A purist would argue that onions and garlic have no place in this dish!

The Romans claim this dish is theirs, but there are others who claim it originates from the town of Amatrice - a tiny town in the mountains bordering Abruzzo (more than 100 miles from Rome!) Wherever it comes from, it is a truly wonderful dish.

Since coming home I have made this dish several times, but this version I think nails it on the head, the flavours that I loved while in Italy.  While not claiming this is a traditional version, it is one that my whole family enjoys.

When you are out and about in real Italian food shops, you find some lovely interesting shapes in the pasta that is on offer on offer.  In Italy we found some very interesting shapes (and colours) of pasta!!


On a recent trip to Haberfield I ran across a shape called "calamari" - it reminded me of the shape of the pasta that I had at our favourite restaurant "Scirocco" - so this was the pasta I used tonight!


Calamari all'amatriciana
from trial and error, and several recipes!!


Serves 6

2 tbs extra virgin olive oil
250g speck, cut into batons
crushed red pepper flakes (to taste)
1/2 tsp freshly ground black pepper
1 onion, minced finely
3 cloves garlic, crushed
3 x 400g cans whole peeled italian tomatoes
500g pasta  *
grated pecorino cheese

Heat the oil in a large frypan over medium high heat.  Add the speck, and saute until crisp, and golden. Drain the excess fat from the pan.  Add the onion and garlic, cook stirring until the onion softens - approximately 5 minutes.  Add the tomatoes, crushing slightly with a fork or a potato masher.  Cook for approximately 15-20 minutes, or until the sauce thickens.

Meanwhile bring a large pan of salted water to the boil.  Add the pasta a cook until 3 minutes before al dente.

(In Italy the pasta is served very chewy, almost with a breadlike consistency - the worst crime you can commit is to serve watery gluggy pasta!!)

* I have found that it is worth paying a little more and buying "real" italian pasta - the "al dente" texture is much easier to replicate.  The cheap local stuff goes far too gluggy!!!

Drain the pasta, but retain the cooking water.

Add the drained pasta to the tomato sauce, toss to incorporate the sauce well.  Add 1 cup of reserved cooking water.  Cook for a further 2-3 minutes, until the pasta is al dente.  Add more cooking water if needed.


Stir in approximately 1/4 cup of grated pecorino cheese.

Serve topped with grated pecorino cheese.


So while this isn't the traditional amatriciana recipe - it certainly went down a treat in our house the other night!!!  No leftovers tonight!!!!

Buon Appetito!!!

Monday, June 4, 2012

Osso Buco Milanese

During a cooking class on my recent trip to Italy, Chef Raffaele gave us some sound advice.  "if you don't have access to fresh, vine ripened tomatoes, use canned!". Looking at the insipid, flavourless offerings that are available at the  moment, I heeded his advice when making this meal!

On my recent shopping spree in Haberfield I picked up some lovely looking veal osso  buco, and some lamb shanks (amongst many other wonderful offers!).  After a cold, wet time at the rugby yesterday, where we watched the game from the protection of an overhanging rock cliff, I gave DH the choice, of either Osso Buco with Parmesan Polenta, or Tunisian Style Lamb Shanks for dinner.  Osso Buco won!

In the current edition of Good Taste Magazine, Tobie Puttock shows us his version of this famous Milanese dish.  Everyone tweaks it just a little, and calls it their own version, but the base ingredients pretty much stay the same.  Although Wikipedia does state that Osso Buco comes in two varieties - the  modern version which is based on a tomato sauce, with the obligatory soffritto as it's base, or the old version which is bianco or "white", with no tomatoes and is flavored with cinnamon, bay leaves and gremolata.

Tonight's version is the modern take.


Osso Buco Milanese 
Adapted from recipe found  in Good Taste Magazine, by Tobie Puttock 

Serves 4-6 

3/4 cup plain flour
8 pieces veal osso buco
Extra virgin olive oil
2 small brown onions, finely chopped
2 small carrots, peeled, finely chopped
2 large sticks celery, finely chopped 
6 cloves garlic, finely sliced
2 x 400g cans cherry tomatoes 
100g pancetta, chopped
12 fresh sage leaves
3 springs fresh rosemary
2-3 dried bay leaves (depending on size)
2/3 cup white wine
1 cup vegetable stock

Gremolata  

Zest of 1 lemon
Zest of 1 orange
Handful of flat leaf parsley, finely chopped
Sea salt to taste
1 clove garlic, finely grated

Parmesan Polenta 

2 cups chicken stock
1 cup water
1 cup polenta
40g butter
60g grated Parmesan cheese

Preheat oven to 220 degrees.  

 Place the flour on a large flat plate, season with salt and pepper.  Mix well.  Add the veal, and turn to coat, shaking off the excess.

Heat a small amount of olive oil in a large ovenproof casserole dish over high heat. Cook the veal,  in batches, for 2-3 minutes each side, or until browned.  Transfer to a plate.

Heat 1 tbs of olive oil over medium heat.  Cook the onion, carrot, celery, and garlic for 5-10 minutes, or until soft.  Stir in the pancetta, tomatoes, sage, rosemary, and bay leaves.  Stir for 5 minutes, or until aromatic. Add the veal, and the wine. Cook for 5 minutes.


Add the stock and bring to the boil.  Cover, and bake for 1 hour.  After 1 hour, check.  At this stage if there is a lot of liquid, you may want to cook for the next 30 minutes uncovered, make sure it doesn't burn on top though!

To make the gremolata, combine all ingredients in a small bowl.  Reserve.

To make the polenta, bring the water and chicken stock to the boil in a medium sized saucepan.  While stirring the liquid, add the polenta to the pan in a thin stream, while continuously stirring.

Stir the mixture for 5-10 minutes, or until thickened and the grains are soft.

Quickly add the butter and Parmesan cheese.  Stir to incorporate well.

To serve place a small amount of polenta on a serving plate.  Top with a piece of osso buco, some sauce, and then a sprinkling of gremolata.


Nothing warms soul more that a beautiful, flavourful casserole!

This meal certainly had us slurping at the bones to get out that rich marrow!

Good choice DH!  Guess that means lamb shanks next week!  That's something to look forward to!

So Dear Readers what is the best piece of cooking advice you have been given? Chef Raffaele also told us that when basil is bountiful, place it, unwashed in a large glass jar, and keep in the fridge.  I have had great success with this one - it lasts for at least 2 weeks!!

Saturday, June 2, 2012

A Little Bowl of Tuscany!

On a cold wet, winter night is there anything better than having dinner in front of a log fire?  I think not!!!

I was feeling a little homesick for Italy the other day, so I took myself off for a shopping trip to Haberfield.  Now, it's not quite like shopping at the market place in Italy, but it was the best I was going to get here in Australia!

I wandered up one side of Ramsay Street, and back down the other, peering into all the shops, and making a mental shopping list as I travelled form shop to shop - menu plans were formulating!

One thing that I have been craving since getting back, is Mozzarella di Bufala (Buffalo Mozzarella), so a trip to Paesanella Cheese Shop was a prerequisite on this trip!  There they were - my beautiful little lovelies, sitting in their milky looking brine!!  There were two varieties on offer - the true Italian one, and the ones that they make themselves.  After being told in Italy, that they should never be refrigerated, I decided to go for the local ones, who knows how long the imported ones have been refrigerated on their trip here!

There were so many lovely looking things on display in the cabinet, it was very hard to choose.  I limited myself with what I though we would consume in the next few days.  Some speck, provolone, and pecorino, but the carciofi (artichokes) looked tempting too, and also the caramelised tomatoes.  A tasting plate was forming in my mind.

Onwards I travelled, some beautiful proscuitto was procured, along with a lot of beautiful looking meats (osso bucco, lamb shanks, Italian sausage, lamb kebabs).  Next some pasta, and then various other vegetables, including some tuscan cabbage were added to the growing mountain of food in my boot!!!

It was very tiring work, all this shopping, so a rest was required - lunch stop was at  Pasticceria Papa for a cappuccino and a panini.

A few more stops, and I had enough food to feed the family for the week!!!

What fun it was, so much better that going to the local iridescently lit shopping mall,  and offending supermarket!!!  Sure it wasn't a market place, but it was different to how I usually shop. The only thing I wasn't able to get were those beautiful Italian tomatoes, but then it is the wrong season!!!  Me thinks a return visit in summer is in order!!!

So what were we going to have for our meal in front of the fire?


Our tasting plate consisted of some rustic bread, which we topped with the Buffalo Mozzarella, Artichokes, Bruscetta, caramelised tomatoes, and dolmades (yes, I know they are not Italian, but we do like them!!).

After being at a night game of rugby we really needed to warm ourselves up - so some soup was in order.  Remember the Tuscan Cabbage?


I just had to make the recipe for Ribollita  from The Tuscan Sun Cookbook, that I recently won from the lovely Not Quite Nigella.  Thank you Lorraine!!!  There's a bowl waiting here for you in front of the fire!


Ribollita
From The Tuscan Sun Cookbook by Frances Mayes & Edward Mayes

Serves 15!

500g dried cannellini beans *
1 tsp salt
2 brown onions, diced
6 carrots, diced
2 tbs extra virgin olive oil
4 celery stalks, diced
4-5 garlic cloves, finely chopped
1 tsp pepper
1 bunch tuscan cabbage, finely chopped
8-10 tomatoes, or 1 x 800g can whole tomatoes, chopped
the heel of a wedge of parmigiano reggiano
2 litres of vegetable, chicken, or meat stock
2 cups cubed, day old bread
generous handful of combined flat leaf parsley,  torn basil and thyme leaves

grated parmigiano reggiano cheese and olive oil to serve


* you can use dried cannellini beans if you have the time, but you will need to soak them for 5 hours though! I used 2 x 400g cans of cannellini beans, drained.


In a large stockpot over low heat, sauté the onions and carrots in the olive oil. After 3-4 minutes, add the celery, garlic and the salt, pepper and the Tuscan Cabbage. Add more olive oil if needed. Cook,
for 10 minutes, or until the cabbage is wilted, then add the tomatoes, and the heel of the Parmesan. Add enough stock to cover. Bring to the boil, and then simmer, covered for 1 hour to blend the flavours.

Make sure you stir now and then.

After about 50 minutes add the drained cannellini beans. Cook for a further 10 minutes. Add the bread cubes and herbs. Heat through.

Serve with a drizzle of extra virgin olive oil and some grated Parmesan cheese.

Bellisimo!

This soup was sooooo good. The best part is that I now have a huge container left for lunches, and easy meals for the rest if the week!

This meal took me back to the night we arrived in Florence. My traveling buddy, Barb, had this as her starters (no we didn't follow protocol that night by having antipasti, primi, secondi and contorni!) We introduced ourselves to Florence that night, by eating at a little trattoria just off the Ponte Vecchio!


I don't know what her's was like that night, but mine last night really hit the spot!


 Ahhh.... Food memories... Don't you love them! So Dear Readers do you make meals to remind you of places you have visited?

Me, I'm on a bit of Italy revisited at the moment.... Osso Bucco tonight!!!!

Wednesday, May 30, 2012

Lamb Meatballs with Chickpea and Potato Mash and Tomato Sauce

Finally, finally, finally, a meal to get me out of the blogging doldrums!

You see it's not so much that I haven't been cooking, it's just that the meals that I have been cooking haven't really been up to blogging standard.

There was the home made ravioli that still needs a little tweaking.  We won't even mention the mozzarella that lived it's days under the aspersion that it was ricotta!  Then there was the sad, sad pork belly that just did not pass muster.  I was so pinning all my hopes on that one too!  It was a Maggie Beer recipe that I diligently copied to my phone as I sat at the chiropractor's office last week.  That one held so much promise, I mean when does pork belly ever go wrong?  When you are hoping to use it as a comeback recipe that's when!  I don't know what went wrong with that one, but to me it seemed like it needed at least another 3 hours of cooking (that would be 6 in total!).  It did redeem itself though as a comeback queen in the next night's pizza topping!  I did, however, make a pasta all'amatriciana that was good, but I forgot to take a photo of it!

So when last night's dinner had a resounding Yum! I thought I just better get straight onto it, and blog about it!


 Lamb Meatballs with Chickpea and Potato Mash and Tomato Sauce
Adapted from recipe found in MasterChef Magazine, June edition 

Serves 4-6

Meatballs 

1.2 kg lamb mince
6 shallots (green onions) finely chopped
1 cup loosely packed mint leaves, finely chopped
1 cup loosely packed flat leaf parsley, finely chopped
3 cloves garlic, finely chopped
200g feta cheese, crumbled
salt and pepper to taste

Place all the ingredients in a large bowl, and with your hands mix well.  Roll into golf ball size meatballs, and place on a tray.  Cover and allow to sit in the fridge for at least 10 minutes.

When ready to cook place on baking dish, and bake at 200 degrees for approximately 45 minutes, or until golden, and cooked through.  Make sure you turn at least once during cooking.

Now to start on the mash....

Chickpea Potato Mash 

 kg potatoes, peeled, cut into 2cm pieces
4 cloves garlic
400g can chickpeas
1-2 tbs sour cream
Salt and pepper to taste

Drain the chickpeas, leaving a small amount of liquid with them.  Place the potatoes, chickpeas and garlic into a large saucepan of salted water.  Bring to a simmer over medium high heat and cook for 10-15 minutes, or until the potatoes are tender.  Drain.

Mash the potatoes with a potato masher (or fork).  Add the sour cream and season to taste with salt and pepper.  Don't add too much sour cream, you don't want the mixture too sloppy!

While the potatoes are cooking, it's time to get onto the tomato sauce....

Tomato Sauce 

1 red onion, finely chopped
400g can of diced tomatoes
4 Roma tomatoes, finely chopped
1/2 cup chicken stock
1 tbs balsamic vinegar
1 tsp sugar
Salt and pepper to taste

Place the onion in a medium sized saucepan with a little olive oil.  Sauté gently for 5 minutes, or until softened, and starting to turn golden.  Add the chicken stock, and bring to the boil.  Simmer until reduced slightly.

Add the canned and fresh tomatoes, and bring to the boil.  Simmer for 5-10 minutes, or until thickened slightly.

Add balsamic vinegar, sugar, and salt and pepper to taste.

Place the mash on the bottom of a serving dish.  Top with the meatballs, then top with the tomato sauce.


As a friend of mine would say "Yumbo Scrumbo!"

And so now I am back in the game!  Let's see if I can continue!

OK, so I must apologise with the photos - I am using my iphone (yeah I know!!)  I will get back into the swing of things here I promise!!!

Just to keep me honest - tonights dinner is Slow Cooker Chicken Cordon Bleu - stay tuned if it's a success I will post (fingers crossed!)

Sunday, April 1, 2012

Chinese Braised Beef

A pinch and a punch for the first of the month!

Today marks several things!

It's April Fools Day, and it's also the end of daylight savings for us down here in the southern hemisphere. The days will now start to get shorter, and colder. For me though, the most important thing about today is that it's the start of the countdown to my trip! Only 20 days to go!!

After the horrible summer (or should I say lack of summer) that we have had here in Sydney, it's hard to believe looking out the window at the glorious sunny day we have today, that winter is just around the corner. So good bye summer, thanks for nothing!

It's time to turn our thoughts to autumn. Our meals will start to change, the BBQs will become less frequent, and soups and stews will start making appearances at our table. I made this stew just recently, and it was a lovely change from the usual. The flavours were fantastic. In fact it was so good, that "The Darlings" gobbled it all up, and left none for DH (who was late home this particular night - that will teach him!).

So if you are looking for something a little different from your usual beef stew, give this a try - you will not be disappointed.


Chinese Braised Beef
Recipe by Valli Little


Serves 4
2 tbs plain flour
1 tsp five spice
1kg chuck steak, cut into 5cm pieces *
1/4 cup peanut or sunflower oil
1 onion, finely chopped
4 cloves garlic, sliced
3cm piece of ginger, peeled, grated
1/2 bunch spring onions, finely chopped
1 long red chilli, seeds removed, finely chopped
50g Chinese rock sugar, or brown sugar
1/4 cup shaohsing Chinese rice wine
1 cinnamon quill
1/4 cup dark soy sauce
1 liter beef stock
2 tbs peanut butter
2 tbs hoi sin sauce
Preheat oven to 180 degrees.
Combine the flour and five spice powder with 1 teaspoon of salt. Coat the beef in the flour mixture, shaking off and reserving any excess flour.

Heat 2 tablespoons on the oil in a large flameproof casserole dish over medium high heat. In batches, cook the beef, turning for 3-4 minutes until browned all over. Remove for the pan and set aside.

Add the remaining tablespoon of oil to the pan and cook the onion, stirring for 1-2 minutes until softened. Add the garlic, ginger, spring onions and chilli, then cook, stirring for a further minute. Stir in the reserved flour mixture with the sugar, rice wine, cinnamon, soy sauce, beef stock, peanut butter and hoi sin sauce. Return the beef to the pan, then increase the heat to medium high and bring to the boil. Cover and transfer to the oven. Bake for 2 hours, or until the beef is tender.

Serve with steamed asian greens, and rice.

* I actually increased the beef to about 1.5kg and there was plenty of sauce even with extra meat.


The smell of this dish is wonderful. Make sure you get in quick, because I can guarantee you there will be no leftovers!

Sunday, March 4, 2012

Miso Glazed Salmon with Asian Vegetables

It was a hung verdict on this meal.  One of us (me) loved it - the other (DH) hated it!  I guess sometimes we just have to agree to disagree!!!

Personally, being on a low carb meal I loved the dish -  but then I am eating so many vegetables at the moment I am worried that I may start and sprout roots soon!! Particularly given this unusually wet weather that we seem to be experiencing here in Sydney!

The only thing I would comment about this meal is that making it the way it was stated in the recipe tended to be a little lack lustre and bland.  So I will give my recommendations of how I think the sauce that accompanies the vegetables should be.


Miso Glazed Salmon with Asian Vegetables
Adapted from Curtis Stone's Recipe found in MasterChef Magazine - March edition

Serves 2

1/2 cup white miso
2 tbs caster sugar
2 tbs brown sugar
2 tbs mirin * plus extra
1 tbs sake
1 tbs soy sauce * plus extra
2 x tail pieces salmon
5g instant dashi powder
1 clove garlic, bruised
1 tsp sesame oil

1 bunch bok choy, cut into pieces
200g shitake mushrooms, sliced
1 carrot, sliced on the diagonal
1 red chilli, thinly sliced
1 bunch broccolini

Place the miso, sugars, mirin, sake and soy sauce in a large ziploc bag.  Combine well.  Add the salmon, and allow to marinate for at least 4 hours, or longer if possible.

To make the dashi, place 1 cup of water in a sauce pan.  Add the dashi powder, and bruised clove of garlic.  Bring to a simmer.  Simmer gently for 5 minutes.  Remove from the heat, stir in the sesame oil, 1 tbs extra mirin, and 2 tsp extra soy sauce.  Keep warm.

Preheat the oven grill to 220 degrees.  Line an oven tray with foil. Drain the salmon from the marinade.  Place skin side down on the oven tray.  Grill for 4 minutes on the top shelf, or until caramelised.  Transfer tray to lower shelf and bake for 3-4 minutes, or until cooked to your liking.

Meanwhile place the  vegetables into a large frypan/wok.  Heat over high heat, add a little water, and water fry the vegetables until they are just cooked.

Place the vegetables in a serving dish.  Spoon over the dashi liquid.  Top with the salmon.


The dashi liquid was way too bland for my liking - the recipe wanted you to make it up with 1/2 tsp of dashi powder and 2 cups of water.  This was so weak in flavour it wasn't worth the effort.  You may have to tweak with the flavours yourself until you get it to your liking.

I loved the sweet caramelised coating the white miso gave to the salmon.  Just be careful you don't over cook the fish - there is nothing worse than dry salmon!!!

For those not on a low carb diet I would suggest you add some steamed rice to the meal.


I'm getting pretty bored with all these vegetables - and a bit de-motivated with the diet!!!  While the first 4 weeks were good, and the weight was dropping off, I seem to have plateaued!  Finding it very hard to keep going!  Can't wait to eat inItaly!!!!

Saturday, February 11, 2012

Chicken Cacciatore in the Thermomix

Sometimes all you need is a little pat on the back to give you the motivation you need to keep on going.

This week was the annual pilgrimage out to the Children's Hospital for the usual pokes, prods, and WEIGH IN for "The Child Who Cannot Be Filled!". The words the doctors uttered were not so much the pat on the back I needed, although I was told that all things considered we were traveling very well along the bumpy road of Prader Willi Syndrome. It was more the look of utter disbelief that I encountered when I met up with a doctor, and please excuse me if that is it not your actual title, you probably are a Professor now! But anyway, when I ran across this particular medical professional in the stairwell, as we travelled between appointments, to say that she literally had to pick up her jaw up off the floor would be a little bit of an understatement. She could not believe that this child that had been given the sentence of "PWS" 14 years ago, was the same child/young man that stood/towered above her now!

The look on her face, was the pat on the back that I needed to say "hey you are doing a great job". It made it seem like all the hard, hard work that I have put into the last 14 years have not been in vain.

As you face these hurdles in life, you often belittle the hardships and challenges you face? Do you take it all in your stride, buckle down and just get on with the job at hand? Do you say to yourself, it's not that bad, it could be worse, what am I complaining about? Sometimes though, inevitably, you leave to take stock, and you realize that what you are actually doing is in fact something out of the norm.

So as I face the week with a renewed sense of self. I pat myself on the back and say "good work, you are doing ok!"

After we came back from the hospital "The Child Who Cannot Be Filled" was also feeling pretty good about himself, so we sat down to a meal that night without a challenge. He seemed to understand (maybe) the reasons why the meals etc are the way they are. He accepted that he could have a massive plate full of food, if it was the right kind meal! So we had a beautiful Chicken Cacciatore, with a mega serve of vegetables!  Everybody was happy!


Chicken Cacciatore
Original Recipe by CateCanCook

Serves 6

1kg Chicken Breast, sliced into 2cm thick pieces
1 onion, quartered
4 cloves garlic
100g pancetta, roughly chopped
1kg tomatoes, roughly chopped
2 carrots, sliced thickly
10g oregano leaves
1tbs TM concentrated vegetable stock
100g white wine
200g swiss brown mushrooms, quartered
olives (if desired)


Place the pancetta into the TM bowl, pulse on turbo twice (1 second each).  Remove from bowl, set aside.  Place the onion and garlic in the TM bowl, chop on speed 7 for 3 seconds.  Add a small amount of olive oil.  Saute for 2 minutes at 100 degrees on speed 1 (with the MC off).  Add the pancetta, and saute for an additional 2 minutes at 100 degrees on speed 1.

Add the roughly chopped tomatoes, stock concentrate, oregano leaves and wine, and cook for 20 minutes at 100 degrees on Reverse, Speed Soft, with the basket over the lid to stop any splatters.

Place the sliced chicken in the varoma tray and receptacle, making sure you don't cover all the holes.

Add the carrots and mushrooms to the tomato mixture in the TM bowl.  Place the varoma on top of the TM bowl.

Cook for 45 minutes at varoma temperature on Reverse, Speed Soft.

Season with salt and freshly ground black pepper to taste.  Place the tomato mixture into a prewarmed (put boiling water in it for 5-10 minutes).  Add the chicken and mix through.

At this point you could either then steam your vegetables in the varoma, by putting 1 litre of boiling water into the TM bowl, and cooking for 30 minutes at varoma temperature on speed 4.  OR you may just wish to steam your vegetables separately.


If you are not on a low carb diet, serve with some steamed rice.

This was an incredibly satisfying meal, and you really did not feel deprived by not having the rice with it.  The best part though - the scales continued to decline in numbers the next day too!!!

So another pat on the back!!!

So Dear Readers how do you face those tough obstacles in life?  Do you buckle down, or buckle in?  It's OK either way!


Wednesday, February 8, 2012

Asian Style Pork Chops on Wilted Asian Greens

This is pure agony!!! As I type and look at the photos of this meal my belly is rumbling.  I didn't think that I was hungry, but obviously my stomach thinks differently!!!

Why is dieting so hard?  Why can't I just use zen thoughts to whittle away the kilos??  How long am I going to have to deprive myself for??

I know, it's all of my own doing - the love of food ultimately leads to an increase of girth, but why, oh why is it so hard to remove those few extra indulgences?  Why cant, say one week of really hard dieting remove - oh 5-10 kilos!!  Wouldn't that be nice???  I have been really good this last week, but the numbers coming off are oh so slow!!  I am finding myself during late afternoon almost beside myself.  "The Darlings" come in from school and cook up popcorn, have chocolate paddle pops, or whatever, and I just want to gnaw off my arm at the elbow (but then I have to tell myself - that isn't going to help - it's protein, and you will just have to have less at dinner time!!!)  So I console myself with a cup of miso soup, and countless glasses of water in an effort to distract myself from thoughts of real food.

Finally dinner time rolls around, here is what I had the other night!


Asian Style Pork Chops with Wilted Asian Greens
Adapted from Taste.com.au

Serves 4-6

8 Pork Cutlets
2 tbs brown sugar
8 whole star anise
2 tbs finely grated ginger
2 tbs rice vinegar
1 tsp sesame oil
1/2 cup light soy sauce

Wilted Asian Greens
1 bunch asparagus, cut in half
1 bunch gai choy, ends trimmed, coarsely chopped
1 bunch bok choy, ends trimmed, coarsely chopped
1/2 wombok cabbage, shredded
1 tbs sesame seeds

Combine the brown sugar, soy sauce, star anise, ginger, vinegar and oil in a large ziploc bag.  Add the pork, and allow to marinate for at least 3 hours, or longer if possible, to allow the flavours to develop.

Preheat the oven to 220 degrees.  Place the pork chops from the marinade, and place in a disposable foil baking tray (gets you out of the kitchen faster - less washing up!!!).  Place the reserved marinade in a saucepan.  Place the pork chops in the oven, and cook for 20 minutes.  ** Remove from the oven, and cover with foil to keep warm while you are cooking the veggies.

 **Add approximately 1/4 cup of water to the marinade, and bring to the boil.  Allow to simmer for 10-15 minutes, or until thickened slightly.

To cook the greens, heat the wok over medium high heat, and gently toast the sesame seeds.  Remove to a plate.

Add the chopped green vegetables, and a small amount of water.  Toss gently until they are just wilted.

Place the wilted greens on a plate, sprinkle over the sesame seeds, then top with a pork chop.


For those not counting their carbs, add a serving of steamed rice.


So did this put the monsters to bay?  Yes, having a huge amount of veggies certainly fills up the belly in the short term - but I find after a while I am hungry again - so my remedy - clean your teeth, and off to bed to read!!!

It's only 60 more days til I go away, will I last?

So Dear Readers, do you have any diet tips, or recipes you would like to pass along?  Please share!!!!

Tuesday, January 10, 2012

Salad Days!

Well we made it!  Sailing around the Whitsunday islands in a yacht is not all it appears in the glossy pictures!  We started the journey with some high wind conditions, which didn't make for smooth sailing for the first few days.  The poor "Darlings" didn't quite know what had hit them!  On day one I was already doling out the seasickness pills, and that was before we had even made it out of the harbour!  (mind you we were sitting in the Harbour for four hours, while they briefed us on how the boat worked!)  Day two had me sitting there, holding my head, wondering what the rest of the trip would be like!  Thank goodness it all calmed down after about day three!

I must say that sailing can certainly be a test of endurance.  Being confined in such close quarters for long periods of time certainly tests your limits.  Majority of the day is taken up sailing to particular locations.  Along the way you may stop and snorkel, and get to see some of the visual wonders that the area is famous for.  The beauty of the area is breathtaking.  The water is that lovely azure colour everywhere you look.  At times you would be snorkeling, seemingly alone, only to find yourself in the middle of a school of fish.  It was amazing, because until they changed direction, and the sun reflected off them differently, you had absolutely no idea that they were there with you!

One night, this guy decided that he liked the look of us, and spent a lot of time circling the boat, he would  occasionally would jump up out of the water so we could get a better look at him.  He was quite large, around about dinner plate size!


It's quite amazing, it takes you several days to get acclimatized to the sea, and quite some time to get your land legs back again too!  I am sure that I was swaying with the water for several hours once we were back on dry land!

Thank goodness once were back home the weather had improved, and we were actually getting some summer weather!  It has been a long time coming, but I think it is here now -  that is if the summer storm we had the first night back is anything to go by!    (And boy am I glad I didn't experience that one at sea!)

So life goes back to normal again.  I was pleased to be able to cook something light and healthy for a change.  The meals that we prepared on the boat were somewhat limiting (we were very poorly provisioned - due to a  lack of forward planning!)

This is a recipe that I found in the current edition of Good Food magazine.  I did pretty much follow the recipe, but of course, I did tweak it a little.  It was great, lovely fresh zingy flavours, courtesy of the lime juice!  Just what the doctor ordered after the bland meals of late!


Sweet Chilli Chicken And Corn Salad

Adapted from Recipe found in Good Food Magazine, February edition


Serves 4


3 x single chicken breasts
2 tbs olive oil
1/3 cup sweet chilli sauce, plus 2 tbs extra
4 cloves garlic, crushed
4 corn cobs, husks and silk removed, cut into 4 pieces each
400g tomato medley
2 limes, quartered, plus juice of 1 lime extra
1 green onion, finely chopped
1 head of baby cos lettuce, leaves separated, and torn into pieces
2 avocados, cut into wedges

Place the garlic, olive oil and sweet chilli sauce into a large ziploc bag.  Add the chicken, and allow 
to marinate for at least 1 hour.

Place the corn, lime quarters, and tomatoes in a large bowl.  Add a good couple of tablespoons on olive oil, and toss to coat well in the oil.


In a small bowl wisk together 2 tablespoons of olive oil, 2 tablespoons of sweet chilli sauce, and the juice of one lime. Add the chopped green onion. Season well with salt and pepper.  Set aside.


Pre heat the barbecue to medium high.  Place the chicken breasts and the corn onto the BBQ.  Cook for 8-10 minutes, turning the chicken halfway through, and rotating the corn to ensure it browns evenly.  Add the lime pieces and tomatoes to the grill.  Cook until the limes are caramelized, and the tomatoes are browned slightly.


Slice the chicken breasts into thick slices.

Place the lettuce into a large serving bowl.  Add the chicken, lime wedges, avocado, tomatoes, and the corn.  Add the dressing, and toss lightly.

What a great light, tasty salad to have on a warm summer's evening!


Oh, it's good to be home again!

What did you do over the Christmas New Year's break Dear Readers?  Did you have fun?  Please share!


Sunday, December 11, 2011

Sticky Coca Cola Pork Ribs

The men in my house are always asking for ribs for dinner. I usually have to say, sorry, I don't have time to make them today, as the recipe that I love the best is quite time consuming.  First make the sauce, then boil the ribs, and then the final baking. However, all that changed when I tried this recipe last night!

For me ribs have to be meltingly soft, and you must be able to almost suck the meat from the bones, and that is where time factor comes in. This recipe however, has you cooking the ribs in a sauce (if you can even call it that - just three ingredients - one of them being coca cola!). You then drain off the liquid, and baste them with another sauce (yes magic ingredient again is coca cola!). The beauty of all this is that they are baked in the oven, so virtually no work involved! Especially if you combine them with baked corn on the cob, and baked smashed potatoes!

This recipe was one that I found in the current edition of Delicious Magazine. It was, however, entitled Dr. Pepper ribs, but I couldn't find any 2 litre bottles of Dr. Pepper, and I thought it a little too extravagant to buy that many cans, so I decided to alter the recipe slightly and use coca cola instead!  Must say they were pretty good, and don't think I will try and look too hard for Dr. Pepper next time!


Coca Cola Ribs
Adapted from Delicious Magazine, December/January edition

Serves 4-6

Ribs (I usually serve 1 rack per person), each rack cut in half
4 cups coca cola
4 star anise
2 cinnamon quills
2 tbs Dijon mustard
2 tbs worcerstershire sauce
1/4 cup soy sauce
1/2 cup (firmly packed) brown sugar
1/4 cup maple syrup
1/2 cup tomato sauce (ketchup)
4 disposable foil baking trays (Saves so much washing up!)

Use 2 disposable foil baking trays. Place half of the ribs in each tray. Put 2 star anise and 1 cinnamon quill in each tray, add 2 cups of coca cola to each tray. Cover tightly with foil, and place into an oven that has been preheated to 160 degrees. Bake for 1 1/2 hours.


Meanwhile make the basting sauce.

Place 2 cups of coca cola , and all remaining ingredients in a sauce pan. Bring to the boil (watch carefully, as while the gas is escaping from the coke, it tends to bubble quite a lot!) Simmer gently for approximately 15-20 minutes, or until thick and syrupy.

Remove the ribs for the cooking liquid, discard liquid. Place the ribs into a new baking tray. Brush liberally with the basting sauce. Bake for a total of 45 minutes, basting liberally every 15 minutes. You want them to be lovely and dark, and sticky!


Serve with copious amounts of paper napkins - you will need them! These ribs are finger licking good!

So now I have no excuse not to make ribs more often - these really take no effort at all, let the oven do all the work I say!

Thursday, November 17, 2011

Home Made Fast Food

I have had several comments lately from loyal readers commenting that my posts have been somewhat irregular of late.  I explained that I have been (as most people) a little time poor lately and have simply been churning out quick and easy dinner solutions.  I was then asked, well what kinds of things have you been making?  Can't you share those with us, we need a little inspiration to??

So here is what I churned out last night - fast food, but home made and healthy!

As "The Darlings" have a love of anything that comes wrapped in flat bread I was sure I would be onto a winner here.  They didn't even comment about the pieces of green stuff in the meatballs, probably because once it was all wrapped up, they were so intent on devouring it, they didn't even see it!!!!  Saying that - they didn't eat the tabbouli - but you can't expect miracles now can you???


I started off by making a hommus - it appears going back through my blog, that I haven't given you the recipe for this before, but it is a stock standard Thermomix recipe.

Hommus
From Thermomix EDC Cookbook

1 clove garlic
400g can chick peas, drained
juice of 1 lemon
2 tbs tahini
40g olive oil
salt and freshly ground black pepper to taste

Place the garlic in the TM bowl and chop for 3 seconds on speed 7.

Add all other ingredients and mix 30 seconds (for a coarser style dip) or up to 1 minute (for a creamy style dip) on speed 4.

Remove approximately 90% of the dip, place in a container, and refrigerate until needed.

With the 10% of the hommus left in the TM bowl, it's time to make the tabbouli.

Tabbouli
Adapted from Meat on the Menu - Thermomix Cookbook

1 cup of burghul
2 green onion/shallots, cut into approximately 6 cm pieces
2 bunches of continental parsley, broken into halves
1 large bunch mint
juice of 2 lemons
50g olive oil
sea salt and freshly ground black pepper
3-4 large roma tomatoes, halved, and seeds removed
1 lebanese cucumber, halved, seeds removed, then halved again

Place the burghul in a bowl and cover with boiling water for approximately 30 minutes.  After 30 minutes, drain well, before adding to salad.

Place the shallots, parsley, and mint into the TM bowl (along with the remaining hommus).  Chop for 5 seconds on speed 6.  Scrape the bowl down, and repeat if necessary.

Add the lemon juice, olive oil, tomatoes and cucumber.  Place on closed lid position, and press turbo 2-3 times until the desired consistency is achieved.

DO NOT RINSE OUT THE BOWL!!!!  One of the great things about the Thermomix is that you don't need to keep washing the bowl all the time - often times you want the transference of flavours to the next thing you are making - of course, make sure you wash it well after mincing the meat!!!!!

Note:  I find that using the turbo function gives you much more control and a lovely uneven chopped consistency - as opposed to simply "processed".

Add the well drained burghul and season well with sea salt and freshly ground black pepper.  Place in a bowl and place in refrigerator until needed.

Now onto the Meatballs......

Beef and Feta Meatballs
Adapted from Meat on the Menu - Thermomix Cookbook

large handfull continental parsley
large handful mint
4 cloves garlic
3 green onions/shallots, cut into approximately 6cm pieces
1kg rump steak, trimmed and cut into large cubes
2 tsp cumin powder
100g fresh breadcrumbs
1 egg
200g feta cheese

Place the shallots, mint, parsley and garlic in the TM bowl and process for 3 seconds on speed 7.  Scrape down the bowl and repeat if necessary.  Remove from the TM bowl, and place into a large bowl.

Place the bread into the TM bowl and process on speed 8 for approximately 10 seconds, or until fine breadcrumb stage.  Remove from TM bowl and add to the herb mixture.

In 200-250g lots process the rump steak by putting in closed lid position and pressing turbo 2-3 times, this will give you a lovely inconsistent texture - some large some small.  Remove from TM bowl and place in large bowl with other ingredients.  Repeat until all the steak is minced.

Crumble the feta cheese, and in closed lid position hit turbo 1-2 times, or until the cheese is just crumbled.  Add the cheese to bowl with all the other ingredients.

To the bowl containing the mince and herbs add the egg, cumin, and season well with salt and pepper.  Using your hands mix the mince and seasonings until well combined.

To save washing up I like to use disposable aluminium trays - spray one or two (depending on size) well with olive oil spray.

Take a small handful of the mince mixture and shape into a torpedo shape.  Place in the prepared aluminium tray.  Repeat until all mince has been shaped.  Cover and place in the fridge for 30 minutes.

Preheat oven to 220 degrees.

Spray the tops of the meatballs with olive oil spray and bake for 110-15 mintes, or until starting to turn golden.  Turn over, spray the other side with olive oil spray and cook for an additional 10-15 minutes, or until cooked through.

To assemble your meal, heat a pice of lebanese flat bread in the microwave for 20-30 seconds.  Spread the bread with a good lashing of hommus, top with 2 meatballs, add a large dollop of tabbouli, then garnish with sauce of your choice - mine is hot chilli sauce!!!!


So there you have our fast and easy dinner last night!!!!


Hope it gives you some inspiration for your dinner tonight!!!  I know it appears that there are a lot of steps to this - but in reality it all took between 30-60 minutes to prepare and all of the hard work was done by thermie.  The most time consuming thing was shaping the meatballs!!!

For all those out there that always ask me "Do you really use your Thermomix?" - there you have your answer!!!  It made making this meal oh so simple - no laborious chopping - just a couple of seconds of button pushing!!!!  I use Thermie practically everyday in some way or another!!!  Don't know how I ever did without my little friend!


Saturday, October 29, 2011

Swordfish with Tomato and Lemon

I know it seems like an awfully long time between posts, and that once again I am starving the family, but let me assure you this is not the case. We have been having incredibly boring meals, and time seems to be my perpetual enemy at the moment.

I did make a Japanese Tapas meal the other day, took the photos with all intentions to post, but as usual...... Well you know how it goes.

Last night 's meal however was definitely one that I need to tell you about.

I saw the idea in the current issue of Good Food magazine. It was an Ian Thorpe recipe (who knew Ian Thorpe could write recipes - perhaps he is hedging his bets in case the Olypmics don't pan out for him! Anyway, I used the recipe as a basis for my meal last night. Changed the fish, upped the ingredients.... And here is the end result.


Swordfish with Tomato and Lemon
adapted from recipe found in Good Food magazine - Recipe by Ian Thorpe

Serves 2

2 x swordfish fillets
300g tomato medley, cut into halves or quarters depending on size
1 x wedge preserved lemon, rinsed, finely diced
1 tbs oregano, finely chopped
1 tbs thyme, finely chopped
1 tbs parsley, finely chopped
3 cloves garlic, crushed
70g pine nuts
1 tbs lemon juice
olive oil

Heat 1 tbs of olive oil in a large frying pan over medium high heat.  Add preserved lemon, tomatoes, garlic, herbs, lemon juice and pine nuts.  Cook, stirring occasionally for 2-3 minutes, or until the garlic is fragrant. Remove from heat.  Season with salt and freshly grond black pepper.  Set aside and keep warm.

Add a little more olive oil to the pan and cook the swordfish steaks for 3-4 minutes each side, or until goden and cooked through.

Serve the swordfish topped with the tomato and lemon mixture.


A nice addition to this meal is some golden roasted kipfler potatoes and some steamed asparagus.

The flavours in this meal were lovely and fresh.  The preserved lemon gave it a great lemon hit, which married with the meatiness of the swordfish steak was just perfect.

Those of you that have not tried swordfish should try it.  It is kind of like eating a white steak really.  If you were blindfolded I think you would have a hard time naming it as fish.

Tuesday, October 18, 2011

Salmon Laksa Style

Technology, it's a wonderful thing isn't it????  Well, when it works it is!!!!

I decided it was time to splash out and get an ipad - well why not, everyone else seems to have one?  It will make life easier, no more queuing for the computer, able to blog on the go..... oh, and the main reason I decided the time was right, is that I have finally decided that I am going to be a big girl and take that trip to Italy that I have been wanting to do for so long!!!!! Remember I wanted to do it for my 50th - well that came and went... so now I am on the move - I will do it next April - for my 51st!!!  Dear Readers you have to keep me motivated, and not let me wimp out again.  I am a big girl now - I can travel on my own!!!!

I have decided on a cooking tour on the Amalfi Coast - well almost decided - there are a couple I am still tossing up between - but I am nearly there.  Airfares must be booked within the next couple of weeks - so once that is done there is no turning back!!

Anyway, back to the ipad, seems like I have issues accessing this blog via the ipad, so that is why there has been a delay in posting of late (oh, you didn't notice eh - figured I was just being slack again???)

So onto the cooking side of things, the other night I was in my usual quandary as to what to make for dinner.  Had picked up a couple of pieces of salmon, and decided to wing it.

Felt like something a little on the spicy side, so this is what eventuated.


Salmon Laksa Style

Serves 2

2 cloves garlic, finely chopped
1 x lemongrass (white part only) finely chopped
3cm piece of fresh ginger, finely chopped
1 bunch asparagus, cut into 4cm pieces
1 cup fresh pineapple, cut into small cubes
100g cherry tomatoes, halved
2 x 150g tail pieces of salmon, skinned, and cut into 4-5 cubes
4 kaffir lime leaves, vein removed, finely shredded
270ml light coconut cream
1 tbs red curry paste
1tbs fish sauce
1 tbs palm sugar
1 tbs ketchap manis
3/4 cup chicken stock
1 tsp sesame oil
fresh coriander, roughly chopped for garnish

Add sesame oil to a medium sized sauce pan over medium high heat.  Add garlic, ginger and lemongrass and gently fry for 1 minute, or until fragrant.  Add the curry paste, and fry for an additional 30 seconds.

Add the coconut cream and chicken stock, stir to combine.  Add the palm sugar and fish sauce.  Simmer gently for 5-10 minutes, or until the mixture thickens slightly.

Add the asparagus and salmon, and gently simmer for 2 minutes, or until the salmon is almost cooked through.  Add the pineapple, cherry tomatoes and ketchap manis.  Simmer for 1 minute, or until all the ingredients are heated through.

Serve with steamed rice.  Garnish with coriander.


This certainly satisfied my taste for something a little spicy.

Posting requirements now filled.... onto the important stuff - more Italy planning!!!! (oh and resolving techincal issues!!!)


Tuesday, October 4, 2011

Chilli Coconut Chicken with Basil and Coconut Cream

Well life as we know it is now back to normal.

"The Darlings" have returned from their adventure in Japan with many stories to tell.  The one who was scared to go because he was afraid there would be nothing there that he would like to eat tells how the food there was really good!!!!  He even tried something that he thought looked disgusting - but it wasn't!!!  My how an adventure on your own can change your perspective!  Let's hope it continues.

Life here went on pretty much as usual (albiet a lot quieter!)  Spent the first few days they were away pulling their room to pieces and starting the arduous task of painting and giving the rooms a fresh look.  I wanted them to be "magazine perfect" when they returned - but that was not to be - am still waiting on several pieces of furniture in order to fully assemble - but they look a lot better than when they left.

After a hard day of slogging away in their rooms it was time to think about dinner.  I had not had a chance to go to the shops - what with one thing and another, so it was a matter of scrounging through the fridge to see what I could assemble!

We had some chicken, basil, coconut cream and some chillies....  I remembered a recipe I made many, many years ago, and went from there.....


Chilli Coconut Chicken with Basil and Coconut Cream
Adapted from Australian Women's Weekly Easy Thai Style Cookbook

Serves 4

1kg chicken breasts, sliced into 1cm strips
2 tbs sesame oil
1 onion, finely chopped
1-2 red chillies, seeds removed, finely chopped
1 cup shredded fresh basil
2 tbs fish sauce
1 tsp chopped fresh coriander root
1 1/2 tsp sugar
1 cup coconut cream
1 tbs ketchap manis

Heat the oil in a wok over medium high heat.  Add the onion and chillies. stir fry until the onion is soft.

Add the chicken and stir fry until the chicken is cooked through and tender.  Add the basil, fish sauce, coriander root and sugar.  Stir fry for 1 minute.

Add the coconut cream and ketchap manis, stir mixture until heated through.

Serve with steamed jasmine rice.


What a lovely, quick and easy dinner this was - great flavours too.  I know the ketchap manis is not usually in the recipe - but I just love the flavour that it adds.

Sorry, too tired for any fancy photos - it was just a matter of let's just eat!!!!

Saffron Rice with Prawns, Peas and Coriander

While I must admit I did miss "The Darlings" life in the food department was somewhat simpler.  I could make one dish - and make what I liked without worrying what I would make for them.  They are not that keen on prawns so whenever we have them I have to come up with something simple that I can make at the same time for them.

This dish caught my eye in the latest edition of Good Food Magazine - it is basically a simple paella - all the flavours of the paella - rice and saffron, but only one meat involved (or should I say seafood!).  This was an incredibly easy, tasty, quick dish to make, and if you love the concept of paella you will love this dish.


Saffron Rice with Prawns, Peas and Coriander
Adapted from Good Food Magazine, October edition

Serves 4

3 cups chicken or fish stock
large pinch of Spanish Saffron
2tbs olive oil
2 onions, coarsely chopped
1 cup long grain rice
1 red capsicum, cut into strips
4 cloves garlic, chopped
1kg green prawns, peeled, deveined, tails intact
1 cup frozen peas
1/2 cup coriander leaves, roughly chopped
lemon wedges to serve

Heat the stock and saffron in a large deep frying pan on low, until just simmering.  Set aside for 5 minutes, to infuse the flavours.  Transfer to a large heatproof bowl, and cover to keep warm.  Wipe the frypan clean.

Heat the oil in the same frypan over medium heat.  Add the onions and cook for 5 minutes, or until softened.  Add the rice, capsicum, and garlic and cook for an additional 5 minutes, stirring well until coated.

Add the hot saffron stock and increase heat to high.  Bring to the boil, stirring constantly.  Reduce the heat to low and simmer gently, covered, for 10 minutes or until the rice is almost cooked.


Add the prawns and peas, pressing gently down into the rice.  Cook for 12 minutes, covered, until the rice is tender.  Remove from the heat and stand covered for an extra 5 minutes, or until the prawns are just cooked.


Scatter with the chopped coriander.


Serve with the lemon wedges.

Yum..... this was too easy, and went oh so well with a lovely cold glass of white wine after a hard day at work.